
With your smartphone you can create funny animations by converting a series of separate photos into an ultra-short movie that continues indefinitely. Creating such an animated gif is very easy with the ImgPlay app. We explain how that works here.
The idea is that you take a series of photos in quick succession to capture something, so that a person, animal, or other subject looks slightly different in each photo. A super simple way to do this is to use the so-called burst mode or continuous mode of your smartphone.
All you have to do is hold down the shutter button for a while. Your phone will then automatically capture a series of photos. A small counter on the screen confirms that the continuous mode is active. On a recent iPhone you work slightly differently. Then you press the shutter button and swipe directly to the left across the screen.
For more information about the possibilities of your smartphone camera, we would like to refer you to this smartphone photography course.

Using ImgPlay
Made a photo series? Then it’s time to turn this into a real animated gif. We use ImgPlay for that, which is available for both Android and iOS.
Do you have a Androidphone, select the option at the top of the screen Photos to GIF. On an iPhone, select the option if the continuous mode has been used Burst and if you have taken single shots Photo. Then tap all the photos you want to use in chronological order and tap Make.
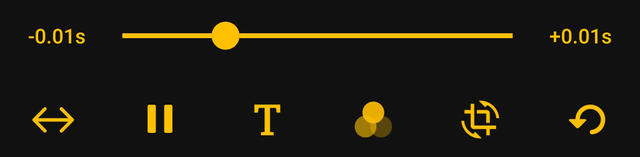
In burst mode on your iPhone, you just tap that one thumbnail and don’t have to tap Make afterwards. The animated gif is now automatically assembled and then plays continuously. Is the animation going too slow or too fast? Then use the slider at the bottom of the screen to change the playback speed.
Satisfied? Tap on Next and after that Save (Android) or on Save and after that Save to Photos (iPhone). Then you choose the quality of the end result: Low, Medium and High. Opting for the highest quality is recommended, but of course also ensures the largest file.


Except as an animated gif, you can also save the end result as a video file. A gif file is not recognized or supported by all devices and (online) platforms. In addition, the quality is sometimes a bit disappointing.
The disadvantage is that a video unfortunately does not repeat itself indefinitely and therefore you have to indicate how often you want to repeat the animation. The footage is then simply repeated several times in succession in the movie file.
On iPhone you will find all storage options clearly arranged together. With Android, a follow-up screen appears as soon as you choose video instead of gif. If you are bothered by the watermark on the end result, you can be released from this via an in-app purchase.
Customize animated gif
After saving you can go back to the editing screen by tapping the arrow at the top left. For example to create a number of variants from the same source images. Tap the arrow in the bottom left corner to play the sequence of photos backwards. Someone then suddenly runs backwards, the ball flies back to the racket, or a pile of shards comes off the ground and forms a cup again.
It is even more fun if the effect first goes one way and then back the other way. You don’t have to record separate animations for that, just tap the arrow again so that you see a double arrow and the animation will continuously go back and forth.
You can also format texts and add filters, adjust the aspect ratio and crop the image if, for example, there is too much empty space along the edges.
More operations are possible on iPhone than on Android. As Adjust with which you optimize things such as lighting, colors and sharpness.
You can also change the aspect ratio on an iPhone via Canvas and crop the image with the option Crop, while on Android this is a combined option. Of course you will not notice this as long as you only work with an Android phone or only with an iPhone.
.