Step by step to remove the Write Protection from your USB.

I’ve found that write protection can be very useful, but can also get in the way. For example, I recently wanted to put some files on my USB, but I found out that this was not possible due to security. That’s why I wanted to remove the write protection from the USB.
I just didn’t know how yet. Fortunately, this is right up my alley and these are the little challenges that make me happy. I had to figure out a few things, but after that I was no longer bothered by the write protection.
Once you know what to do, it’s really simple. It is purely a matter of knowing how and I am happy to lend you a hand by giving you those steps. Do you also suffer from write protection on your USB? After reading the steps in this article, no more. 😉
What is the Write Protection?
Write protection is literally protection on your disk: in this case on a USB stick. If you store important files and would like to keep them private, securing your USB stick is a good option.
A USB stick is already a relatively safe way to store important data anyway: a USB stick must be physically present to gain access to the data on it.
Prefer an even safer option ? Wise! Get the best USB stick and secure it. I always do that myself. This prevents others from accessing the data on the USB, even if it is physically present.
All well and good, but it sometimes happens that the security is not so ideal after all. Maybe you want to make a bootable USB, you don’t get new data on your USB, or you have another reason why that security is not useful at all.
In that case it is a matter of removing the write protection from your USB. You can read how to do that here! 😄
You need this
You are about to remove the write protection from your USB stick. Fine, but make sure you have everything you need ready:
- The USB stick from which you wish to remove the write protection
- A PC
- A USB hub (if your PC doesn’t have enough USB ports)
- The steps in this article 😋
Everything at hand? Then it’s time to start. Below you will find different ways to remove the write protection from your USB, for both Apple and Windows PCs.
Toggle the physical write protection (Windows & macOS)
How nice it would be if it was a matter of flipping a switch… In some cases it is!
There are USB sticks with a switch that allows you to turn the security on and off . Now I hear you thinking “What’s the point of security then?” And then I say, “I wonder that too!”
Anyway, suppose there is a write protection on your USB stick and you don’t know where that comes from, then it is a possibility that there is a switch on it. Slide it the other way and that’s it . Simple locking, simple unlocking. 😅
Removing write protection via DiskPart (Windows)
Do you have a Windows PC? Then this is the first step that I recommend, because I have experienced that this has the best chance of success. And personally I think this is also the easiest way. I hope you agree with me. 😉
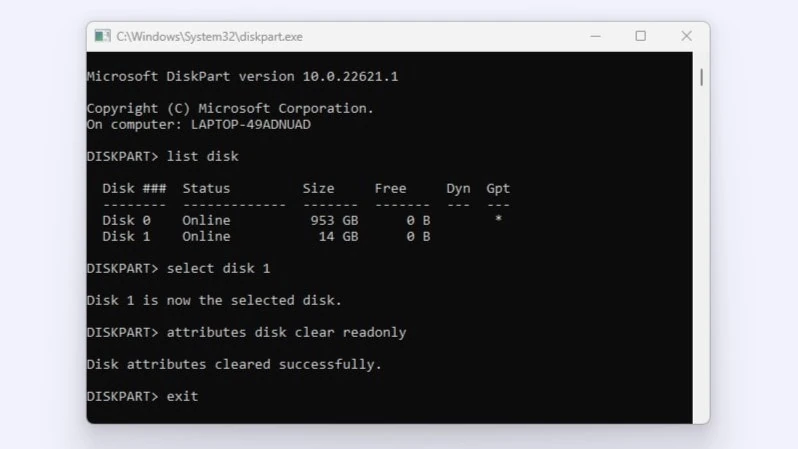
- Step 1 : Open DiskPart . Type ‘DiskPart’ in the search bar of your PC. Or press the Windows key and the R key at the same time and type ‘DiskPart’ in the pop-up window that appears. Click allow when your PC asks to allow the app to make changes.
- Step 2 : Select your USB stick. Type ‘ list disk ‘ and click enter. A list of the drives that your PC recognizes will now appear. Check which drive is the usb. An easy way to recognize your USB is to look at the storage space.
- Step 3 : Enter ‘ select [usb stick] ‘ and press enter. For example, is your USB stick ‘disk 1’. Then type in ‘select disk 1’.
- Step 4 : Enter ‘ attributes disk clear readonly ‘ and press enter again.
- Step 5 : Exit DiskPart by typing ‘ exit ‘ and pressing enter.
These steps should remove write protection. Restart your PC and check if this is indeed the case. Isn’t this so? Then look at another method in this article.
Secure write protection via BitLocker (Windows)
Bitlocker is only present in business versions of Windows. Do you not have a BitLocker or are you sure that the USB stick is not secured via BitLocker? Then skip this step. Is your USB stick (possibly) secured via BitLocker ? Then you are in the right place. 😁
To disable BitLocker on your USB stick, you need a password or recovery key . Make sure you have this ready. Then follow the steps below.
- Step 1 : Open the Explorer app and navigate to your USB stick. You do this by opening the ‘This PC’ folder.
- Step 2 : Right-click on the USB stick containing BitLocker and choose ‘Manage BitLocker’.
- Step 3 : A window of the BitLocker Drive Encryption will now open. This contains all disks and the corresponding status. Find your USB here and click on it.
- Step 4 : Under your USB, click on ‘Disable BitLocker’ and enter the password. Exit BitLocker.
BitLocker encryption is now no longer on it.
Removing Write Protection using the Registry (Windows)
Before you do this step, I recommend that you check out the first described option via DiskPart if you haven’t already. Not only because I believe that this is the easiest option, but also because you really shouldn’t make any mistakes with this step.
Windows uses a registry that contains a lot of important information. A small mistake may then have greater consequences . Therefore, only perform this step if you have already reviewed the steps for the DiskPart option and it is also not possible via BitLocker.
That said: it is not the case that this is a dangerous option and can destroy your PC, but it is possible that you, for example, protect all drives instead of removing the protection from your USB stick. Therefore follow the steps below carefully . 👀
- Step 1 : In the search bar of your PC, type in ‘regedit’ or press the Windows key and R key at the same time and search for ‘regedit’ here. The Registry Editor app should now appear. Open this one.
- Step 2 : Navigate under ‘Computer’ to ‘HKEY_LOCAL_MACHINE’ and click on the arrow (>) in front of it to open the options below.
- Step 3 : Open the ‘SYSTEM’ folder by clicking on the arrow in front of it again and open ‘CurrentControlSet’ here and again below you open the ‘Control’ folder.
- Step 4 : In the Control folder, scroll to ‘StorageDevicePolicies’. Double-click it to open the folder
- Step 5 (a) : Then double click on ‘WriteProtect’. Here change ‘Value data’ to 0 and check ‘Hexadecimal’. Click on ‘OK’ and restart the PC to check whether the write protection has indeed been removed.

Don’t see the ‘StorageDevicePolicies’ folder? Then you still have to create it. You do that like this:
- Step 1 (b) : Right-click on the ‘Control’ folder. Select ‘New’ and then ‘Key’.
- Step 2 (b) : Now name the folder ‘StorageDevicePolicies’ exactly as it is written here.
- Step 3 (b) : Open the new folder and click with your right mouse button on the empty part, somewhere under ‘(default’).
- Step 4 (b) : Choose ‘New’ and choose ‘DWORD (32-bit) value. Name the new folder ‘WriteProtect’. Then proceed to step 5(a) above.

Remove Write Protection via First Aid (macOS)
The write protection on your USB may be due to incorrect permissions. You can solve this via the first aid option of macOS. 👇
- Step 1 : Open the disk utility. You do this by pressing the CMD key and the space bar at the same time and typing ‘disk utility’.
- Step 2 : In the left column, locate the disk in question and select it.
- Step 3 : Then press ‘First aid’ at the top of the window and click ‘run’.
- Step 4 : Wait for the scan to complete and then click on ‘Restore write permissions’.
If the error was indeed with the permissions, this one fixes it.
Remove write protection by formatting your USB (Windows & macOS)
For Apple PCs, formatting your USB stick is the only solution if the step described above does not help. It’s a relatively easy option, but beware! Formatting your USB stick not only removes the write protection, but also all other information from your USB stick.
Do you have an iMac or MacBook ? Then perform the following steps:
- Step 1 : Open the disk utility and select the correct USB stick in the left column.
- Step 2 : Click ‘Clear’ at the top of the window.
- Step 3 : A new window will now open. Under “File System,” choose a file system that’s compatible with your version of macOS. The best choice is usually ‘AFPS’.
- Step 4 : Click ‘Delete’.
When the process is complete, everything is erased from your usb; also write protection.
Windows PCs are a bit different. Whether it is possible to format a USB stick with write protection depends on how the protection has been set on it.
With good security, it is not possible to format the USB stick, but it never hurts to try.
- Step 1 : Open the Explorer app and navigate to your USB stick under ‘This PC’.
- Step 2 : Right-click on the USB stick with write protection. Select ‘Format’ here.
- Step 3 : Choose the appropriate settings, including the file system, in the pop-up window and click ‘Ok’. Now it’s a matter of waiting for the PC to finish formatting.

Are you unable to format the USB stick on a Windows PC because the write protection prevents this and the other steps in this article do not work either? Then I’m afraid you have no other options. In principle, the security does nothing more than its job well. 😅
Conclusion
Write protection is useful, but certainly not always. The solution? Remove the write protection from your USB. Hopefully, after reading this article, you will know exactly how to do that. Do you have any questions? Then let us know. Thank you for reading! 😊