It is not difficult to take beautiful photos with your iPhone, but it can always be better. With the tricks in these iPhone tips you will succeed!
iPhone tips: better photography with your iPhone
Your iPhone has all kinds of tricks that help you take better photos. You probably already know some of them, but most people certainly don’t know them all. That’s why we help you with these iPhone tips!

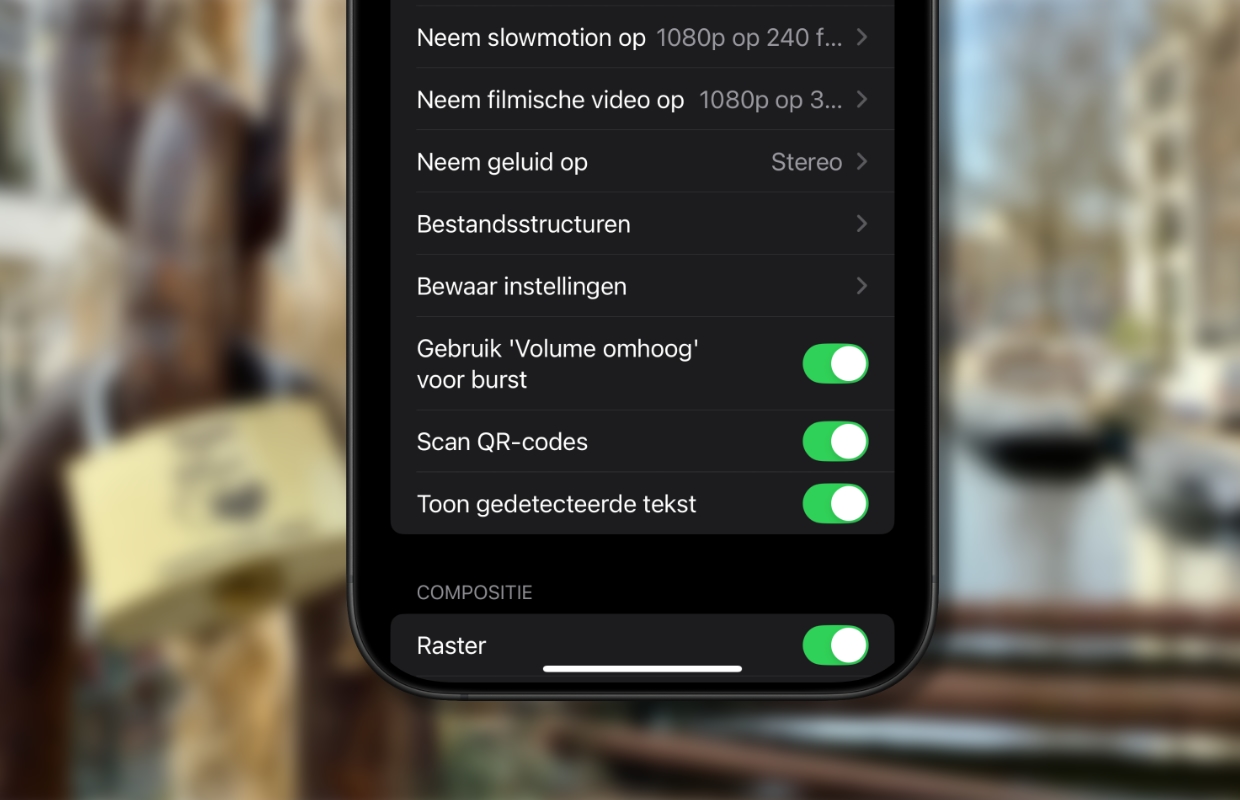
1. Use the grid for better compositions
You make better compositions if you have help lines. The grid divides the screen of your iPhone into nine surfaces, so that you can easily apply the third -party rule, for example. You place the subject in the left or right third of the image. This ensures a more interesting photo than when the subject is exactly in the middle. You add the grid as follows:
- Open the app settings;
- Tap ‘camera’;
- Put the switch behind ‘Raster’ on green.
2. Storting photos is no longer necessary thanks to the spirit level
In the same place there is still a handy functions that help you take better photos, namely the spirit level. It is especially useful if you can’t see well on the screen whether you keep your iPhone straight or not. The grid does not help you, but the spirit level does. If you have activated the spirit level, it will appear automatically when you open the camera app.
You then see a white line horizontally that moves with the movements of your iPhone. When that line is exactly horizontal, it turns yellow. Then you keep your iPhone perfectly straight. If you take a photo at that time, you certainly don’t have to put it right afterwards. You can find the switch for the spirit level under that of the grid from the previous tip.

3. Better results with live photos
Timing is important in photography and it often happens that you are just too early or late. To prevent that, you can use the Live Photos function. With a Live Photo you also record what happens just before and after the recording. You can switch the function on and off with the round that you see in the top right of the picture when you open the camera app (top left if you keep your iPhone in landscape mode).
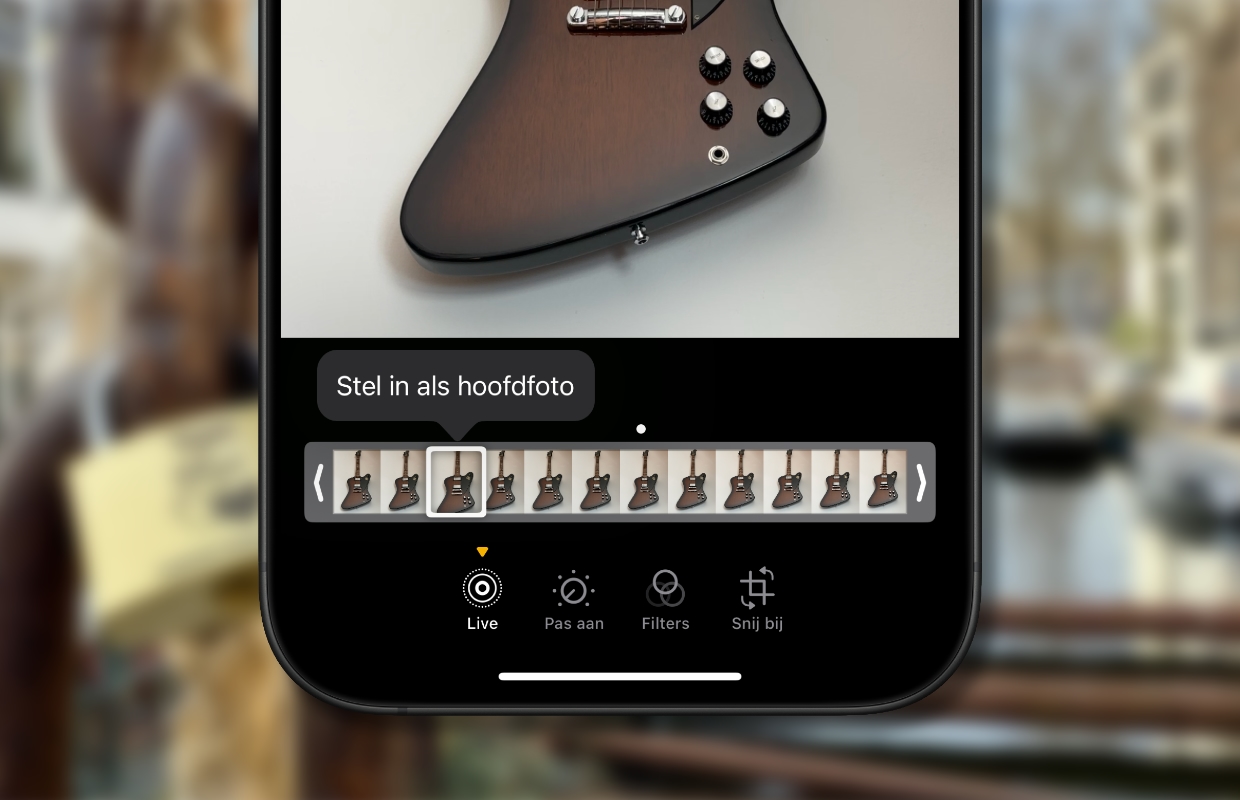
If you have taken a photo with Live Photos enabled, you can still choose the best moment afterwards. To do this, go to the photos app and open the photo you took. Tap the button downstairs to edit the photo (right next to the ‘I’) and then tap ‘Live’ at the bottom left. Choose downstairs at the miniature views which looks best and tap ‘Set as main photo’. If you tap on top of the yellow button ‘Live’ then your live photo will be converted into a normal photo.

4. This is how you use the portrait mode
As the name suggests, the portrait mode helps you make better portraits. If you use this mode, it is very easy to clearly portray the subject (someone’s face) and the background out of focus. You can also adjust this so -called depth of field afterwards. The portrait mode also works if you make a selfie and you use it as follows:
- Open the camera app and tap down on ‘portrait’;
- Focus the camera on the subject and tap the place where you want to focus;
- Tap at the top right of the F-icon;
- Adjust the depth of field by adjusting the F value below;
- If you are satisfied, you take the photo.

If you still want to adjust the depth of field, go to the photos app and open the photo you have taken. Tap the button below to edit the photo (right next to the ‘I’) and adjust the F value by wiping horizontally to the left or right.
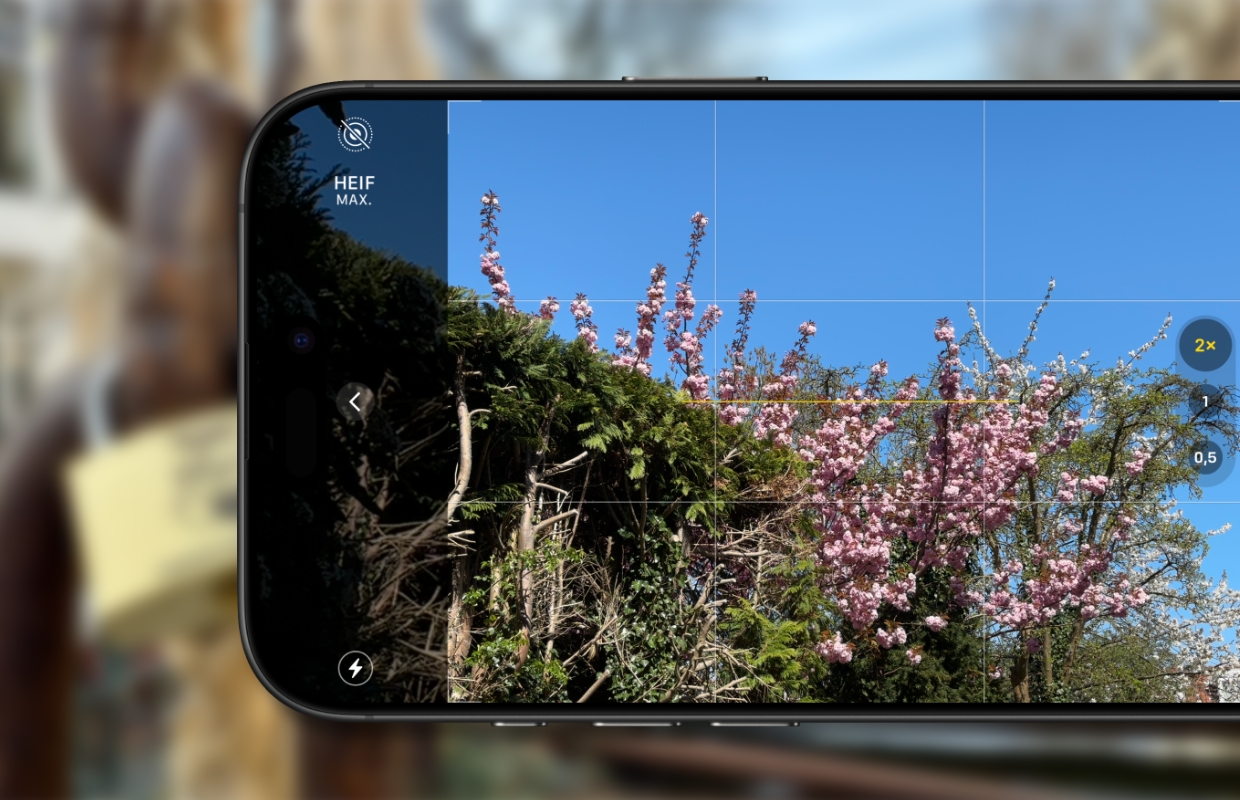
5. More impressive photos with the ultragro area lens
The ultra -wide angle lens is useful if, for example, you are going to take a landscape photo and want to be the entire landscape, or if you want to photograph a large building in its entirety. Thanks to the ultra -wide angle lens, it works fine without having to walk a lot backwards. Even in small spaces, where you can no longer distance themselves, the ultra -wide angle lens is an ideal solution. You can change camera lens as follows:
- Open the camera app;
- Below you see ‘1x’, which means that you use the wide -angle lens;
- Tap ‘0.5’ to use the ultra -wide angle lens.

When you press ‘1x’ for a long time, a zoom controller appears and you can zoom in and out by wiping to the left or right. The ultra -wide angle lens is used from ‘0.5x’ to ‘0.9x’. As soon as you come to ‘1x’, you see that lens is being changed.

6. Adjust the exposure during photography
You can of course edit your photos afterwards, but sometimes it is a good idea to adjust the exposure during photography. That is easier than you might think. We explain how you do that.
- Open the camera app;
- Focus the camera on the subject and tap the place where you want to focus;
- Press the sun on the right next to the yellow square that appears and hold;
- Swipe up for a higher exposure and down for a lower exposure;
- If you are satisfied, you take the photo.

7. Take beautiful panoramic photos
With the panorama mode you can easily take beautiful panorama photos with your iPhone. Open the camera app and select the panorama mode below (right next to portrait). An arrow appears in the picture. Tap the shutter button and move the camera quietly from left to right. Try to keep the white arrow neatly on the yellow line in the middle.

Your iPhone indicates it if you go too fast or deviate from the line. In that case, move a piece. Go through the entire line, or press the shutter button earlier to stop. In this way it is also possible to ‘clone’ someone. Picture a person on the left. Turn to the right until it has disappeared and then keep your iPhone still. Let the person walk behind you to the right, so that he can stand just outside of the picture. Then you move your iPhone further and the person comes back into the picture.

8. Use photographic styles
With photographic styles you give your photo a different look. The camera is automatically set to ‘Standard’, but you can also opt for ‘rich contrast’, ‘lively’, ‘warm’, or ‘cool’.
If you have an iPhone 16, iPhone 16 Plus, iPhone 16 Pro or iPhone 16 Pro Max, then you have access to the latest photographic styles. There are many more. You will find, among other things, the photographic styles of rosé gold, luminous, cozy and dramatic. You choose photographic styles as follows:
- Open the camera app;
- Wipe up in the middle of the image;
- Tap downstairs on the relevant icon (4th from the left, or 3rd from the right);
- Wipe horizontally over the image to change style;
- On an iPhone 16 you wipe down through the miniature views.

If you have an iPhone 16, you can also add photographic styles afterwards. This is not possible with other iPhones, so then you really have to do it while photographing. Below you can see how we have converted a photo with an iPhone 16 by means of a photographic style to black and white.


More iPhone tips?
Did you like these iPhone tips and do you want more? On iPhoned Read useful tips and tricks for your iPhone every week. Check the most recent tips below!
-
iPhone tips: With these tricks you learn to photograph better with your iPhone
-
IPhone screen never goes out (and you solve it that way)
-
This is WhatsApp hijacking and so you can easily prevent it
-
Your Smart-TV secretly makes screenshots: this is how you switch it off
-
3 ways to exchange iPhone photos with your Mac or Windows PC