
Printing is expensive and not very ecological, so you prefer to do it as economically and efficiently as possible. Our 10 tips and tools can help you with that.
Show from Daele
In this article, we assume that you already have a printer. If you are considering purchasing a new printer, know that an inkjet printer is the cheapest when you buy it. On the other hand, the printing costs with a laser printer, which are more expensive to purchase, are usually a lot higher. According to some studies, the total cost of an inkjet printer would be on average ten percent higher for a family after three years than for a laser printer. The latter usually prints faster and there is virtually no risk of smudges. However, such a device is less suitable for printing photos. On the website tomsguide.com/us/inkjet-vs-laser-printers,review-6199.html you will find an extensive comparison between the two printer types.
It is also good to know that it is better not to switch off (some) printers after every print job, because they may then perform a limited cleaning. This can lead to ink wastage and ultimately cost you more than the minimum power consumption in standby. Consult the manual for the device for this.
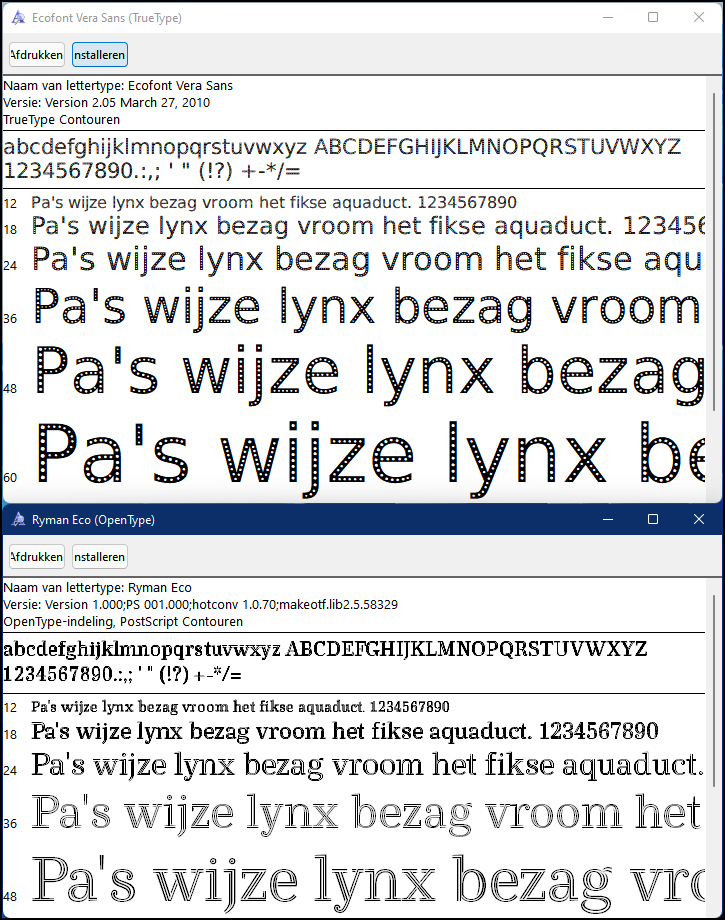 |
| 1. Ecofont Vera Sans: font with holes |
1. Font Selection
It may surprise you, but the font used can make a big difference to the ink consumption. For example, if the print is intended for yourself, you can consider using a more ecological font. Well-known fonts that use less ink are Courier and Century Gothic, but there are also fonts specially designed to use less ink, such as Ryman Eco (debbievayanos.com/ryman-eco) and Ecofont Vera Sans (wfonts.com/font /ecofont-vera-sans). You can download both for free and unpack them first if necessary. The result is an otf or ttf file. When you double click on this in the Explorer, a dialog box pops up with sample text. After clicking Install at the top, you’ll find the font in your Windows apps, ready to use. These fonts would use about a quarter less ink than standard fonts. The secret: the tiny white spaces in every character.
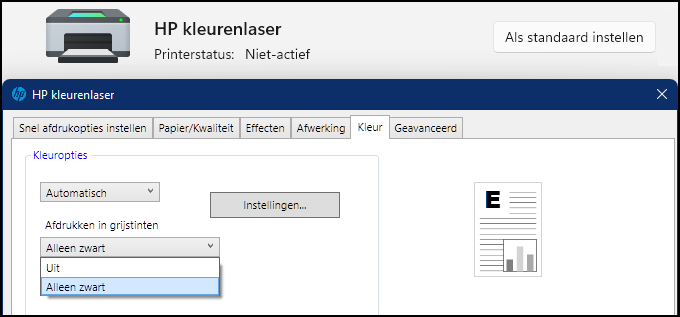
Another way to reduce ink consumption is not to print your text completely black, but choose dark gray in your word processor, for example.
 |
| 2. A true print manager that lets you print more efficiently (and economically) |
2. Print Management
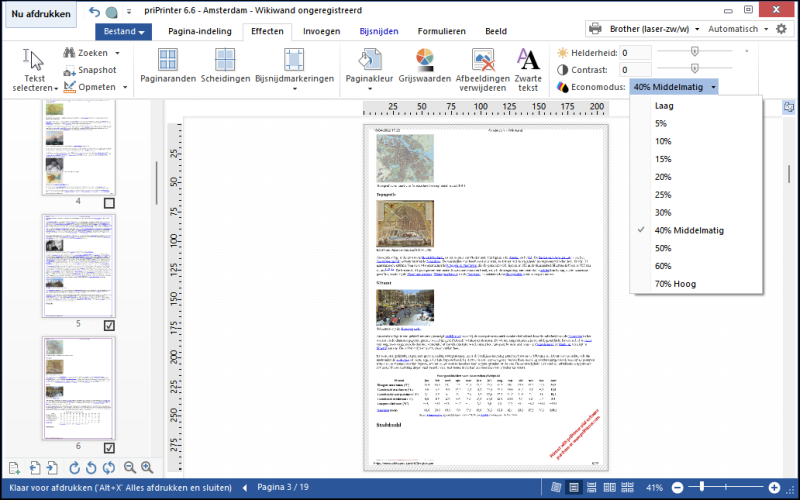
A so-called virtual printer nestles between your application and your physical printer. As soon as you give a print job, the virtual printer pops up and you can manipulate the print jobs before you actually start printing. priPrinter (Standard) is such a tool. Download the app from priprinter.com and install it. If you now want to print a document, choose priPrinter. In a management module you then indicate which pages you actually want to print. On the tab Effects can you include Grayscale and Pictures select delete and a Econo mode with an adjustable percentage. On the tab crop mark a specific part of the page you want to print and Page layout all it takes is the push of a button to print two, four or six pages on one sheet. Click on the top left Print now to send the result to your printer.
The free version of priPrinter does print an extra promo line on every page. You can get rid of this for € 24.95.
 |
| 3. Strip your web page of all redundancies before printing it |
3. Web pages
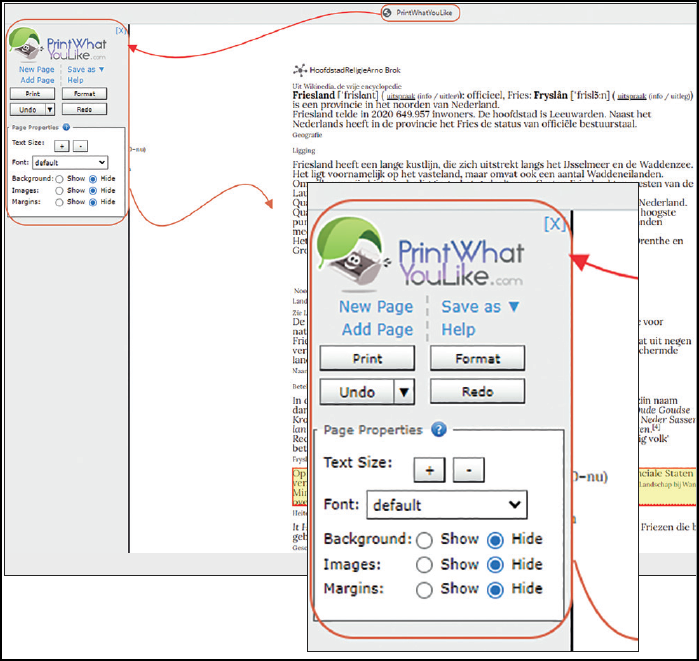
If you find such a print manager rather cumbersome and if you mainly want to print overprinted web pages more economically, there are more convenient alternatives. One of them is PrintWhatYouLike (printwhatyoulike.com), whose link you can see as a so-called bookmarklet to your browser’s bookmarks bar so that it becomes available as a button. This button then brings up a side panel next to the web page from which you can adjust the font and remove images and the page background. It is also possible to remove specific text elements before printing the web page.
An alternative: install the Reader View extension in Chrome or Edge (chrome.google.com/webstore/detail/reader-view/ecabifbgmdmgdllomnfinbmaellmclnh?hl=nl). This is intended to make busy web pages instantly ‘more readable’. For example, there is even a button that reads the page text neatly. But because you can also remove images or adjust the font size, Reader View also serves as a frugal print manager. You can read how to install such an extension here in this issue of PC-Active.
 |
| 4. Collect your print jobs and print all files at once |
4. Batch Print
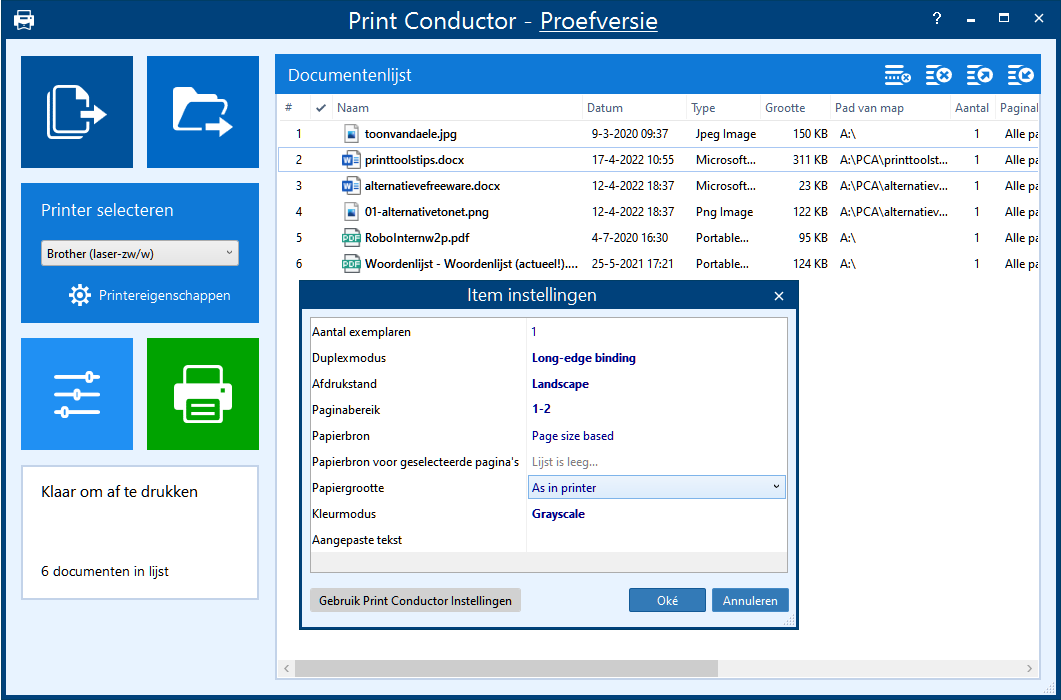
If you do print a number of documents every day, but they are not urgent, you can consider putting the documents in a print buffer and printing them once a day, for example. This can be done with Print Conductor (print-conductor.com; free for personal use, with promo page afterwards). After installation, you drag documents (of various types) to the program window. You can always change the print order by dragging the items. Conveniently, you can also adjust the print settings of each added file from the context menu, including duplex printing, orientation, page range and color mode.
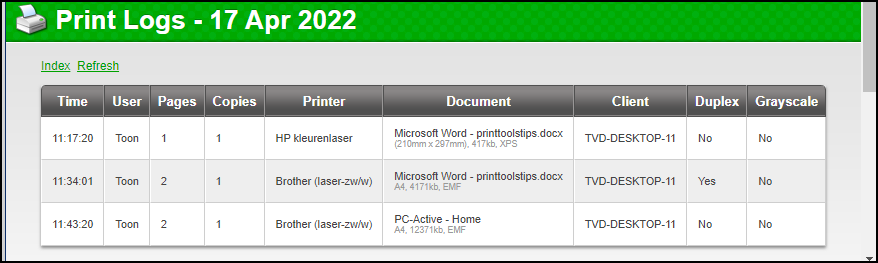 |
| 5. This tool keeps track of who printed what and where |
5. Print Control
If you want more control over who prints what, you can install the free PaperCut Logger (papercut.com/products/free-software/print-logger). It installs as a Windows service (press Windows key + R and run services.msc to make it visible) and track all print activity in an html report.
You can view this by opening the file index.html in your browser in the PaperCut Logger installation folder (default is C:Program FilesPaperCut), in the logshtml subfolder. Here you can click on View per day. You can then see which user printed which document with how many pages on which PC and to which printer and whether it was double-sided and in colour.
If you absolutely want to avoid that a user prints to a specific printer (with expensive color prints, for example), you can also arrange that from Windows. Go to Settings from Windows and choose Bluetooth and devices. Select Printers and scanners and click the printer name. Choose Printer Featuresopen the tab Securityadd the account name and check that account Print in the column To refuse.
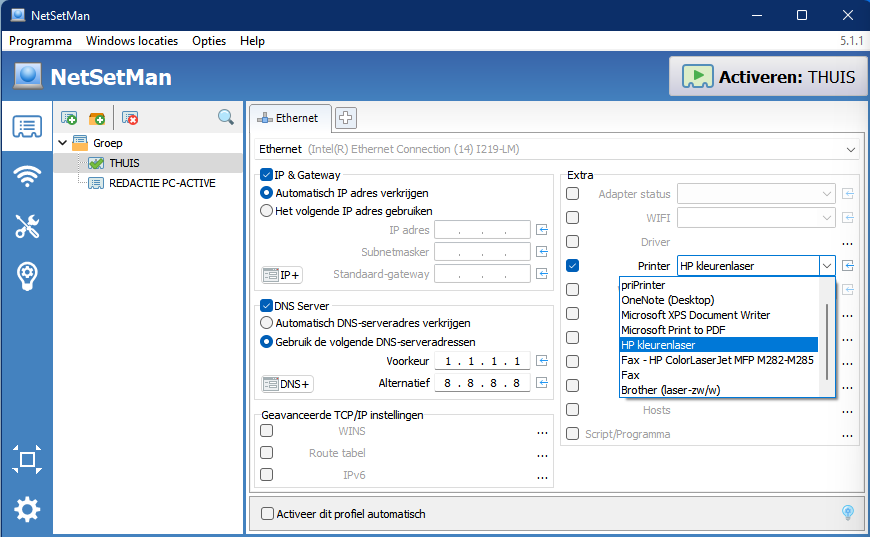 |
| 6. Select a printer on site with NetSetMan |
6. Automatic Printer Selection
You commute with your laptop back and forth between your home and work or maybe also with some customers on the road. To be able to print at the various locations, you must of course select the correct printer. Rather than doing this manually, you can use the free NetSetMan (netsetman.com) for this.
Install the app and launch it. Select the appropriate network connection from the drop-down menu and set all items as desired, such as the IP address and default gateway (or select Obtain IP address automatically) and possibly the DNS server. At Extra you can set all kinds of other options, such as the WiFi connection, and last but not least: the printer. Give a suitable name to the profile and click Activate:
 |
| 7. Same printer installed multiple times, with custom configurations |
7. Printer Configurations
You have configured your printer in Windows. Great, but if you often switch between, for example, an economical draft mode and standard mode, or between color and black and white, it is even more convenient if you create a separate printer configuration for each of these modes.
To do this, you install the same printer several times, but each time you give it a custom name, such as ‘Printer draft’ or ‘Printer black and white’. Then you go to Printers and scanners in Windows settings and choose Printer Featureswhere you via Preferences adjust all options to your liking and choose, for example, draft mode or black and white. You repeat this for the other printer configurations.
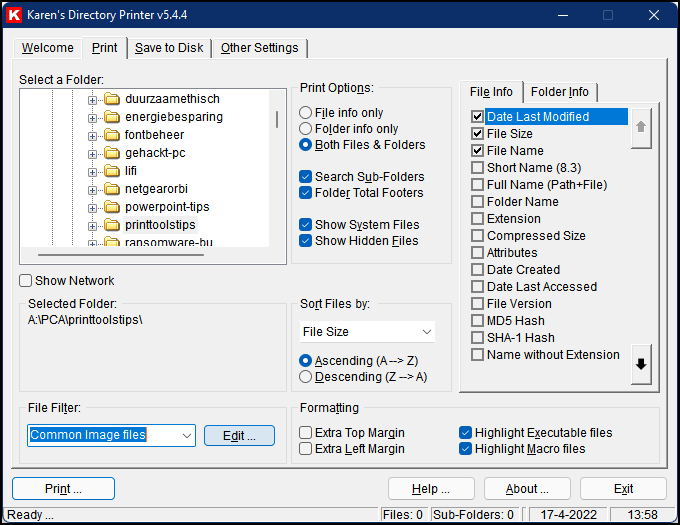 |
| 8. With Directory-Printer you decide how you print (sub)folders |
8. Print Specials
Sometimes it takes a while to find how you can print something (optimally). A typical example is the content of (sub)folders. This can be done with commands from the command prompt, but a more user-friendly and flexible way is with the free Directory-Printer (karenware.com/powertools/karens-directory-printer).
Launch the tool, open the tab printselect a folder, leave the check mark next to Search Sub-Foldersplace on the tab File Info a check mark next to all the items you want on paper. click on printselect your printer and start printing.
 |
| 9. Manual 2-sided printing with multiple pages per sheet |
And what if you have a folder with a whole selection of photos that you would like to print (reduced) on one sheet? This is of course possible with various photo management tools, but it can also be done from Windows. Navigate with the Explorer to that folder and select all the desired photos. You can keep the Ctrl-key pressed during your selection. Right click on your selection and choose Print. A dialog box pops up, where you can, for example: Wallet (nine photos per sheet) or Summary Print (35 photos per sheet). Just select your printer – that’s also possible Microsoft Print to PDF are – and you’re done.
9. Custom Print
Use much less ink and paper… It often only takes a little effort. As mentioned, you can print your text in dark gray, for example. Or you print in a frugal draft mode. Also, make the most of the option to print on both sides if your printer supports this feature. You can also always ‘manually’ double-sided. For example, in the print window you choose Odd Pages in the field Print and after you flip the paper stack, choose Even pages.
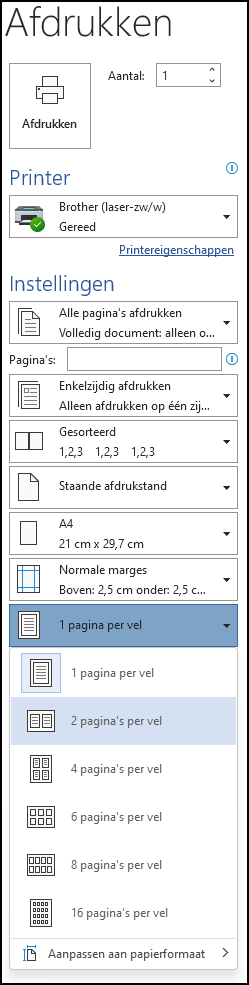
You may also not always need to print all pages in full size. Text normally also remains sufficiently legible if, for example, you print two pages on one sheet. Some applications, such as MS Word, have such an option themselves. In the print window, specify two pages per sheet (or four, six, eight or sixteen) in the drop-down menu.
10. Calibration
Many tips have already been discussed for more economical and efficient printing, but a tip to make photos more beautiful on paper should of course not be missed. Unfortunately, we can only lift a tip of the veil here, but a lot has to do with a well-calibrated display in combination with adjusted printer settings. You perform the screen calibration using the built-in tool Calibrate Display Colorwhose steps you follow carefully.
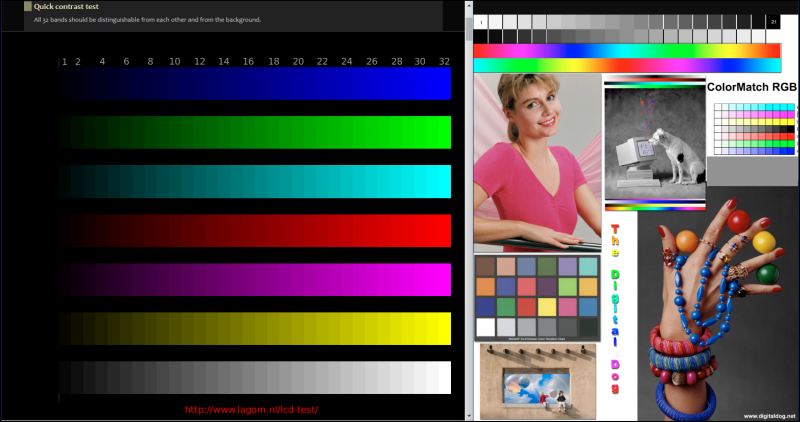 |
| 10. Run some print tests using suitable test images |
Afterwards, look for a few suitable coloring pictures, such as those at digitaldog.net/tips or lagom.nl/lcd-test. Print it on the type of paper you use for your photos. Take a magnifying glass and check the prints for possible inaccuracies, such as color cast. You can then try to adjust these from the configuration window of your printer (see under Printer configurations above). You can find here via Preferences probably an option or tab like Color(management).