 Make working with Finder easier and faster by customizing it through Finder preferences.
Settings Finder
The Finder application is the gateway to all information and applications on a Mac. This makes it perhaps the most used program. A good reason to take a look at the possible settings. You can adjust all kinds of things in Finder in the ‘Finder Preferences’ menu.
Default folder
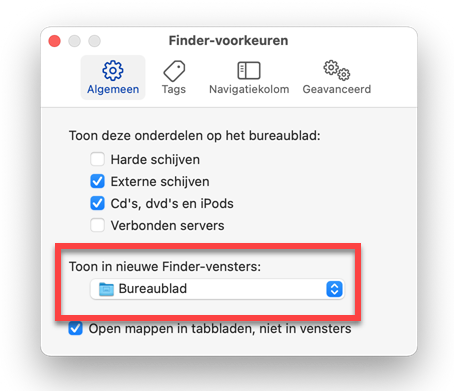
When opening Finder always shows the same folder. By default, this is the ‘Recent’ folder, which contains the most recently opened files. Do you always click directly to another folder? Then set this folder as default. That saves clicking again.
- Open Finder by clicking the smiley face icon on the Dock
 .
. - Click on the top left finder.
- click on Preferences.
- Click on the tab General.
- Under “Show in new Finder windows,” click the drop-down menu and click the folder you want. Is it not among them? Then click on Others…, click on the desired folder and finally Choose.

Sidebar Parts
On the left side of the Finder window is the sidebar. You can quickly navigate to the right place on the computer using this column. But chances are that there are many parts that you never use at all. Or maybe one is missing. Customize the outline to make the sidebar easier to use.
- Open Finder and click in the top left finder > Preferences.
- Click on the tab Sidebar.
- There is a check mark in front of the parts that are visible in the column. Click on an item to place or remove a check mark. The adjustments are implemented immediately.
Folders at the top
The folders and files in the Finder window can be sorted by various properties. One of the options is sort by name. Folders and files are mixed up. But it is also possible to separate folders and files. Folders are then always at the top. That is easier to find.
- Open Finder and click in the top left finder > Preferences.
- Click on the tab Advanced.
- Put a tick in front of In windows when sorting by name under ‘Make sure folders are at the top’.
Show filename extensions
A file name extension indicates the type of file. For example, an images or PDF. The extension appears after the file name and is separated by a period. For example, for a photo this is ‘Holiday photo.jpg’. For example, with a PDF it is ‘Instruction.pdf’. It is useful to always show this extension, so that you know exactly what kind of document you are seeing.
- Open Finder and click in the top left finder > Preferences.
- Click on the tab Advanced.
- Put a tick in front of Show all filename extensions.
Search location
There is a search function in Finder. This allows you to quickly find the right information. The Finder preferences set where Finder should search. On the entire Mac or just in the folder that’s open.
- Open Finder and click in the top left finder > Preferences.
- Click on the tab Advanced.
- Under ‘When performing a search’, click the drop-down menu.
- Click on the desired option.
Set tags
At the bottom of the sidebar, the heading ‘Tags’ is displayed by default. This is another way to organize folders and files, namely by color. Folders and files related to each other can be the same color. For example, you can give all folders with the subject ‘Holiday photos’ the color green. All you then need to do is click on ‘Green’ under ‘Tags’ to find all folders or files containing ‘Holiday Photos’. They are all here together.
To tag a folder or file:
- Right-click on the folder or file.
- Click on the drop down menu at the bottom tags.
- Click on one of the colors. You decide for yourself what color you want to give the folder or file. In addition to colors, you can also choose the tags ‘Home’, ‘Important’ or ‘Work’ here. You may need to click Show all… click.
- Click the colors under Tags in the Finder sidebar to see all the files you’ve colored the same.
In Finder preferences, set which tags to show in the sidebar:
- Open Finder and click Finder > Preferences in the top left.
- Click the Tags tab.
- After the tag or word, check the box of the tags you want to see. It is now in the sidebar by default.