Are you taking a screenshot of part of the screen using the Snipping Tool? Color the selection marquee for a clearer selection.
Set screenshot type
In Windows 7 and 10, screenshots, also known as screenshots, are easy to take with the Snipping Tool. Set in the program what kind of screenshot you want to take: a full screen image, a single window, any rectangle or even a free form.
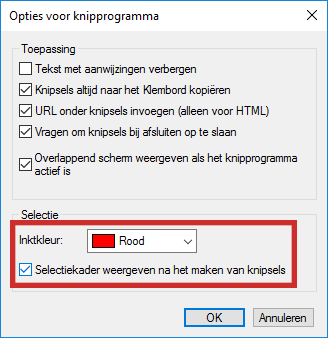
Especially with the rectangular snip and free-form snips, it’s helpful to clearly see what you’re taking a screenshot of. Therefore, set the color of the selection frame and specify that the frame is also visible after taking the screenshot.
- Press the button Start > All programs (Windows 7) > desk accessories > Snipping Tool to open the program.
- click on Options.
- The Snipping Tool options open in a window. Click behind Ink color on the drop-down menu to choose the color of the bounding box.
- Click on the desired color. Choose a contrasting color from what you’re taking a screenshot of.
- Put a tick in front of Show marquee after making snips.

- click on OK.
- In the Snipping Tool, click on the drop-down menu behind ‘New’ and click on the desired shape of the screenshot, for example Rectangular Cutout.
- Select the area you want to take a screenshot of: click on the starting point, hold down the mouse button and drag the mouse pointer until everything is in view. Then release the mouse button.
More information
To learn more about taking a screenshot and how to use the different types of snips, read the “Using the Snipping Tool” article.