Music, videos, contacts… Keep them on iPhone or iPad in parallel with your Mac using iTunes.
End of iTunes
Note, iTunes is only available on Mac computers running macOS 10.14 Mojave or earlier. On the latest versions of macOS, iTunes has given way to other applications. However, these programs have not inherited the syncing feature from iTunes. Syncing an iPad/iPhone is now easiest via iCloud. Read more about this online storage service from Apple in the article ‘Backing up iPad/iPhone’.
What is synchronization?
Synchronization means that data or documents are kept the same on different devices. For example, you have a playlist of music on Mac that you want to have on iPhone as well, syncing transfers the playlist. If you add songs to the playlist and then synchronize, the playlists on both devices are the same again.
What can you sync?
Through iTunes, you can sync the following between the Mac and the iPhone/iPad:
- music, films, (audio) books and podcasts;
- photos and videos;
- contacts and calendars;
- previously made backup of the iPad or iPhone.
If you sync via iTunes, that means you do this manually. The iPad or iPhone and Mac are connected via a USB cable while syncing. Via iCloud, Apple’s online storage service, it is possible to synchronize data automatically. You also have the option to keep e-mail, notes and bookmarks the same. How this works is explained in the article ‘Exchange data between Apple devices with iCloud’.
When to sync via iTunes?
Use iTunes if you don’t want to use the iCloud online storage service or if you only want to sync a limited portion of your photos or music between the devices. For example, because you don’t have that much storage space on the iPad or iPhone. When setting up iCloud, don’t turn on iCloud Photo Library, and don’t let music automatically arrive on the iPad or iPhone. You then manage these two parts manually.
Latest version iTunes
Always install updates from iTunes so that you have the latest version. If necessary, check the App Store for an update.
- Open the App Store program on the Mac. To do this, click on the program icon
 on the Dock, or access it via finder
 > Programs > App Store.
 - Click on at the top Updates.
- If there is an update for iTunes ready, click on it next to it Update. (Choose for Update everything can also. That’s how the whole Mac is updated again.)
Get started with syncing
- Open iTunes. To do this, click on the program icon
 on the Dock, or access it via finder
 > Programs > iTunes.
 - Unlock the iPad/iPhone and connect the device to the Mac with the supplied USB cable.
- If the message “Would you like to give this computer access to information on this iPhone” appears on your Mac, click Continue.
- If you see the question ‘Do you want to trust this computer’ on the iPad/iPhone, unlock the device and tap trust. Then enter your passcode on the iPad/iPhone if you have set it up.
- If you have a new iPhone, the message ‘Welcome to your new iPhone’ will appear in iTunes. You can then restore a backup of an older iPhone (Choose Restore from this backup and select the backup you want to restore), or go with a clean slate by leaving Configure as New iPhone selected. click on Continue > follow any instructions > To work.
- The device icon appears at the top left of iTunes. Click on the device symbol.

- On the left, under ‘Settings’, you will see various components that can be synchronized. Click on the item you want to sync.
- In the main window, put a check in front of Sync[onderdeel].
- There are various options for each component, which we explain in more detail below. Read it through, make your choices for each part and then start the synchronization. Click on the bottom right of the screen to do so Apply.
- If the synchronization does not start, click the button at the bottom right of the screen Sync.
- After syncing, disconnect the iPad/iPhone from the Mac by clicking the eject icon at the top left.

Now in sync, the content will be updated automatically when you connect the iPad/iPhone to the Mac and open iTunes.
Below you can read more about the different settings per component.
Overview
The first section provides more information about the paired device, settings for the backup, and various options for performing the synchronization.
- Under ‘Backup copies’ choose iCloud or This computer. (iCloud is recommended because this way you have the most up-to-date data if the device unexpectedly breaks.
- If you save the backup on the computer, put a check in front of Encrypt iPhone/iPad Backup. That way, the backup will also contain saved passwords and other sensitive data, but protected with a password that you set yourself.
- Checked ‘Encrypt iPhone/iPad Backup’? The ‘Set password’ window appears. Type a password for the backup, retype it after ‘Control’ and click Set password.
- Under ‘Options’ there is a checkmark for Sync automatically when this iPad/iPhone is connected. If you remove the check mark, you must always start the synchronization yourself after connecting the device by clicking Sync.
- You can also choose to sync over the Wi-Fi connection. No cable is then needed, both devices must be connected to the same WiFi network and iTunes must be open on the Mac. Put a check in front of this Sync with this iPad/iPhone via WiFi.
Sync music, movie and photos
With a large music collection in iTunes, you usually choose to put only a part on the iPad or iPhone. After all, storage space is limited.
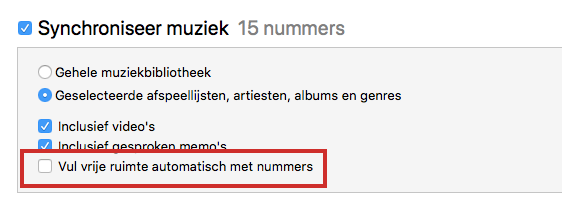
- Put a tick in front of Selected playlists, artists, albums and genres.
- Check the playlists, artists and/or albums you want to put on the mobile device.
- Another option that has appeared is ‘Automatically fill free space with numbers’. Check this box if you want to have as much music as possible on the device and make the most of the storage capacity of the iPad/iPhone.

Also read the article ‘Fill iTunes with music’.
Movies and TV Shows
The same applies to the ‘Movies’ and ‘TV Programmes’ sections as to music. The storage space on your mobile device is limited, so if you want to synchronize these components, please tick the desired components yourself.
photos
Choose here whether you want to sync photos from Apple’s Photos program, or sync photos in the Pictures folder on your Mac (located via Finder).
- After ‘Copy photos from’ you will find the option ‘Photos’ by default. To sync photos from a folder, click photos in the selection menu > Pictures.
- Choose Selected folders or Selected albums.
- Put a checkmark in front of the folders/albums that you want to see on the iPad or iPhone.
Sync contacts, calendar and documents
At ‘Info’ you can synchronize contacts and calendars. If you turn on synchronization, you synchronize everything by default. Optionally, choose to sync selected groups or calendars. Make your own selection.
file sharing
File sharing allows you to make documents stored on the Mac available on the iPhone/iPad and vice versa. There must be apps on the device that can open the documents. Think of the apps Keynote, Numbers or Pages.
- Select an app under ‘Apps’.
- Under ‘Documents’ you can see which associated documents are now on your mobile device. Save a document on the Mac? Select the document and click below the documents on Keep.
- Browse to the folder where you want to save the document and click Keep.
- Transfer a document from the Mac to the iPad/iPhone? Click under ‘Documents’ on add.
- Browse to the folder where the document is located, click it to select it, and click add.
Documents that you transfer from the computer to the mobile device or vice versa are stored in the corresponding app on the ‘Location’ iPad or iPhone. It is possible that the app shows documents that have been synchronized via iCloud by default, so you will not see them in iTunes.
Disable Sync
If you no longer wish to have certain items on the iPad/iPhone, disable synchronization for that item.
- On the Mac, open iTunes via finder > Programs > iTunes.
- Connect the iPad/iPhone to the Mac with the supplied USB cable.
- The device icon appears at the top left of iTunes. Click on the device symbol.

- Under ‘Settings’, click the item (or items) you want to stop syncing.
- In the main window, uncheck Sync[onderdeel].
- You will be asked if you are sure you don’t want to sync an item anymore. In the notification, click Delete.
- click on Apply.
- If the synchronization does not start, click the button Sync.
The items you have unchecked are still on the Mac, but no longer on the iPad/iPhone.