Back up the photos and videos taken with the iPad. Learn how to transfer the recordings to a computer running Windows.
Windows version
In this article, we’ll cover transferring photos from an iPad with iOS 10 or later to a computer with the Windows operating system.
On computer or in iCloud
In this article, we will show you two ways to transfer photos to the computer. The photos are transferred directly from the iPad to the computer. However, Apple itself promotes iCloud, the company’s online storage and syncing service. Saves the files online. You can then view and download it via a website. We will not go into this further in this article. If you do want to use iCloud, read the article ‘Exchange files between devices with iCloud’.
Import images and videos (1)
You can transfer photos to the computer using the standard ‘Import images and videos’ function. This is a good method to transfer all the photos on iPad to computer at once. It is also useful that the computer recognizes whether the photos are already on the computer. If there are any new photos taken with the iPad since the last time you imported photos, the computer will import only these new photos.
- Connect the iPad to the PC using the supplied white USB cable.
- Unlock the iPad if it isn’t already. The iPad asks if you want to allow the device access to your photos and videos. Tap on Allow or trust.
- On the computer, open File Explorer via the yellow folder icon in the Language bar.
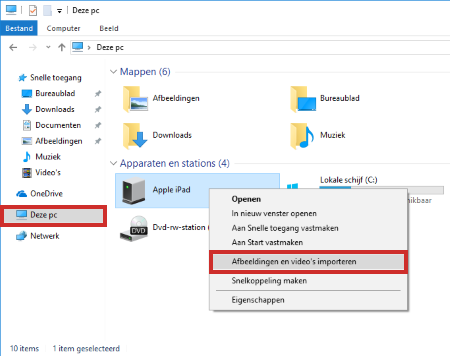
- Click in the left menu on This PC.
- Right click on Apple iPad or the name you gave the iPad.
- click on Import images and videos.

The computer will now search for available photos and videos.
Import images and videos (2)
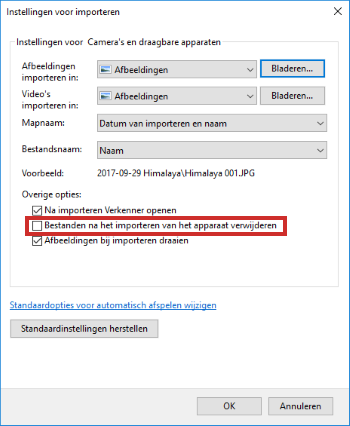
- click on More options. Here you can set how you want the photos to be imported.
- Behind ‘Import images to’ you can choose where you want to save the photos.
- The photos are placed in the ‘Pictures’ folder by default. You can change this by clicking To leaf through. Browse to the folder where you want to put the photos and click OK.
- If you have videos on your iPad, you can choose to put them in a different location than the images. You can of course keep the videos in the same location as your photos.
- If you want to change the location of your videos, click To leaf through, browse to the desired folder and click OK.
- After ‘Folder name’ you can choose the name of the folder with photos. We leave ‘Date of import and name’. The computer will then automatically give the date of import to the folder followed by a name that you can choose yourself.
- Behind ‘File name’ you can choose whether you want to give the name of the folder to each individual photo as well (choose the option ‘Name’) or whether you want to keep the name of the original folder (in that case choose ‘Original file name’ ). The option ‘Original file name (keep folders)’ ensures that the folder structure of the iPad is preserved when importing the photos. We will leave this setting at ‘Name’.
- Under ‘Other options’ is the option ‘Delete files after importing from the device’. We recommend leaving this option unchecked so that your photos remain on the iPad.

- click on OK.
- click on Import all new items now. This way you only put the items that have been created since the last time you transferred the files to the computer each time.
- click on Enter a name. Now you can give the folder where the photos will end up a title, for example ‘Photos from iPad’.
- click on Import.
Transfer individual photos
Maybe you only want to put a selection of the best photos on the computer or there is one particular photo that you would like to edit.
- Connect the iPad to your PC using the supplied USB cable.
- Unlock the iPad if it isn’t already. The iPad asks if you want to allow the device access to your photos and videos. Tap on Allow or trust.
- On the computer, open File Explorer via the yellow folder icon in the Language bar.
- Click in the left menu on This PC.
- Double click on Apple iPad or the name you gave the iPad.
- Then double click Internal Storage > DCIM.
- If necessary, open the folder with the correct photos.
- Press and hold the Ctrl key on your keyboard. Then click on the photos you want to transfer to the computer.
- Press Ctrl+c on the keyboard to copy the photos.
- Browse to the folder where you want to put the photos.
- Double click on the folder to open it.
- Press Ctrl+v on the keyboard to paste the photos.