 Use the Skype program to (video) call and chat via the computer. It’s convenient, free, and works well within Windows 10.
What is Skype?
Skype is a well-known program for chatting and video calling. This is something very normal nowadays via a laptop, tablet or smartphone. But in 2003, when the foundation was laid for Skype, it was still new. Calling abroad was expensive, and (video) calling via Skype was not, so the program became popular. In 2011, Microsoft bought Skype, and the program has been standard in Windows for some time now.
Skype can be used for the following: making video calls (using a webcam and microphone), calling (using a headset with earphones and microphone), and chatting via the keyboard.
Needed to use Skype
Skype requires a computer with Windows 10 and an internet connection. Skype also has apps for mobile devices, but those are not covered in this article. Laptops are usually equipped with a camera and microphone, with which Skype can be used. To make video calls on a fixed computer, users need a separate webcam and a headset (headphones with microphone). A headset alone is enough to make calls on a fixed computer. Chatting just happens via the keyboard.
To use Skype, you need to log in. The program is from Microsoft, so you can log in with your Microsoft account (eg Hotmail or Outlook.com). Do you not have this, or do you not want this? Create a new account. Read how to do this in the article ‘Create a Microsoft account’.
New user
In this article, we assume that you have not used Skype before. We therefore describe the steps that are followed when using it for the first time.
Start Skype
Start Skype:
- Click on the Home button > Skype.
- Press the button Join to get started and enter your username and password.
- Do you see an account name, but it’s not the right one? Then click on Using a different account.
The next time you open Skype, you will (probably) be logged in automatically. If not, click again Join and log in.
Choose profile picture
Set a profile picture. This way other people can see who they have in front of them in the contact list. It is of course not mandatory. click on To skip if you don’t want to set anything. If so, do the following:
- click on Upload photo.
- Navigate to the desired folder and select the image you want to use.
- click on To open.
- Satisfied? click on Get on.
- Unsatisfied? click on Remove picture. Repeat the previous steps.
Test audio and speakers
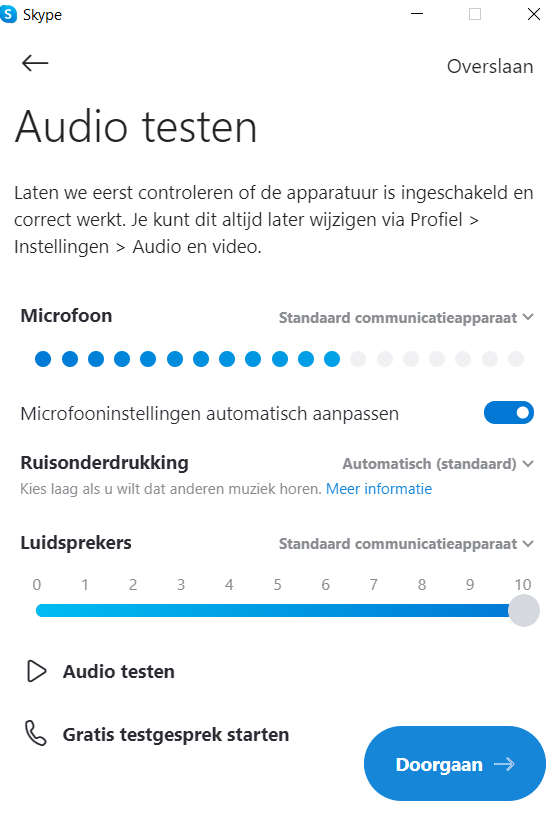
Test the operation of the microphone and speakers. This way you can be sure that other people hear you and vice versa. click on To skip if you don’t want to test this.
- Test the microphone: say one or more words. The dots under Microphone indicate whether this sound is being picked up.
- Test the speaker: click Test audio. The Skype ringer should now be heard. Click on Start a free test call to conduct a test call with a computer.
- Is everything working properly? click on Get on.

Test video
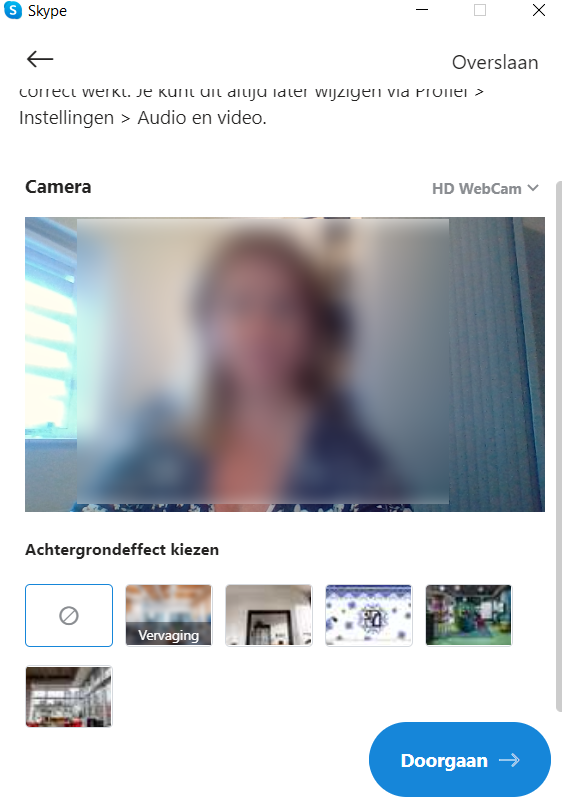
Time to test the video settings. This way you can be sure that others can see you during video calling. If you are only going to call or chat ‘normally’, you can skip this section. Click on To skip. If you want to test it, do the following:
- Check whether you are well in the picture. If necessary, move the webcam or PC to get a better picture.
- Don’t want others to see the room you’re video calling in? Under ‘Choose background effect’, click on one of the other backgrounds. Feel free to try a few. Prefer the real background? Click on the area with a circle with a line through it.
- click on Get on if all is well.

The format of Skype
Skype wants to provide suggestions for contacts. These could be people you’ve had email contact with through your Microsoft account. This can’t hurt, they’re just suggestions. So you don’t have to talk to those people via Skype.
- click on OK.
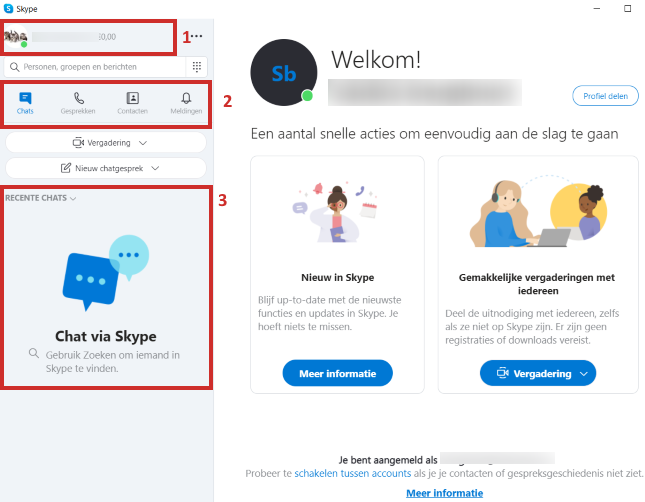
When Skype opens, you will see the following:

The main parts are:
- Your Skype Name. Click to access your profile information and to update your status.
- The buttons for chats, conversations, contacts and notifications.
- An overview of recent conversations and their contacts. If you are just starting to skype, the overview will be empty.
Between fields 1 and 2 there is also a search field to search for contacts.
Find people and start a chat
- Click in the left menu in the search bar and type the name of the person you are looking for.
- Press the Enter key.
- An overview of persons with a searched name appears. Is the person in question listed? Click on the person’s name.
- Type a personal in the right pane.
- Click on the round blue button with the arrow (Send message).
The message has been sent. The person in question must first accept the call before you can make further contact via Skype. The same goes the other way around, if someone sends you a message, you have to accept it first. Unknowns can be blocked.
Calling Contacts
The people you’ve sent a message to will appear in your contact list. If there is a green circle with a check mark next to their name, they are online and you can call them.
- In the left part of Skype, click Contacts.
- Click on the contact’s name.
- In the right pane, click the button with phone or video camera.
- The connection is established and your call may be answered. When you call someone, you will hear a ‘tone’ as if the phone is ringing. When your contact answers, you can talk to each other.
- Click on the image of the red telephone to hang up.
Have you chatted or made (video) calls with someone more often? Click on a contact’s name to see conversation history with them.
Adjust status
At the top left of the program you will see your Skype name with your profile picture or initials with a green circle on the left. That’s your status. It says whether you are online (active) or absent. You are online (active) by default, but you can of course change the status when you leave or are busy.
- Click on the green circle.
- Click in the new menu on Active and choose another status, such as Away or Do Not Disturb. With ‘Invisible’, other people think you’re offline.
View settings
Adjust everything in the Settings.
- Click the button with the three dots next to your profile name and status.
- click on Institutions.
For example, change your date of birth or choose a different profile picture. Or arrange for Skype to start at the same time as Windows and choose a different theme (appearance of Skype) via ‘Appearance’. Adjust the microphone and camera settings via ‘Audio and video’ if necessary. The ‘Messages’ and ‘Notifications’ sections are also worth checking out and adjusting if necessary.
- Satisfied? Close the settings via the cross at the top right of the window.
To block
The program is clearly structured and has many more possibilities than we discuss here. The best thing is to try everything out at your leisure. Then close the session:
- Click on the three dots icon.
- click on Sign out.
- click on Yes to exit and remember the account information on this computer.
- click on new if you want to clear this information (recommended).