
As chairman or secretary you are responsible for the periodic newsletters that all members of your association should receive. This can of course be in the form of a Word document that you send via your email provider, but it can also be done more professionally. With a (often free) service like MailChimp that is easier than you might think. Creating your own newsletter is done in no time.
There are various web applications that can streamline the creation, sending and handling of newsletters and related digital publications. One of the best known and most popular is MailChimp. That shouldn’t really come as a surprise: the free version is quite nice, because it allows you to send up to 1200 messages per month to a file of up to 2000 members. More than enough, we think, to get started with this.
click on Sign Up Free for a free registration, enter the requested information and confirm with Get Started! A little later you will receive a confirmation email: click on this Activate account and after you have filled in some administrative details on the site you can get started.
Collect and import contacts
A little later you end up in your online dashboard. MailChimp proposes to design a first e-mail alias newsletter right away, but we will wait a while. click on I’ll do this later so that the option Add your contacts gets the focus. It seems logical to us to compile a list of subscribers. We assume that you already have such a contact list; then it comes down to converting it into the correct format after which you can import it into MailChimp.
We take Outlook as an example. Start this program and go to File, Options, Advanced. click on Export, Export to a file and press Next one. Choose Comma-separated values, press again Next one, click on Contacts and give a name to the csv file. Confirm with Next one and with Complete. Other email clients and services offer similar export options.
Speaking of Outlook. This mail program from Microsoft is packed with features that you may not all use. Sin! With our basic Outlook course the mail software has no secrets for you anymore. Recommended!
Over to MailChimp, where you Import from a file select and CSV or tab-delimited text file ticks. click on Continue To Setup. Through Browse refer to the csv file. click on Continue To Match so you through Edit optionally column titles such as First Name, Last Name and Email Address link to your own fields. You can remove excess fields with Skip or in one movement with Skip All (Bee unmatched columns), so you can continue with Continue To Organize.
Leave the status of the imported contacts at Subscribed and click Continue To Review; round with Import. The imported items now appear on the tab Audience (click on View Contacts). You can also add new contacts from here. Open the section Add contacts and choose Add a Subscriber for manual additions or on Import Contacts.
Set up mail campaign
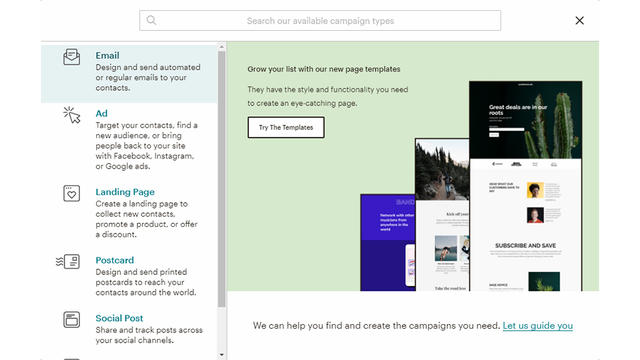
You already have a subscriber list, so it is high time that we set up a “campaign” in MailChimp language. To do this, open the tab Campaigns, at the top of your dashboard, and press Create Campaign. A dialog box with various campaign types appears. We keep it simple and choose this E-mail. Late Regular selected, make up a suitable campaign name and click Get started.
Via the button Add Recipients you can indicate the desired subscriber list in the drop-down menu; by the way, note that within this list you also belong to predefined segments like New Subscribers can limit. Even more: via Group or new segment you determine yourself the criteria of such a subgroup, such as Date Added is after a specific date. However, we simply leave here All subscribers in audience selected. Confirm with Save. With the buttons Edit From and Add Subject set the shipping address and subject line for your campaign.
Working with themes
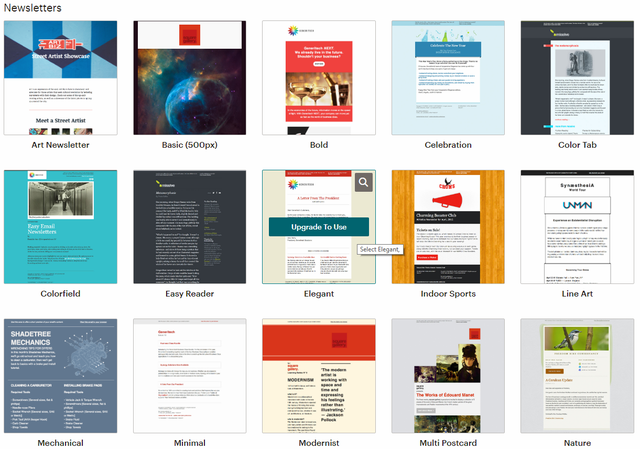
You have managed the administrative headers of your newsletter campaign, but you can still hardly notice the newsletter itself. With the button Design Email change that quickly. MailChimp comes with a whole range of templates for layouts and themes. Click here (for example) Themes and scroll to the category Newsletters: there is a choice of thirty copies. Unfortunately, only two appear to be available in the free version: Art Newsletter and Postcard. More options are hidden behind subscriptions.
Once you have selected a theme, you will end up in an online editor. On the left you get a preview, on the right a window with numerous building blocks with which you can further shape your newsletter. If you have accidentally left this design mode, you will quickly return from your dashboard: open Campaigns and click Edit Design.
The online editor turns out to be quite user-friendly. As soon as you hover the mouse pointer over an object in the preview, a semi-transparent window with some tools will appear. You can drag the object from here (Drag to Reorder), remove (Delete), duplicate (Duplicate) and edit (Edit Block).
Suppose the template contains an image that you want to replace with your own copy. Then click on Edit Block and in the right window on Replace. Then click Upload (or on Import from URL), select the imported image and confirm with Insert: the image will now be placed in your newsletter. To adjust it, select the image and choose Edit Block, Edit.
Via an online photo editor you can now adjust and embellish the image in many ways. Save your changes with Save.
Working with blocks
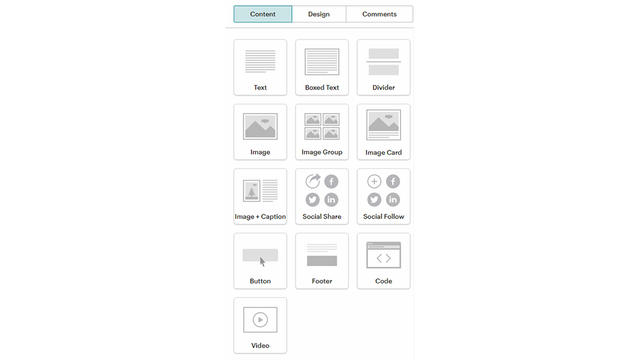
However, you do not have to limit yourself to the building blocks that are already included in the newsletter template by default. From the tab Content in the right window you can simply drag extra objects in your newsletter to a location with the notification Drop block here. To name just a few examples: (Boxed) Text, Image (Group), Social Share, Button, Footer, Video. You can then move, duplicate, edit or delete the newly added block just like the others.
To view the result in the meantime outside the online editor, you only have to Preview and Test to click. Select here Enter preview mode, you can still choose between one Desktop– and a Mobile-display. The Inboxdisplay, which simulates various mail clients, is reserved for paid subscriptions, but don’t worry: you choose Send a test email and you send the design to your own email address. Convenient is also Push to mobile, where you can view the design on your own mobile device.
Press Save and Exit to edit your design. Or click Save as Template if you want to save it as a template so you can use it for later newsletters. Keep in mind that in the free version MailChimp places a logo under your designs.
Send newsletter
Your newsletter looks slick and is finally ready for sending. MailChimp also takes care of this process. Go to your dashboard, open Campaigns and select the desired campaign. Double check or at To well whether the intended recipients are selected – if necessary, adjust this with Edit Recipients. Is everything okay? Then click the button at the top right Send and confirm with Send Now.
What if you don’t want to send the newsletter right now? Then you really don’t have to wait until the big moment has arrived. In this case, you click Schedule and determines the appropriate date and time. Confirm your choice with Schedule Campaign.
Analyzing reports
MailChimp also provides a handy analysis module for the sent newsletters. In your dashboard, go to the tab Reports. Select the desired campaign and press View Report for an overview of the most important analyzes. Here you will learn, among other things, how many users from your subscriber list have received and opened the newsletter when and which addresses are involved.
This is possible because MailChimp sends a tracker (web beacon) with the newsletter that registers all this. If you prefer to avoid that, open your – not yet sent – newsletter, scroll down to the bottom Settings & Tracking, click here Edit and uncheck it Track opens and / or at Track clicks.
Finally, MailChimp also tells which recipients unsubscribe from your newsletter. After all, the recipients will receive a link at the bottom of the letter with an unsubscribe option.
.