Get started with the word processing program Pages to create documents on your Mac. Type texts, format documents or add images.
Pages on Mac
The word processing program Pages comes standard on new Mac computers. It is part of Apple’s iWork suite and is similar to Microsoft Office’s Word. Create documents with text and/or images with Pages.
Is the program not on the computer yet? Download it for free from the App Store. Read how to do this in the tip ‘Download pages for free’.
Using Pages
Open Pages on a Mac with macOS 10.14 Mojave or later:
- In the Dock, click the . icon finder
 .
. - click on apps.
- Double click on Pages.
- At the bottom left of the window that opens, click New document.
- Click on the type of document you want to open. We leave ‘Empty’ selected.
- Click on the bottom right create.
A new document in Pages opens and word processing can begin.
Menus
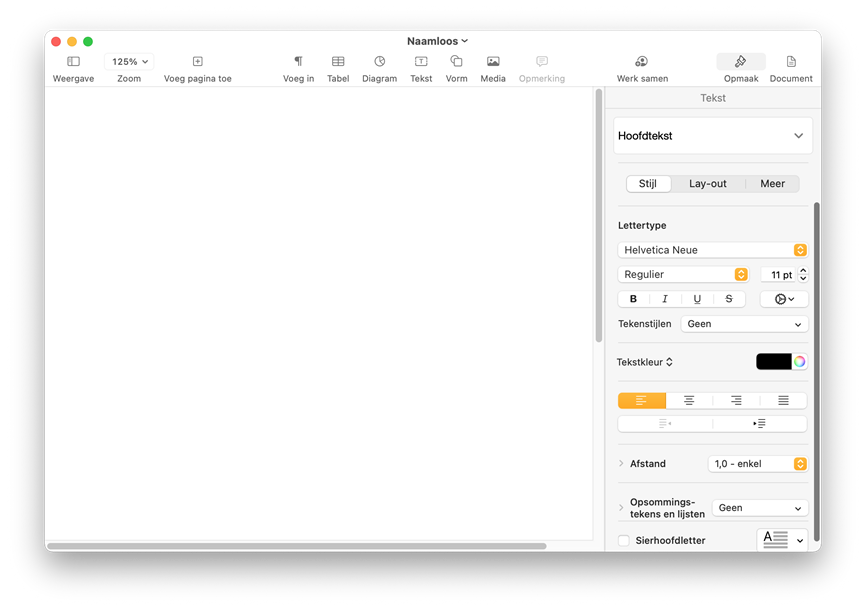
In Pages there are menus in three places. First of all, there’s the menu bar at the very top. Every program that opens on a Mac has a menu bar here. The buttons in the bar differ per program. All possibilities of Pages are accessible with the help of this bar. Frequently used options are also above and to the right of the text area. We will discuss some of these options later in this article.
Type text
As soon as a blank document opens, typing can begin. Hit the letters on the keyboard and the text will immediately appear in the large white area. That is similar to the sheet of paper in a typewriter. Unlike a typewriter, you don’t have to press the Enter key at the end of a line on the computer. Pages automatically continues on a new line at the end of the line. To create paragraphs, do press the Enter key. The cursor then jumps to the next line.
Select and delete text
Did you type something wrong? You can delete text with the Backspace key on the keyboard. To delete or format a large chunk of text at once, you can also select text. This can be done in several ways. The selected text is given a gray or blue background color.
- Select one word: double click on the word.
- Select a single paragraph: Click three times within the paragraph.
- To select more words or lines: drag the mouse pointer over the part to be selected while holding down the mouse button.
- Select the whole document: click on the menu bar Change > Select everything or use the keyboard shortcut Cmd+A. To do this, press the Cmd key and the letter A at the same time.
Formatting text
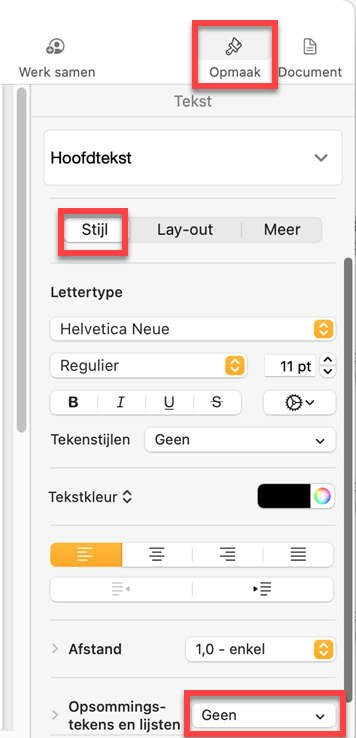
There are many formatting options for text. These are visible in the right menu. Shows either the options for formatting text or for the document. We now discuss formatting for text.
Under ‘Font’ and ‘Alignment’ you can find the following options for the text:
- Font style
 : click on the arrows and select a font from the drop-down menu.
 - text style
 : Click on the arrows and select a text style from the drop-down menu.
 - Font size
 : click on the arrows and select the font size from the drop-down menu.
 - make fat
 .
. - Make italic
 .
. - underline
 .
. - Text color
 : Click the color box and click the desired color. For more colors click on the color wheel.
 - alignment
 : By default, the text is aligned to the left. Click on one of the other three options to adjust this.
Add summary
Sometimes it is useful to use a summary.
- Select the text to be included in a bulleted list, or start on a new line where the bulleted text should appear.
- Make sure “Format” is selected above the right menu. Not the case? Then click on it. The same goes for ‘Style’.
- Click on the drop-down menu next to ‘Bullets and lists’.

- Click on the desired bullet.
The bullet appears on the paper.
Insert picture
Brighten up the document with an image. For an image from the Photos program, do the following:
- Click at the top of the window Media.
- click on photos.
- Photos appear on the screen. Click on the desired photo.
The photo is in the document and formatting options appear on the right.
To add an image elsewhere on the Mac:
- Click in the menu bar on add.
- click on Choose.
- Navigate to the correct image and click on it.
- click on add.
Save Document
Done working on a document? Then save it:
- Click in the menu bar on Archive.
- click on Keep.
- Type a name for the document. Note that all documents are given different names. Files with the same name will be overwritten.
- Navigate to the folder where you want the document to go.
- Finally click Keep.
The document can be opened again later with Pages.
Export document for Word
To share the document with someone who uses Microsoft Word, you must export the document.
- Click in the menu bar on Archive.
- click on Export to.
- click on Become.
- click on Next one.
- Type a name for the document.
- Navigate to the folder where the document should come
- Finally click Export.
The document is now saved with the extension .docx. The document can then be opened with both Pages and Word.