The timeline is your personal page on Facebook. It’s your profile that friends on Facebook can see. Set it up to your own taste.
What is a timeline?
You fill in the timeline yourself. In short, it is a chronological collection of photos, messages and videos that you share. Post highlights, life events and status updates to the timeline and all your Facebook contacts will be aware of your worries. In this article we explain how to adjust the Facebook timeline in the browser on the computer. It looks slightly different on the tablet or smartphone, but the options are the same.
Set Facebook cover photo
The timeline has room for a photo that people see when they visit your page: the cover photo. It appears above the profile picture and is the first thing people see about your timeline. It is therefore nice to place a personal photo there, for example of a holiday, your beautiful garden or your pet.
To add a cover photo to the timeline:
- Go to your timeline (click on your own name at the top of the screen). If necessary, click the down arrow first
.png) .
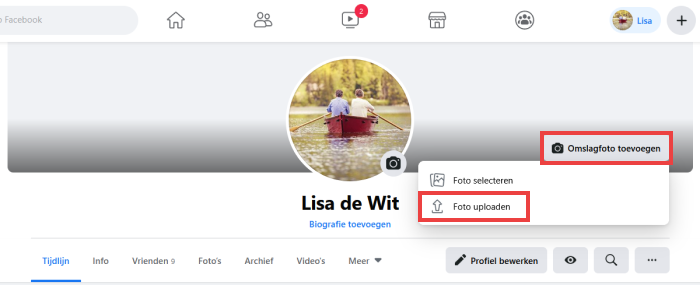
. - Click to the right of the profile picture add cover photo > Upload photo.

- Scroll to a photo, click it and click To open.
- If the selected photo is too small, you will see a notification. In that case click on OK and repeat the above steps with another photo.
- The photo will be in place. Usually not the whole photo fits in the frame. If necessary, drag the image for a different crop. You do this by clicking anywhere on the photo and holding down the left mouse button while moving the mouse.
- Click on the top right Saving Changes if the cut is to your liking.
- Is your position not to your liking? The next paragraph explains how to adjust this.
Adjust cover photo
How to change the current cover photo:
- Go to your own timeline (click on your own name at the top of the screen).
- Click the button in the right corner of the cover photo Edit cover photo.
- A drop-down menu will now appear with four options to choose from.
- click on Select photo if you want to use a photo you’ve already saved to Facebook. Click on a photo and drag it to the desired position.
- click on Upload photo if you want to use a photo that is on the computer. Scroll to the photo you want, click it and click To open. Drag it if necessary.
- click on Move to bring the photo a little higher or lower, for example.
- click on remove to remove the cover photo without replacing it with another photo. click on Confirm.
Don’t forget to click on the top right Saving Changes (except when deleting a photo).
update facebook status
Have you experienced or discovered something and would you like to share it with your Facebook friends? Then make a so-called status update. Here you can enter text, but also photos, videos, a link or a ‘feeling’.
- Click on your name or on the icon of a house in the top bar.
- Then click in this box that asks: “What are you doing, [naam]?”

- The ‘Create message’ window opens in the middle of the screen. Here you can create a status update and share it with friends. Read more about the options in the next paragraph.
- Are you ready to show the message to your Facebook friends, click the blue button Places.
Create Facebook post: the options
The window where you create a status update has many buttons and options. These options are intended to make your status as beautiful or cozy as possible. In the ‘Create Message’ window, click the three-dot icon to display all options. The most important options are explained:
.png)
Who will see my status update?
Decide for yourself who can see the message. Directly below your name is the option ‘Friends’ .png) . Click to select who can read the message. Other options are, for example, ‘Only me’, ‘Specific friends’ or ‘Everyone’.
. Click to select who can read the message. Other options are, for example, ‘Only me’, ‘Specific friends’ or ‘Everyone’.
Photos and videos
The great thing about Facebook is that friends can enjoy your photos and videos with you. Add photos and videos like this:
- Click on the green icon for Photo/video. If necessary, click the three-dot icon first.
- Select the file you want to upload. Then click on To open. It is also possible to post several photos and videos at the same time.
- Click on the text if necessary What are you doing, [naam]? and type an accompanying text for the photo(s) or video(s).
- click on Places when you are done.
Tag friends
Optionally add friends to a status update by tagging someone. In this way you indicate who you are or have been with.
- Click on the three dots and click on Tag friends.
- Type a name (in capital letters).
- Names appear as you type. Click on the person you were looking for.
You have now tagged a Facebook friend in a post. If you now share the status update, the message will also appear on the page of the tagged person. His/her friends can also see the message.
Add location
Let friends know where you are (or were) by sharing your location. If necessary, click on the three dots and click To check in. A location can be a city or village, but also a hotel or amusement park. Enter the name of the location where you are or have been, for example ‘Utrechtse Heuvelrug’. Suggestions often appear as you type. Click on one of the suggested locations to add it to the message.
decorate background
You can click on the rainbow colored block in the status update window. Then the background of the message you want to post will change. That’s nice if, for example, you don’t have a photo with a message. Read how it works in the tip ‘Facebook posts with background color’.
Feeling and activity
This option adds an emotion or activity to the message. Click on the yellow smiley icon or click on the three dots and click Feeling/activity. Now a menu opens with many different options. Click on an option that matches your message. The feeling or activity has now been incorporated into the message.
Life events
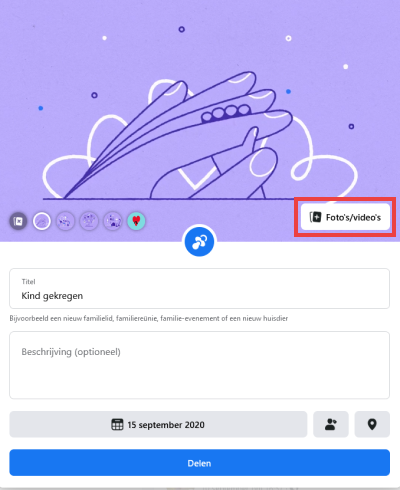
Another option is the ‘life event’. Indicate which important events in your life have passed or are yet to come. Think of a trip, marriage, diploma or the birth of a (grand) child. These events are additionally highlighted on the timeline.
Add a life event like this:
- In the window where you can also create a status update, click life event.

- Click on the desired category. Scroll down if necessary.
- Each category has subcategories. For example, who clicks on Family, can then click on New pet. If the event you want to share does not fall within an existing subcategory, click Enter a title.
- Fill in all the details, such as the title of the event, the location, who you were with, the date of the event and possibly write a nice report.
- An image is automatically placed that is appropriate for the chosen category, but you can also upload photos or videos yourself. click on Photos/Videos, choose a file and click To open. Repeat to use multiple photos or videos.

- Life events are automatically visible to ‘Friends’, so only Facebook friends can see this. You can adjust this. click on friends and choose another option in the drop-down box.
- click on To share.
Create photo album
In Facebook, you can neatly organize your photos into albums. For example, Facebook friends can easily view a photo album with holiday photos, for example. Read how to do this in the tip ‘Create a photo album in Facebook’.