If it bothers you that your Windows 11 computer automatically connects to saved wireless networks as soon as it comes within their Wi-Fi range, here’s how, with just a few clicks, you can disable this feature and prevent these connections. automatic.
As always with Windows 11, the option is available quite far in Microsoft’s Operating System Settings. But when you know the way through the menus dedicated to networks, this procedure only takes a few seconds.
Wi-Fi, a wireless network like no other…
In our file dedicated to the Wi-Fi network, we warned you about this very particular network connection. It is certainly very practical, but it may lack stability, speed, or even security for your Windows computer.
Wi-Fi can be a security nightmare for your system. Indeed, a hacker only needs the password of this wireless network to sneak in and access the computers and smartphones connected to it.
It then does not need much to lock your machines against a ransom, or even collect your personal data, whether to sell it on the Dark Web or to use it for malicious purposes.
So you may, for a lot of reasons, not want your computer to automatically connect to a Wi-Fi network, public or private. Whether it’s for lack of confidence in its security or simply to preserve your laptop’s battery.
Here is the procedure to follow to disable the automatic Wi-Fi connection of your computer under Windows 11. And as always, it is simple and fast.
Windows 11: prevent automatic Wi-Fi connections
Unfortunately, there is no option to prevent, at once through a single checkbox, all automatic Wi-Fi connections. It is only possible to perform this maneuver with the wireless network on which your computer under Windows 11 is connected to access the Internet. So Wi-Fi network by Wi-Fi network.
As always, you have to go to Windows 11 Settings, and more specifically to the “Network and Internet” section. In this settings menu of your Windows computer, click on the “Wi-Fi” pane to enter the sub-menu dedicated to this wireless internet connection.
Note that, if you wish, you can already completely deactivate the connection to the wireless network via the checkbox available on the Wi-Fi banner. Your Windows computer will no longer be able to access the Internet. via Wi-Fi. But if you want to prevent automatic connections to the Wi-Fi network you’re using, you should proceed.
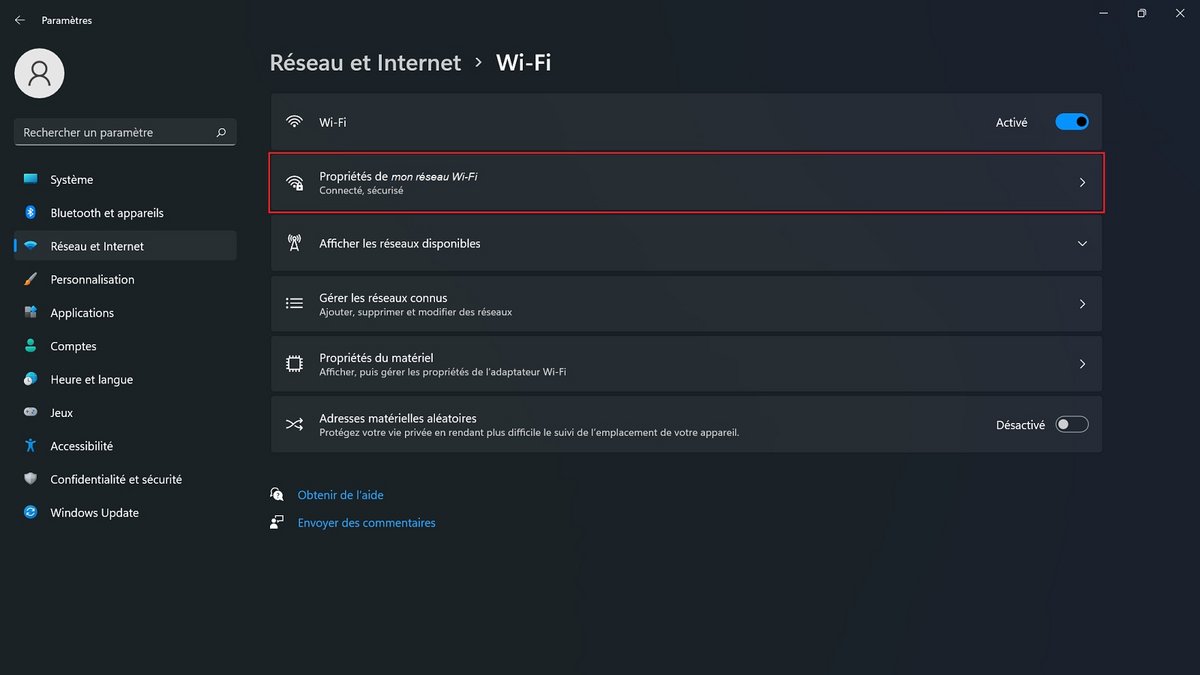
In the Wi-Fi sub-menu of the “Network and Internet” settings of your computer under Windows 11, click on the pane “Properties of [réseau Wi-Fi] to access the characteristics of this wireless network and its detailed options.
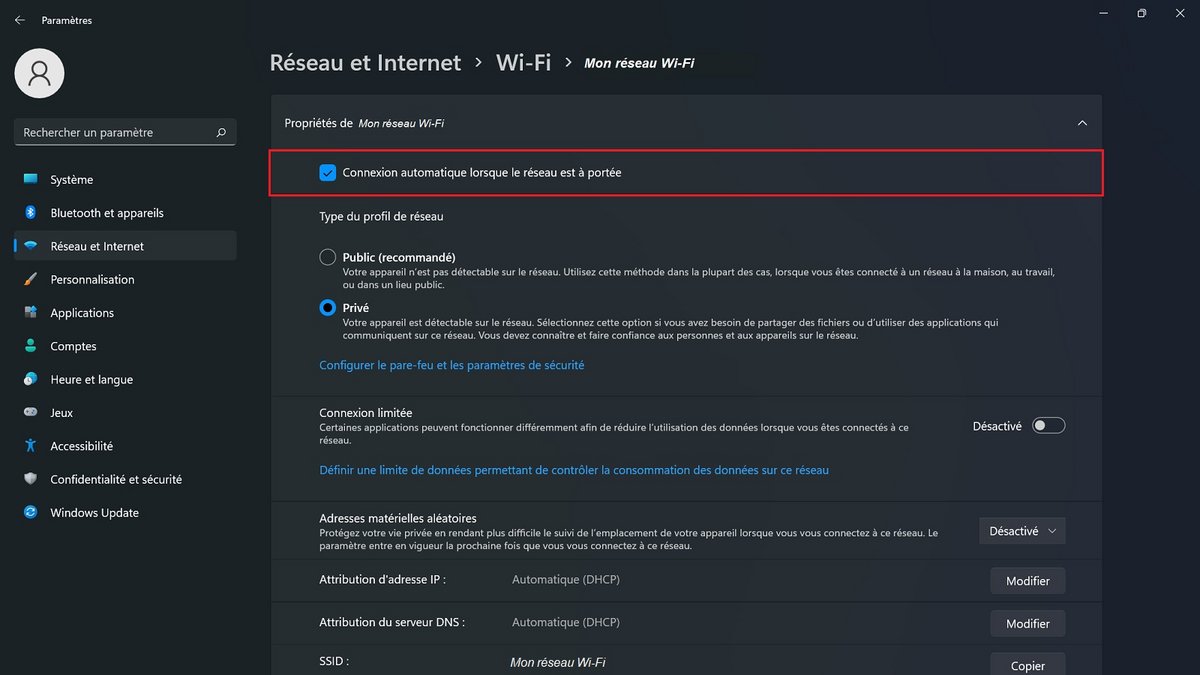
Once in the settings screen of the Wi-Fi network to which your computer is connected in Windows 11, simply uncheck the option “Automatic connection when the network is within range”.
Thus, your computer will no longer automatically connect to this wireless network; you will need to activate this connection manually when you want to access the internet.
.