iTunes is an Apple program that allows you to manage and play your digital media collection (music, movies, etc.). Import your own music CDs or buy new songs from the built-in store, the Apple Store. You can also use iTunes to transfer music to your iPod, iPhone or iPad.
Mac or Windows?
iTunes comes by default on Mac computers. Windows users can download iTunes from the Software article. In it you will find an explanation about the installation of iTunes.
Launch iTunes
After installing the program, launch iTunes via Start > iTunes. Or click on the shortcut on your Desktop. On a Mac, open the program via finder > Programs > iTunes.
- Optionally, close the ‘iTunes videos’ window by clicking the cross in the top right.
- You will see the iTunes welcome screen. click on Agree.
fill iTunes library
To play music through iTunes, you need to add the files to the iTunes library. That can be done in different ways. To add music files already on your computer to the library:
- In iTunes, click File > Add file to library. If your music is together in a folder, choose Add folder to library.
- The Explorer (Windows) or Finder (Mac) opens. Browse to the correct file. If you want to load a number of songs at the same time, hold down the Ctrl button (Windows) or Cmd button (Mac) and click on a number of songs. Release the button.
- click on To open.
The music is now in the iTunes library. Automatically, the songs are sorted by the same artist, album or genre. Adding movies and other media works the same.
Import music CDs into iTunes
Another way to add music to iTunes is to import your own music CDs. The music on the CD is then made digital and put on your computer in iTunes. This goes like this:
- Insert a music CD into your computer’s CD player.
- After a while a window will appear asking if you want to import the CD. click on Yes.
- A window may appear asking if you want to share information about the music with Apple. click on Send or do not send. This is your own choice.
- All tracks from the CD are now converted one by one into a digital file that iTunes can read and play. This may take some time. At the top of the iTunes window you can see the progress by song. Songs that have already been imported will have a checkmark (in a green dot). Wait for all numbers to be converted.
The program takes over all information from the music CD automatically. You do not have to enter the artist, the titles of the songs, the name of the CD, the duration of the songs and such things yourself.
Where is the music now?
You have just imported a CD and the songs are visible in iTunes. To return to the overview of your music library, do the following.
- Click on the eject button after the CD name
 .
. - The CD comes out of the computer and iTunes automatically returns you to the music library.
music library
You can browse the music library in several ways, including Songs, Albums, Artists, Genres, and Music Playlists. The first four mainly determine how you see the music in front of you: by song, album, artist or genre. These options can be found on the left side of the window. The category you are using will turn dark gray. The option ‘Playlists’ offers you the possibility to collect music yourself that you like to listen to one after the other. You can read more about this later in this article.
What if music is not properly sorted?
When you import or purchase music from a CD from the iTunes Store, iTunes automatically adds information (such as the title, singer, or group). But music you download from the Internet may contain incomplete information. Therefore, you can manually complete this information.
- In the iTunes library, right-click on a music file and choose . from the drop-down menu Show info or Info number.
- Fill in missing information and click OK.
Listen to music
Playing music is very simple: double click on a song, album, artist or genre and the music starts. Click the pause button at the top left to stop the music. Click the play button again if you want to continue listening.
Meanwhile, you can browse to other music by clicking once on an item. Once you’ve found a song you’d like to play next, click the three dots icon to the right of the song. This appears when you hover the mouse pointer over the song. Then click Play next or Play next.
Create playlists
If you have a lot of music, you will enjoy making selections of songs you want to hear for different occasions. Making such a selection is easy in iTunes.
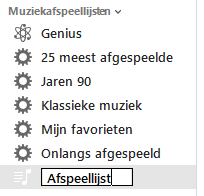
- Right click on Music playlist.
- click on New playlist.
- Under ‘Music playlists’ a new line will appear called ‘Playlist’. The text is already selected. Type a name and press the Enter key.
- You can always change the name of a playlist. To do this, double click on the name of the list.

You can now add music to the playlist:
- Browse the library for the songs you want to add to the list. Drag a song to the list on the left. You do this by clicking on a song, hold down the mouse button, move to the playlist and release the mouse button.
Buy music from the iTunes store
You no longer need to buy new music in the CD shop. You can also do that online through the iTunes Store (iTunes’ online store).
- You will find the button to go to the iTunes Store on the right side of the screen. click on store and the store will open (you go back to your own music by clicking Library).

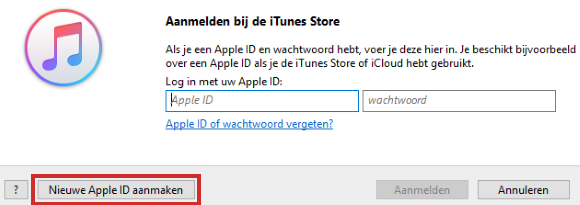
- Before you can purchase music, you must create an account in which you provide payment information. For example from your credit card or from a ‘ClickandBuy’ account that works via direct debit. The account you create is called an Apple ID. If you already have an Apple ID, for example because you created it for an iPad, you can log in directly via the options Account > To register or Login. Then log in with your details.
In the next section we will create an Apple ID.
Create an Apple ID
We now show you how to create an account:
- click on store.
- Click on the right side of the screen under ‘Music’ account.
- A login window will appear. click on Create new Apple ID or Create new Apple ID.

- Click behind ‘Email’ and enter your e-mail address.
- Click behind ‘Password’ and type a password’. Click behind ‘Confirm’ and repeat the password.
- Place a checkmark in front of Click Continue to confirm that you agree to Apple Media Services Terms and Conditions.
- click on Continue.
Creating an Apple ID: Entering Personal Information
- Enter your email address. This will be your username in the iTunes Store. Apple calls this username the “Apple ID.”
- Think of a password, enter it after ‘Password’ and again after ‘Verify’.
- Enter your date of birth by selecting the day and month. You enter the year yourself.
- Choose three questions and then fill in the answer. With the control question, Apple is building in extra security. For example, if you have forgotten your password, you can request it, but you must first answer the control question that you have devised. Use a question whose answer cannot be found by everyone. For example ‘what was your favorite children’s book?’
- click on Continue.
Create an Apple ID: Enter payment information
You can pay with your credit card, an iTunes gift card or with a ‘ClickandBuy’ account that you can create after clicking ClickandBuy. We show the credit card.
- Enter your credit card details and your address.
- Then click Continue.
Create an Apple ID: Verify Account
- You’ll see a message in iTunes that an email has been sent to the address you provided. Wait for this message to arrive and then click on the link in the email to activate your account.
- After your account is activated, in iTunes, click Ready.
- You are now in the iTunes store, where you can now purchase music.
Buy music
After you create an account, you can purchase music. For example, you can browse the iTunes Store. But you can also search for music.
- Click in the search box at the top right.
- Enter the name of an artist you want to look up music for to buy, for example ‘Marco Borsato’. You will then see an overview of all music by Borsato that is for sale in the store. You can purchase individual songs or entire albums.
- First listen to a part of a song by clicking the play button in front of the title.
- You can buy something by clicking on the button next to the album or song that shows the price in euros. After clicking this, a window will appear in which you must enter your Apple ID and password. Fill this in and click Buy.
- iTunes asks for confirmation of your purchase. click on Buy. If you don’t want to see this window again next time, check first Don’t show song purchase notification again.
- The song, or album, will now be downloaded to your library.
- When you click under ‘Library’ on Purchased click, you will see which albums/songs you have purchased. The song is also in your music library. Click on Music. Music playlists now also includes the ‘Purchased’ playlist.
Do more with iTunes
- In the article ‘iTunes: Sync iPad or iPhone’ you can read how to put music on the iPad via iTunes on the Windows PC.
- In the article ‘Synchronize iPad or iPhone via iTunes (Mac)’ you can read how to transfer music to the iPad via iTunes on the Mac.
Since Apple updated the operating system to Catalina (macOS 10.15), iTunes has been split into several music, movie, and podcast services. For music, use the Music app. Read more about this in the ‘Use Music App on Mac’ article.