In the Mail app of Windows 10, creatives can nicely format their messages with, for example, a photo or a self-made drawing.
What is Mail?
Mail is the mail program that comes standard with Windows. Create an account first, if you don’t already have one.
Create new message in Mail
Start Mail and create a new message:
- In Mail, click at the top left new e-mail or on the plus sign.
- An empty message opens on the right side of the window. After ‘To’, enter the recipient’s email address.
- Type a subject on the “Subject” line.
- Click in the white text field to type your message.
- Type a message.
Format the email
There are two ways to format a message: before you start typing or after the text is ready. We explain how formatting works with a message that has already been typed.
- The formatting functions are on the ‘Format’ tab. If necessary, click this tab to access the features.
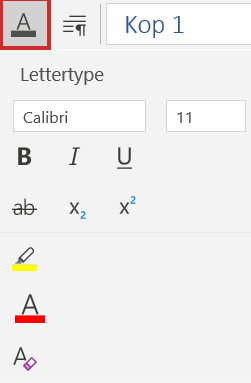
- Click the underlined A to see all formatting options.

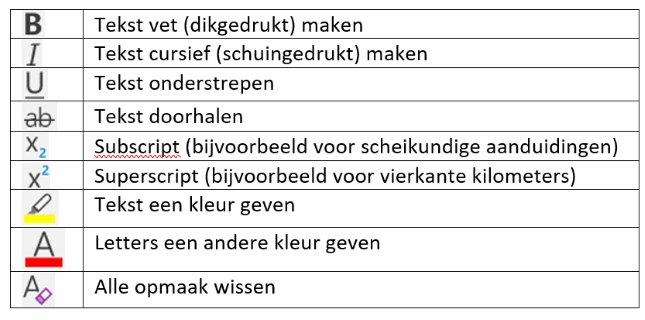
At the top are the font size and active font. Below are some other features:

The Format tab (with quotes) has a more extensive menu when the window is maximized:

Some of the functions are now immediately visible. The other functions are visible via the down arrow to the left of the first vertical thin line.
Formatting Typed Text
- Select the text you want to format, for example a sentence to be bold.
- If you don’t see the extended menu, click the button character format (the underlined A).
- Click on the desired formatting tool, such as the B. The selected text becomes bold.
In this way you also make the text italic, underline it or apply the other functions.
For example:
- Select the text to which you want to apply formatting. Now we are going to highlight a sentence.
- Press the button character format (the underlined A).
- Press the button To mark (pen with yellow stripe below). The selected text turns yellow.
You have formatted the existing text. Use the same buttons to format text as you type. Then click on the desired function beforehand, so before typing a word or sentence. Click it again when the correct words or sentences have been formatted.
Put photo in an email
Photos are often sent as an attachment to an email. The photo is not immediately visible, the recipient has to open it first. But the picture can also be in the email itself. We don’t recommend this for a few, but if you want to send one or at most a few photos, it’s possible. The recipient will then immediately see the images in the text of the email. This is how it works in a new mail message or a reply to a received message:
- Place the mouse pointer where you want the photo to go.
- Click on the tab Insert.
- click on Pictures.
- The Explorer opens. Open the folder containing the photo.
- Click on the picture.
- click on Insert.
The photo appears in the email. There are dots in the corners. Drag it to make the photo larger or smaller. When the photo is selected, there is also a separate tab above the email. Here you will find functions such as rotating the photo and cropping it. Don’t see this tab? Click on the photo to select it. The dots and the tab will reappear.
Sign in a message
In the Mail app, people can also draw. An ’empty paper’ will appear on which you can indulge your creativity. The drawing will be sent by e-mail. Drawing can be done with the mouse or with a touch screen, drawing tablet or trackpad on the laptop.
- Place the mouse pointer where you want the drawing to be.
- Click on the tab Draw.
- click on drawing paper.
- On the screen, a drawing sheet is placed between gray lines. There are white dots in the lines. Dragging it will make the paper larger or smaller.
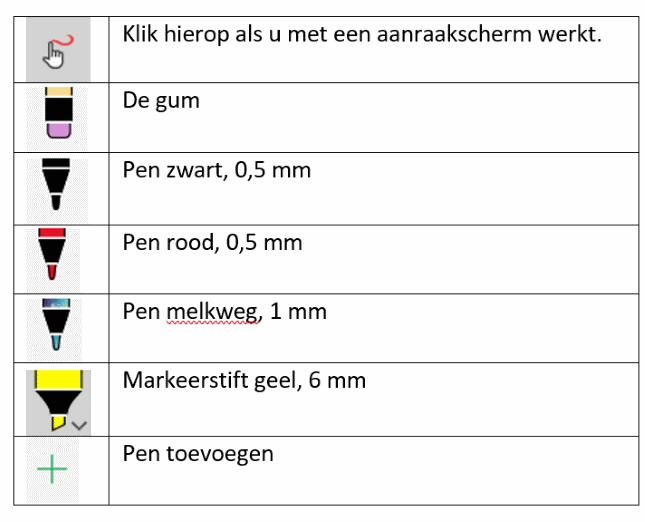
- Click on the pen you want to draw with.

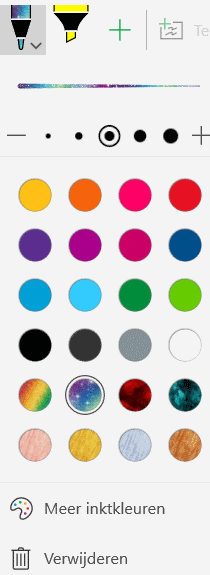
- Would you like to choose a different color? Click the pen button again to see the available colors:

- Make the line of the pen thicker or thinner at the top of the drop-down box using the plus or minus sign.
- Click on another color to draw with it.
- More colors can be found via the button More ink colors.
- Better stay away from the button remove, this removes the pen from the menu.
- Click outside the color menu to see the canvas again.
- Draw a drawing with the mouse pointer.
- Alternate with pens and colors as above.
Do you not want to send a drawing? Click on the white arrow to the left of the options for the pens, right-click on the drawing and choose remove. The drawing disappears.
- Send the email in the normal way.