Whether it is to secure your connection and your internet browsing or to access content that is unavailable (or cheaper) in your country of origin, a VPN is there for that. A VPN like WireGuard, offered by Free, on your Freebox.
In this tutorial, we explain how to activate the WireGuard VPN server included for free on the Freeboxes: Révolution, mini, One, Delta and Pop. Your Freebox must be in version 4.5. If not, just restart your box. To use it, you will need to install the WireGuard client on each of your devices using the users created.
Activate the WireGuard VPN server on your Freebox
1. Go to the interface of your Freebox
- Open a browser and go to mafreebox.freebox.fr with a computer connected to your box via Wi-Fi or Ethernet
2. Connect to the administrator area of your Freebox.
By default, you arrive in guest mode. You will have to log in as an administrator to access the WireGuard and Freebox settings in general.
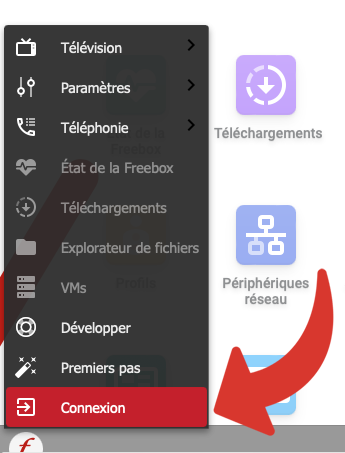
- Click on the Free logo, represented by a white circle with a red “f” located at the bottom left
- Click Login

- Enter the admin password
Note: if this is your first connection, follow the instructions that appear to find the password and personalize it.
- Validate with Login

3. Enter the Freebox settings.
Now that you are connected, you will be able to enter the Freebox settings.
- Double-click Freebox Settings. It’s the 4e icon, dark red, with two cursors.

4. Enter advanced mode.
To be able to configure a WireGuard, you must enter advanced mode.
- Click the Advanced Mode tab at the top of the window

5. Go to VPN Servers Settings.
More options are available to you.
- Double-click on VPN Server, in the 1D part, Internet connection. A new window opens

6. Enter WireGuard configuration.
To be able to activate WireGuard:
- Click on WireGuard, in the left menu, at the very end

7. Enable WireGuard.
Now that you are in the WireGuard configuration:
- Check Enable
- Validate by clicking on Apply at the bottom of this window
Note: you can leave the Port and MTU fields as default.
An empty list of users appears. You will need to create one user per device.

8. Go to Users.
- Click on Users, in the left menu

9. Add a user.
To add a user:
- Click Add User, at the top of this window

10. Configure a user.
Next, choose WireGuard from the drop-down list next to “VPN Server Type”.
Choose the login of your choice. You can leave the default fixed IP.

11. Validate your new user.
Once the user is configured:
- Validate with Save
The list of users appears. You can click the pencil to edit the user. The login cannot be modified. You can delete a user with the trash can icon.
Repeat these steps for each device.

12. Check the list of users in WireGuard.
Return to the WireGuard menu and see that the previously added user is present.
You will then have the choice to click on the diskette to download the configuration or to click on the QR code to display it in large size and scan it.

For further
We have just had to know how to activate your own VPN server with WireGuard integrated into your Freebox from Freebox OS 4.5 on the Freebox Revolution, Mini, One, Delta and Pop. Now, to use it, you will need to install the WireGuard client on each of your devices. The WireGuard application is available for all platforms: Windows, macOS, Android, iOS and Linux. Attention ! You will need to create one user per device.
If you want to customize the default port to use WireGuard, be sure to choose one from the range of ports assigned in IPV4 to change it in Port Management.
.