Back when Macs came with hard drives, we all had plenty of space on our Macs, but the solid-state drives that power our Macs today have more limited capacity, and high-resolution videos, photos , music and other essential files take up more space than ever.
Lack of space can really hamper your Mac: if you want your Mac to run fast, you need to make sure that 10% of your storage space is free at all times, otherwise your Mac can really slow down (read: How to speed up a Mac). At worst, if you don’t remove some of the things that take up storage space on your Mac, you might not even be able to start it one day because the startup disk is full! You may see warnings that your startup disk is almost full. You should not ignore them.
Remove Duplicates with Smart Folder
Unnecessary files par excellence, duplicates are the first ones you should try to get rid of. The reason is simple: they do not ask for any arbitration and will not leave any conscience in the event of permanent deletion. Even if the storage manager is, as we will see right after, very useful when it comes to identifying and destroying large files, it is less efficient in effectively identifying duplicates. Fortunately, another method native to macOS exists to identify them: smart folders. Here’s how to create one.
1. Start by opening the Finder.
2. You will then have to go find the “File” tab in the top bar and then click on “New Smart Folder”.
3. Once created, click on the “+” located in the upper right corner of the window.
4. Finally, without touching the “Type”, select the nature of the file you want to display instead of “Any”.
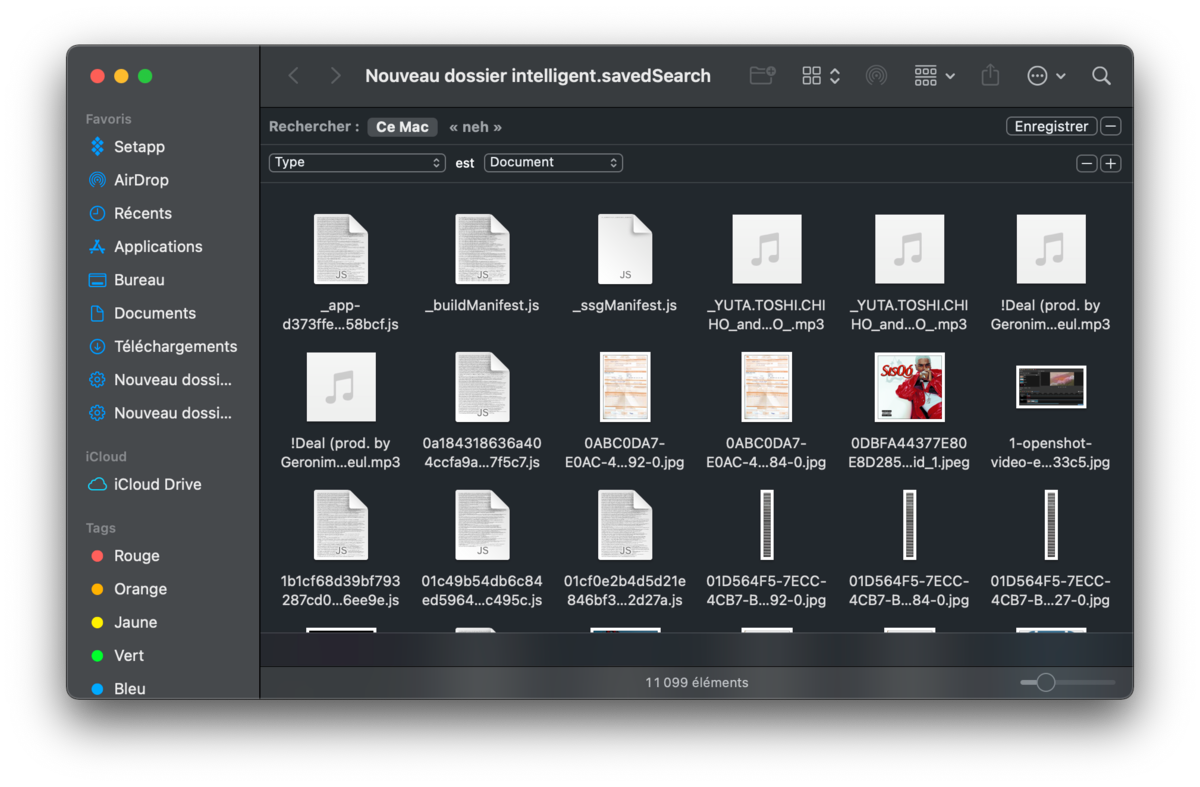
5. All the files corresponding to your parameters will be displayed in alphabetical order, all that remains is to delete the duplicates by hand.
Delete apps you don’t use
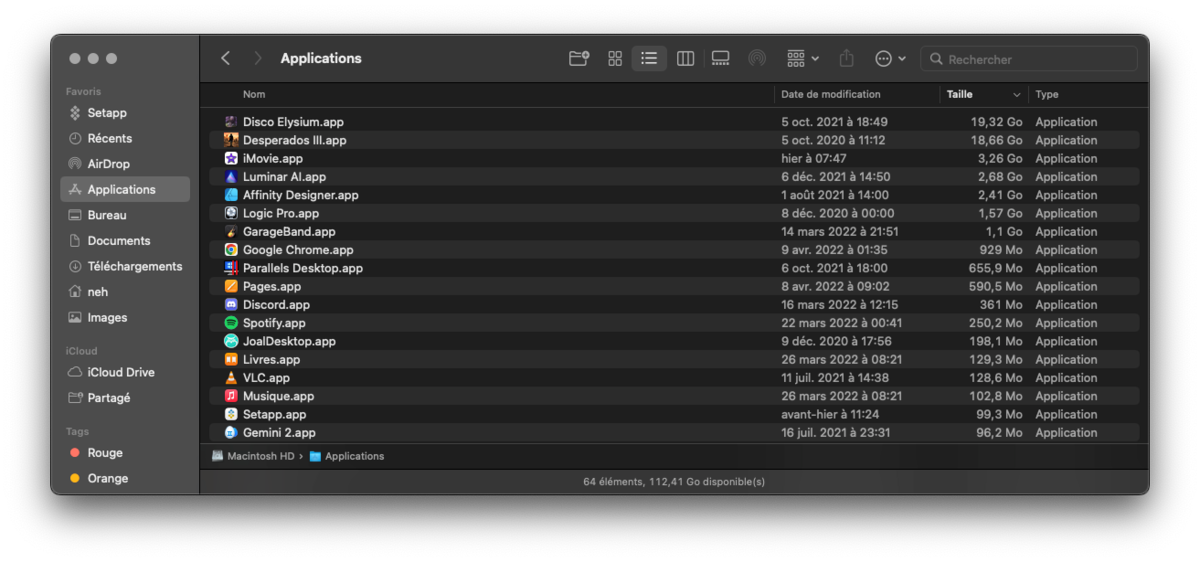
The applications you have installed on your Mac obviously take up space. You should uninstall them if you don’t need them: open a Finder window, select Applications in the sidebar, then drag the app icon to your dock’s trash. Some of these apps can take up a lot of space.
To find out which applications are taking up the most space, open a Finder window and select Applications. Then click on the “Size” tab to sort the installed apps by size.
Free up space without deleting files with compression
For large files or folders that you don’t want to delete, you can compress them to save space without having to delete them. Compression reduces the space occupied by files.
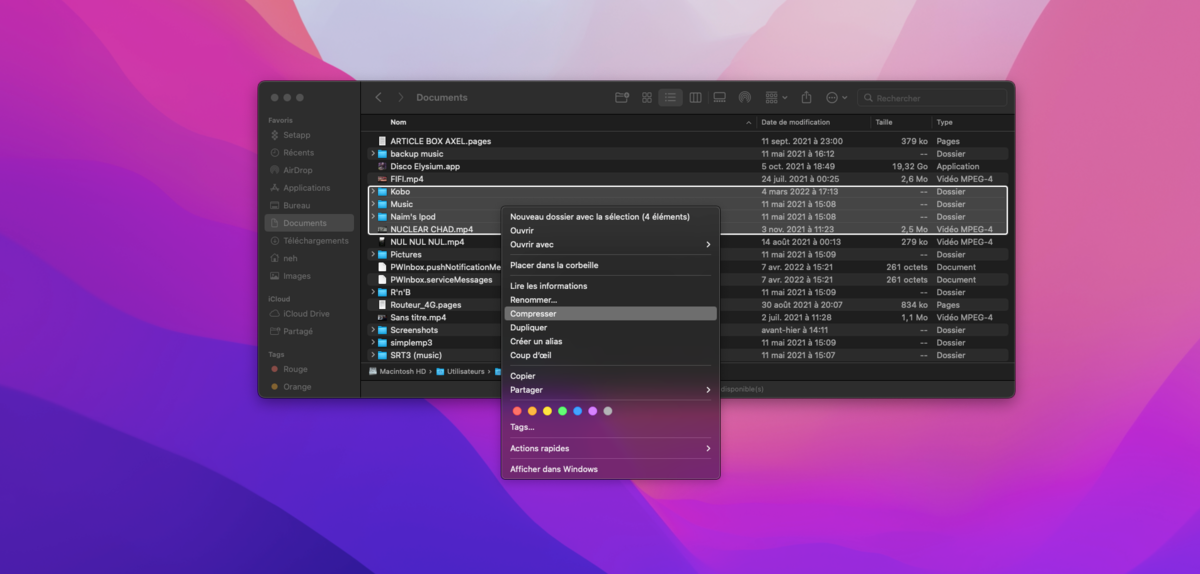
macOS has offered a native solution for a few years to compress its files. To do this, simply select the files and folders to compress in the Finder and select Compress from the context menu opened by right-clicking. The archive created will be in ZIP format and can be decompressed at any time with a simple double-click.
Delete temporary files
Your Mac’s hard drive probably contains temporary files that you don’t need. These files often take up disk space for no good reason. macOS tries to delete temporary files automatically, but a manual run will likely find more files to clean up. Cleaning up temporary files won’t necessarily speed up your Mac, but it will free up some of that precious disk space.
Read also:
How to clear cache on Safari?
Your web browser has a built-in option to clear browsing data that you can use to quickly free up some space, but that’s not necessarily a good idea. These caches contain web page files so that your browser can load web pages faster in the future. Your web browser will automatically start rebuilding the cache as you browse, and this will only slow down web page load times as your browser’s cache grows. Either way, every browser limits its cache to a maximum amount of disk space.
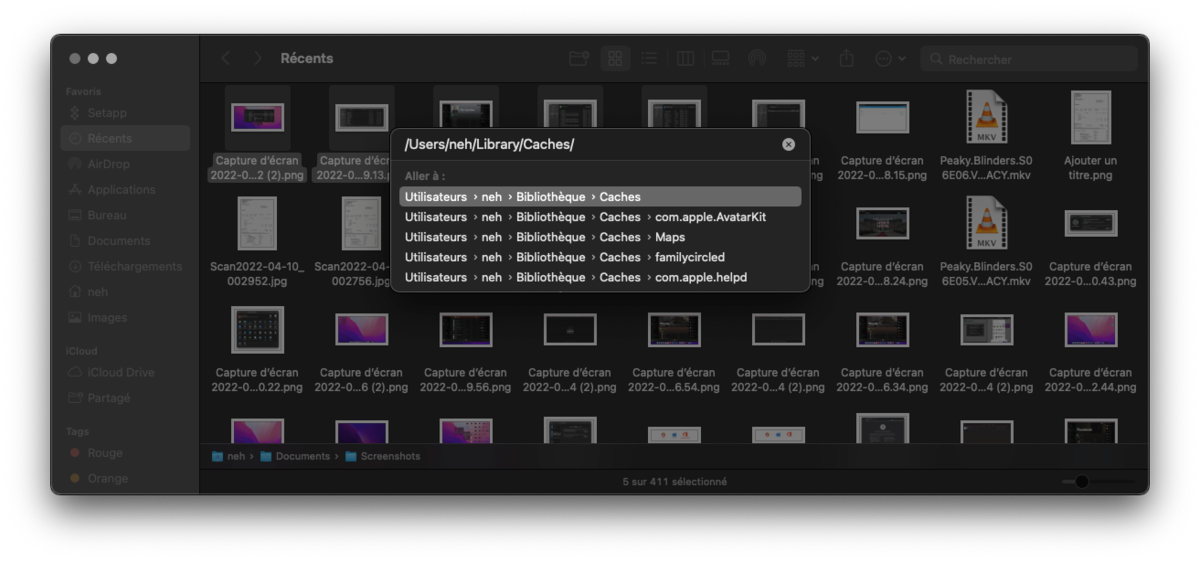
There are many other temporary files on your system, which you can see by opening Finder and going to the corresponding folder.
1. Open the Finder.
2. Use the command Shift + Command + G. A window with a path to enter should open.
3. Enter the path ~/Library/Caches and press Enter.
This will take you to the folder containing temporary files and system cache. You are free to delete what you need to recover the necessary disk space.
Delete application language files
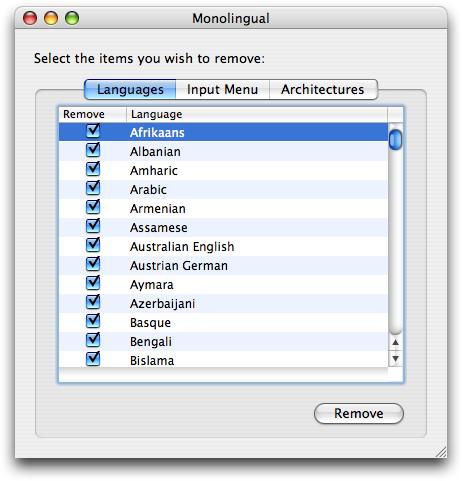
Unless you’re a polyglot, you don’t need all of the language files that each of the apps installed on your Mac includes. Deleting them by hand is certainly possible, but this procedure remains tedious and dangerous. Fortunately, a developer had the good idea to develop a small utility called Monolingual. This software allows you to remove unused languages and architectures from each of your applications to free up several hundred megabytes of space.
Store files in iCloud

Storing your content on iCloud, Apple’s cloud storage service, allows you to save space on your computer while having easy access to your files. When storing files in iCloud, you can choose one of three options:
Office and Documents
iCloud stores all files located in these two folders. When your Mac is running out of storage, only recently opened files are stored on your Mac. Files stored in iCloud have a download icon (a cloud with an arrow pointing down). To access files stored in iCloud, simply double-click the icon to download the file.
Pictures
iCloud stores all your photos and videos in their original format, at full resolution. When your Mac is low on storage, only space-saving versions of your photos are stored on your Mac. To download the original version of the photo or video, just click on it to open the file.
Posts
iCloud stores all your messages and attachments. When your Mac is low on storage space, only recently opened messages and attachments are stored on your Mac.
Note that Apple users automatically get 5GB of storage space for free, but if you need more, you can purchase more iCloud space for a monthly fee starting at 50GB for $0.99 per month.
Delete iPhone and iPad Backups You No Longer Need
If you backed up your iPhone or iPad to your Mac using iTunes or Finder, you probably have a bunch of massive backup files taking up a significant amount of space. It’s pretty easy to access it using the native macOS storage manager.
1. From the Apple menu in the left corner of your screen, choose About This Mac.
2. Click the Manage button to open the Storage Manager:
3. Select iOS Files from the side menu and delete backups you no longer need.

If you do not want to part with these backups, it is also possible to move them to an external hard drive. They are in a folder accessible in this way:
1. Open the Finder.
2. Use the command Shift + Command + G. A window with a path to enter should open.
3. Enter the path ~/Library/Application Support/MobileSync/Backup and press Enter.
For further :
- Your Mac is slow? Here are 13 points to check
- The best antiviruses for Mac
- The best cleaning software on Mac
.