 You can put videos together with the Photos app in Windows 10. So make a nice video without a professional editing program.
Create a slideshow from your own photos
The Windows Photos program is not a video editing program, but it is very suitable for sequencing images (photos and/or videos) and turning them into a nice movie.
Create a video manually or automatically
Photos has two video options: compose a video with music yourself or have a video made. In both cases, select which image material appears in the video. If you are not satisfied with the automatic video, you can switch to composing it yourself. Users can then embellish images with texts, filters and music. Start like this:
- Click the Start button > photos.
- Click in the menu (top) on video editor.

Create automatic video in Photos
An auto-generated video is made quickly, but there’s a chance it might go too fast or not to your liking. Fortunately, you can easily switch from an automatically generated video to editing the video.
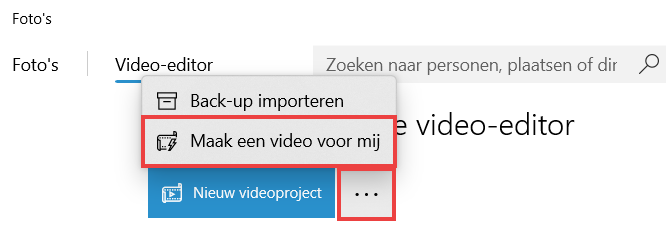
- Next to ‘New video project’, click the three dots icon.
- Click on Make a video for me.

- Click on the photos and/or videos you want to add to the video remix. Tip: click above a group of photos All [getal] Selecting if you want to use all the footage from a specific date.
- Click at the top To make.
- Remove the “Name your video” text and type the name of the video. It will also appear on the title page.
- click on OK.
- The video is created and plays right away.
- Are you so satisfied? click on Complete video > Export. Change the name of the file if necessary and click Export. The video will open immediately when the export is complete.
- Not quite satisfied yet? click on Video editing.
Skip the next paragraph. In the following paragraphs we describe the possibilities in terms of editing. These are the same options as when creating a non-automatic video (New Video Project).
New video project: set everything yourself
If you don’t like the automatic videos or who prefer to be in control anyway, it’s better to start with a clean slate.
- click on New video project.
- Under ‘Project Library’, click Add and choose where to get the photos/videos from. We choose From this PC.
- The Explorer opens. Click on the photos and/or videos you want to add to the video remix. Tip: Select multiple files at once by holding down the Ctrl key and clicking the photos/videos you want to use.
- click on To open.
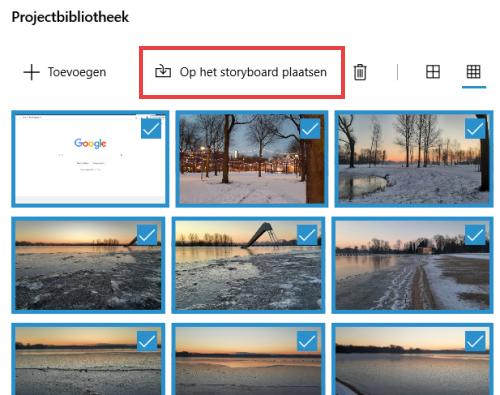
- The files are in the project’s library. Now they still have to go to the timeline at the bottom of the screen, where the editing takes place.
- If necessary, select the files you want to use. To do this, click on the squares in the top corner of the thumbnails. If it has a blue square with a check in it, the file is selected.
- click on Post to storyboard.

- A video will appear on the right for you to play. Click the play button below the image
 to see what the result is.
In the following paragraphs we describe the possibilities in terms of editing.
Change order, footage and speed
Editing the video is done in the so-called ‘storyboard’ (pronounced: storyboard). It’s kind of a timeline of the video. It looks like this (but with different images):

Delete image clip
- Click on an image in the timeline.
- Click the trash can icon on the right, above the timeline.
Add image clip
- Go to the image to be added under ‘Project Library’.
- Click on it and drag it to the timeline.
- Is the correct image not yet in this library? First click Add > From this PC and open the correct file. Then drag it to the timeline.
change order
At the bottom is the order in which the image fragments are used in the video. This order can be changed.
- Click on an image and drag it to another location while holding down the mouse button. The fragments move quite quickly, so it can take some practice, especially if you use a lot of images and the timeline is long.
Tip: Sometimes repositioning an image is faster than dragging it to the right place. Delete the image from the timeline. Click in the timeline on an image fragment where the photo/video should appear. Click on the image in the project library and click on Post to storyboard. The image appears to the right of the selected clip.
Adjust how long a photo is shown
There is a number on each image fragment in the timeline. For photos, the default is ‘3.0’. This means that the image is shown in the video for three seconds. You can adjust this.
- Click on a photo in the timeline.
- Click above the timeline Duration.
- Click on one of the options (1,2,3,5,7 seconds). Or click on the bottom box, type your own number and press the Enter key.
Tip: do you want this for multiple clips at the same time? Select all photos that should have the same duration. To do this, click on the square in the right corner of the image. A blue check mark will appear to indicate that the clip is selected. Don’t forget to uncheck all the check boxes before doing any other edits.
Add title card and music
If desired, add a title card (or create the automatic video’s as desired). You can also add music to the video.
Insert title card
- Above the timeline, click the three dots icon > Add title card.
- A colored area appears on the right. Here’s what you’re making.
- Click above the timeline Background and choose a color.
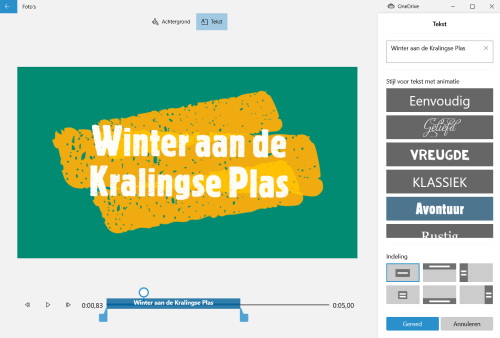
- Click above the colored area Text.
- Delete the word ‘Title’ in the top right and type here what you want on the title card. For example: ‘Holiday Portugal 2018’.
- If desired, under ‘Animated text style’, click one of the options such as ‘joy’ or ‘classic’. Click the play button at the bottom left to see what the animation looks like. Don’t want any of those moving things? Then click on Simple.

- Under ‘Layout’, click one of the options to determine the position of the text.
- Finished? Click at the bottom Ready.
- You will return to the timeline. Don’t forget to drag the title card to the correct spot on the timeline if necessary.
- Edit the title card later? Right click in the timeline on the title card and click To process > Text or Background.
Add standard mood music
Photos has a library of mood music to put under the video.
- Click above the video preview Background music.
- A list of songs appears. Click on the play button for a song to listen to it.
- Made a choice? Click on the song to select it.
- Under the list, if necessary, click the box for ‘Synchronize video to the beat of the music’. As a result, the jumping of image fragments happens more to the music.
- click on Ready.
Add your own music
- If you want a tune from your own music library, click at the top Custom audio.
- click on Add audio file.
- The Explorer opens. Navigate to a music file and click To open.
- Check out how the video comes across with the music on the left.
- Isn’t this quite it? Then try another song. Click on the cross in the right corner of the audio file and add another music.
Please note: if you want to make the video public later on YouTube or elsewhere, you may only do so with royalty-free music. You cannot use music from your favorite artist.
Add filters, text and effects
The buttons above the timeline allow you to make even more adjustments. In addition to ‘Duration’, you will also see ‘Text’, ‘Motion’, ‘3D effects’ and ‘Filters’ for a photo. A video also says ‘Cut’, ‘Split’ and ‘Speed’. We discuss the options below. Always click first on the image fragment in the timeline that you want to edit.
Filters
- Choose a color filter for this particular image.
- click on Ready if you have found the correct filter or continue editing text or motion from this window. These options are at the top of the screen.
Text
- Type a piece of text in the ‘Type your text here’ field.
- Click on a style of your choice.
- Indicate the location of the text under ‘Layout’.
- Finally click Ready.
Movement
Does the point of view remain the same or do you bring extra movement to a fragment? Determine it here.
- Choose a movement style.
- Watch the effect.
- Finally click Ready.
3D Effects
Use this to add extra elements to the video, for example balloons at a party. It does take some practice to apply this properly.
To cut
This option belongs to a video clip.
- Use the blue sliders to indicate which fragment should be included in the final video. For example, you can remove the beginning or the end of a movie clip. The blue part is the part that comes in the video.
- click on Ready or continue from this window with the editing options at the top of the screen.

Divide
This option also belongs to a video fragment. Use this to cut a film fragment into two parts. For example, to put a piece of film a little further on the timeline or to cut a piece out afterwards (as described above). click on Ready.
Speed
This option also belongs to a video fragment. Determine whether a clip should be played slowly, normally or quickly. 1x is normal speed, 2x is twice as fast.
Save video (interim)
Interim saving is not necessary. Photos automatically saves changes, so feel free to close the program. Next time you will find a video project as follows.
- Open Photos. Click on the Startbutton > photos.
- Click in the menu (top) on video editor.
- Under ‘My video projects’ you will find all the projects you have started. The most recently edited videos are at the top. Click on a project to open it. Even if a video is already ‘finished’, you can still edit the project.
Save a video as a separate file by exporting. It will then become an mp4 file. Most devices can play that without difficulty.
- Click on the top right Complete video.
- High quality is set automatically. You can leave this alone.
- click on Export.
- The Explorer opens. If necessary, change where the file is saved or change the file name. click on Export.
- The video is being created. When that is done, the video will be played immediately in Photos.