
It is undeniable: when you start a PC with a brand new Windows installation, everything runs nice and fast. A few months later, when everything starts to slow down, you are much less enthusiastic. If you don’t see a completely new Windows installation, then fortunately there are a lot of less radical tweaks that can bring your Windows sessions back on track. You can make Windows 10 faster in 15 steps.
Tip 01: Critical gaze
Masses of tips and tricks are circulating on the internet that promise to make your Windows PC faster and better. But you have to pay attention! The quality of those tweaks varies from usable to downright ridiculous, and there are also some that make your system less stable.
Also, don’t be tempted to buy a tool with one-click optimization. Often such a program operates as a ‘black box’ where you, as a user, have little or no insight into what the application is actually doing, so that you also do not know how you can reverse certain actions should something go wrong. We are therefore more fortunate in interventions where you are in control. In this article we provide very different tips, including the BIOS and the hardware. Unless otherwise stated, the tips apply in principle to both Windows 7, 8 (.1) and 10.
Tip 02: AHCI mode
Let’s immediately kick in an open door: in addition to puncturing extra RAM (on a memory-hungry system), your hard drive is and will always be replaced by an SSD one of the best interventions to make your system a whole lot faster in one go. First check in the BIOS whether the SATA mode is set correctly: assuming of course that you have linked your SSD to a SATA controller. Most SSDs work faster if that mode is set to AHCI (Advanced Host Controller Interface) instead of ( Native or Standard ) IDE. You can also activate the RAID mode (if available), but that of course only makes sense if you need that functionality (and have at least two disks). An important advantage of the AHCI mode (and RAID mode) is that it supports NCQ. This stands for Native Command Queuing, which means that the controller will optimize the order of the read and write commands. Keep an eye on! Do not simply change this mode on a working system: such a switch means that you will have to reinstall Windows.

Tip 02 The AHCI mode also supports NCQ optimization.
Tip 03: SSD optimization
You already have an SSD? Then you already have a solid optimization. However, it doesn’t hurt to check a number of settings that can make your SSD work a little faster. Especially when you have transplanted an existing Windows installation to an SSD, you better check whether the partitioning is correctly ‘aligned’. After all, a misalignment reduces the performance and lifetime of your SSD. You can restore this with for example the tool Minitool Partition Wizard Free . Right click on your SSD and choose Align All Partitions .
Also check whether the TRIM function has been activated, which ensures better performance of your SSD. To do this, open the command prompt and run the following command: fsutil behavior query disabledeletenotify . If you get DisableDeleteNotify = 0 , TRIM is indeed active. If the value is 1, you can still activate TRIM with the command fsutil behavior set disabledeletenotify 0 . An SSD? Then make sure you have correctly aligned partitions!
Tip 04: Defragmentation
Unless a disk is extremely heavily fragmented, which means that a large number of files are stored in non-adjacent clusters, defragmenting a hard disk will yield little speed gain today. So ignore all websites that claim otherwise today. You could possibly have your system checked for fragmentation, but such a function is already built into Windows: Windows checks your classic hard drives every week. However, defragmentation on an SSD is bad for the hardware, but fortunately the Windows versions from 7 and higher are so smart that defragmentation cannot be performed on SSDs (a TRIM operation is fine). To be sure, check in the window of the Windows function Optimize drives or indeed the Medium type for your SSD stationsSSD (solid – state drive) is set. If this is not the case, also check whether the BIOS has recognized the SSD drive correctly.
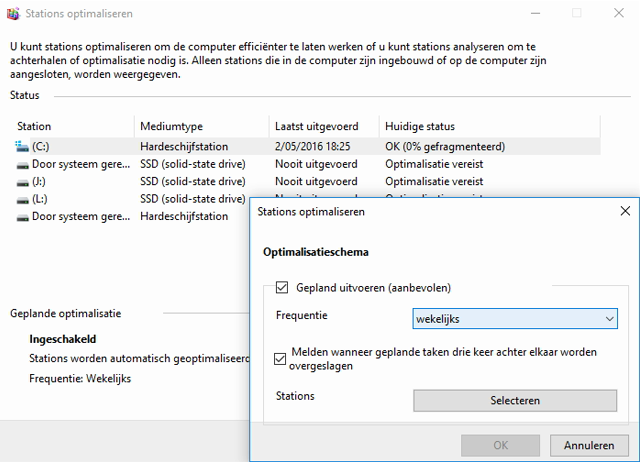
Tip 04 Fortunately, Windows 7 (and higher) is so smart not to perform defragmentation on SSDs.
Tip 05: Auto starters
One of the main reasons why Windows starts up slower over time is programs that start automatically with Windows and remain active in the background. Well, a person can sometimes be tempted to try all kinds of free software …
Now you can detect such automatic start-up software via the msconfig command (Windows 7) or via the built-in task manager (Windows 8 and 10: press Ctrl + Shift + Esc). In both cases, open the Startup tab . A more useful tool is Quick Startup . However, be careful during installation to remove the check mark from the option Install Glary Utilities , otherwise you install more than you intended. When you start this tool, you will get an overview of these auto-starters on the Startup Programs tab . If you are sure that you no longer need an item, set the slider to Disabled. Alternatively, you click the arrow button next to such and slow selects, then you can decide how many seconds (30 to 270) the start of this item should be deferred. With some luck you can read in the window how fellow users think about it, but in case of doubt you better google for feedback yourself.
You will find more items on the Scheduled Tasks tab . They come from the Windows Task Scheduler : you will find them when searching for a task scheduler in Windows. Since the Task Scheduler gives you more information about these items, you better arrange that via Windows itself. This also applies to the items on the Program services and Windows services tabs (see next tip).

Tip 05 The start-up of this system is very burdened by automatically starting tools and services. Too many automatically starting programs are disastrous for a smoothly operating system
Tip 06: Services
It is quite normal that on a typical Windows PC there are dozens of services running, background processes of Windows and of certain applications. As mentioned, you can also find an overview of this via the Quick Startup tool, but the built-in Windows Services module is more informative. You start it by pressing the Windows key + R and the services command . to perform msc . Click on a service and choose Properties , after which you can change the Startup type on the General tab . Set this to Manual, the service will only be started if required. Optionally, you can set a service that is necessary but not necessarily ready at startup to Automatic (delayed start). Mind you, don’t experiment with this randomly: after all, some services are essential and can cause your Windows to crash if you disable them. With the least doubt you google for more feedback.
A useful site is that of Black Viper , because here you get an overview of all Windows services for almost every conceivable Windows edition. On the page of your Windows version, scroll down until you see the columns. Then click on the Show / hide columns button and, if necessary, remove the checkmark from DEFAULT [Windows version] for the Windows version (for example Enterprise) that you do not have. The Tweaked column in the overview is particularly interesting for those who want to deactivate as many superfluous settings as possible, but this column is not available for every version.

Tip 06 Randomly switching off services can be risky … so make sure you know (learn) what you are doing.
Tip 07: Background apps
After Apple and Google, Microsoft has also fallen under the spell of native ‘universal apps’, in such a way that they also start pushing them firmly in the latest Windows versions. A number of apps even run in the background as standard in Windows 10, even though you have not intentionally started them yourself. That has the advantage that they are available a little faster, but at the same time it also means a waste of system resources. However, you can determine yourself which of those apps are active in the background. Open the Windows start menu, choose Settings and go to the Privacy section . Scroll down and choose Background – apps . Set the switch to Off if you no longer want it active in the background, that can also be useful if you want to save energy on your laptop.
Tip 08: Auto registration
Chances are that Windows will always ask you for your password at startup, even if you are the only user. If you find this protection unnecessary, you can also disable it, so that Windows will restart properly. Press the Windows key + R and run the netplwiz command . Select the desired user name, remove the checkmark from Users must enter a user name and password to use this computer and press Apply . Enter the corresponding password (2x) and confirm with OK . From now on you no longer have to log in to Windows. You can also undo this procedure using the same method.
If you find it unnecessary to ask for your password when the PC comes out of sleep, open the Windows start menu, choose Settings and go to the Accounts section . Select Login Options and choose Never in Require Login .
Tip 09: Fast start-up
Windows 10 has a feature built in that ensures that when closing the system all applications are closed and the users are logged off, at the same time the current system status (with loaded kernel and drivers) is stored in a ‘sleep file’. If you now switch the PC on again, your RAM will simply be provided with the snapshot in that sleep file, so that you will arrive very quickly at the login screen. This feature is on by default, but it doesn’t hurt to check if that is also the case on your system. Search for energy in Windows and start Power Management .
Click Determine the behavior of power buttons , and place a check next to Enable fast startup . If necessary, first choose Settings change that are currently unavailable. Confirm with Save changes . Note that this mode also has a few drawbacks. It is possible that certain system updates will not install properly, but you can solve that by restarting your system. In this mode, your hard drive is also ‘locked’, which can cause problems if you try to access your drive from another operating system via a dual boot. On some systems you can therefore not reach your BIOS (UEFI), also here a restart can offer the solution.
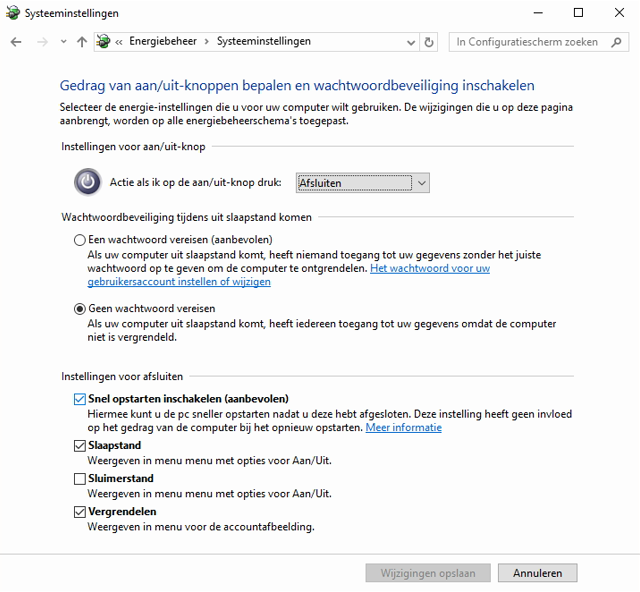
Tip 09 The quick start function does indeed work (albeit with a few possible disadvantages). Fast start-up saves time, but is not without disadvantages
Tip 10: High performance
By default, your system’s energy management schedule is set to Balanced , which means that Windows tries to keep the middle line between optimum performance and an energy-efficient system. However, there are other schemes and it is also possible to adjust a scheme to your own insight. To do this, open Energy Management again (see previous tip). If you want to do it extra economically (for example, to conserve the battery of your laptop), you can select the Energy saving scheme here . In the context of this article, we are primarily aiming for a faster system: click on Show additional schemes and select High performance . To make adjustments, click Change the schedule settings , after which you decide when the screen turns off and the PC goes into sleep mode. Click Change advanced energy settings for even more options. For example, with Hard disk you can indicate how much time (of inactivity) the disk can be switched off and you can indicate with processor power management what the minimum processor load may be; at high performance that is 100% as standard .

Tip 10 A faster system, but then slightly less energy efficient.
Registry set
There are a lot of registry settings that in one way or another have a (modest) impact on the performance of your Windows system. Now we can list all of them and comment on them, but they have already done so on the AskVG site . On that page they talk about “for Windows 7”, but don’t pin it down, because the fourteen listed registry tweaks are just as good for Windows XP, Vista, 7, 8, 8.1 as 10. All tweaks are nicely explained and for those who don’t see it, the changes can be made via the Registry editor (Windows key + R, command regedit ): you will also find a link here to download a ready-made script. After extracting the zip file a double click on Registry Tweaks To Make Windows Faster.reg is sufficient (after which you must confirm) to implement the changes. Via Notepad you can view (and edit) the script first. You can always return to the original state via a double-click on Restore Default Settings.reg .
Tip 11: Close faster
It still requires a few mouse clicks to shut down your PC in Windows. This can be done a little faster and in two ways. This way you can put a shortcut on your desktop with which you close Windows immediately. Right-click your desktop on an empty space and choose New / Shortcut . In Type the location of the item to fill your % windir% \ System32 \ shutdown.exe / s / t 0 in. You can also add the / f parameter to this, but keep in mind that active applications are then forced to close without warning the user. Press Next , give a name to your shortcut and complete with Finish: the shortcut now appears on the desktop. During such a closing procedure, Windows gives background processes the opportunity to close themselves neatly, but you can shorten this time-out via a register bar. Press the Windows key + R and run regedit .
Navigate to HKEY_LOCAL_MACHINE \ System \ CurrentControlSet \ Control . Double-click WaitToKillServiceTimeout and decrease the value to 3000 (milliseconds). If this adjustment results in unexpected problems, you can increase it (step by step) by 1000.

Tip 11 For those who count every second: shorter timeout with closing signal.
Tip 12: Special effects
The eye of a Windows user also wants something, but be aware that all that ‘eye candy’ demands a little more from your system. Especially on an older system with less generous system resources and an older version of Windows, that can be a bit slower. However, you decide for yourself how nice Windows should look. Press the Windows key + R and run the sysdm.cpl command . Open the Advanced tab and press the top Settings button . Based on the determined strength of your system, Windows has already selected Automatic selection and placed a check mark at the most suitable (out of 17 available) options. However, there are also two sets of presets: Best display and Best performance : the first simply selects all options, the second none. However, do you want to decide yourself which options you want to activate, such as Animation on the taskbar, Show transparent selection box, Save thumbnail views of the taskbar, Show shadow under mouse pointer , etc. Confirm your choices with OK .
Tip 13: Clean up programs
Windows and your applications require sufficient free disk space to function smoothly and reliably. Those who have to deal with a modest SSD may soon have to deal with a full disk. A possible consequence is that updates can no longer be installed (correctly). In the first instance you can then remove all redundant applications. This is possible from the Windows Control Panel, but a tool such as Revo Uninstaller works even more thoroughly (by also removing stubborn residues on the disk and in the registry). In this case, choose the Average removal method . You can find the (somewhat older) free version on the website via the Downloads tab. But you can also choose the 30-day trial version or purchase the paid version.

Tip 13 Fussy application? Then you get Revo Uninstaller!
Crapware
If you have a new PC with a pre-installed version of Windows, chances are that it will bulge with the surplus applications, which are often difficult to remove. Such tools not only delay your system’s start-up, they regularly attack you with advertisements and can even make your system unstable. Rather than trying to remove them one by one, you release a free tool like PC Decrapifier . After a brief analysis, this tool categorizes the detected applications into three tabs: Recommended , Questionable and Everything Else . In principle, you can simply remove the tools on the first tab, with the other you first check which ones you want to keep.

Ready-made PCs are often full of (irritating) junk.
Tip 14: Clean up data
Once you have removed all unnecessary applications and there is still a shortage of disk space, you will have to clean up data files such as heavy downloads or large video files. Free tools such as SpaceSniffer and SequioaView help you quickly locate the largest space lovers with the help of a graphic disk representation. You can also safely release the built-in Windows Disk Cleanup function on your disk: press the Windows key + R and execute the cleanmgr command . You can also use a cleaning program such as the free CCleaner to clean up all kinds of redundant files from Windows and all kinds of applications.
If you always completely shut down your system and you do not need the standby mode, you can also hiberfil the hidden system file . remove sys . You can do this as follows: right-click Command Prompt in the Windows start menu and choose Run as administrator . Then execute the following command: powercfg -h off . Confirm with Enter (reactivating standby mode is always possible with powercfg -h on ). The amount of space you save is approximately the equivalent of your internal memory.
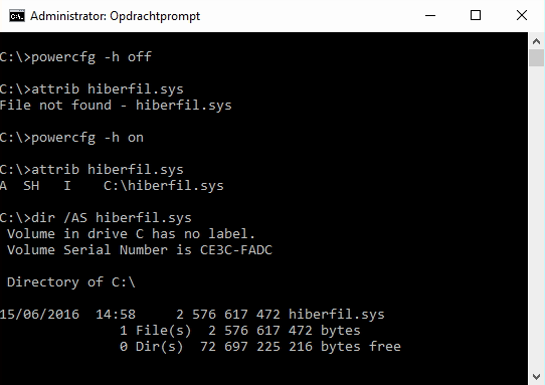
Tip 14 Can you go without the standby mode? Then you can save space by switching it off.No standby required? Quickly save 2 GB of disk space!
Tip 15: Updates
Driver and firmware updates sometimes add functions, but very often they also improve the stability or speed of the relevant hardware. Especially with video cards, that is often very accurate. Unfortunately, the drivers that you get through the Windows update service do not always seem to be optimal and you should therefore better regularly check the site of the video card manufacturer for suitable updates. We also recommend that you regularly check for updates to the firmware of your router and NAS. Before you install it, it is advisable to check on the manufacturer’s site to see what improvements such a firmware update has in store for your device and you should also google for possible (negative) experiences of fellow users.
Gaming
As a gamer you are of course always looking for the best experiences and then you owe it to yourself to regularly browse the internet (for example via Steam, user communities or social media) in search of ‘user mods’ (modifications). For many games new modifications regularly appear that not only make your favorite games look better or provide them with extra functions, but also make them faster and more stable.

User mods often provide a better (and sometimes faster) gaming experience.
Font Management
It will not make your system faster in itself, but those who work a lot with Office can undoubtedly benefit from a thinned and therefore more manageable font list. The easiest way to weed out unnecessary fonts is through a free tool such as NexusFont (also available as a portable application). The program shows all installed fonts based on a (personal) example sentence. You can remove one or more fonts simply by selecting them and choosing Uninstall from the context menu. Be careful not to delete fonts that Windows or applications need. These are in particular the Arial, Courier (New), Lucida, Modern, MS (Sans) Serif, Roman, Script, Segoe, Small Fonts, Symbol, Tahoma, Times New Roman, Webdings and Wingdings font families. In any case, it is advisable to first temporarily copy a font to a backup folder before deleting it in NexusFont. You do this from the context menu in NexusFont, with the option Copy to folder.