Getting started with internet banking
If you want to start using Rabo Internet Banking, you can request this via the Rabobank website. It is free with many Rabobank packages, such as a Rabo Total, Basic or Direct package. You can also request Rabo Internet Banking by telephone. Call for this with your local Rabobank.
Rabo Scanner
The Rabo Scanner is a device to log in to Rabo Internet Banking. Together with your pin code and debit card, the device ensures a secure login procedure.
For people with a visual impairment there is the Random Reader Comfort, which is larger and can read anything. You can request the Random Reader Comfort at your Rabobank branch.
And do you find the Rabo Scanner a bit slippery? That’s why the Rabo Scanner Grip, a plastic sticker for the device. It offers support when pressing the buttons of the Rabo Scanner. Request it for free at Rabobank.
Step 1: log in
To log in you need your bank card and Rabo Scanner. Then log in to Rabo Internet Banking as follows:
- Go to the Rabobank website: www.rabobank.nl.
- Click on the top right Login.
- You will arrive at a login screen. Follow the instructions that you see on the computer screen and on your Rabo Scanner and finally click on login.
read more information about how to use the Rabo Scanner.
Step 2: overview of your accounts
Now you come to the overview screen of Rabo Internet Banking. You probably want to check your balance or make a payment. You can already see the balance on your account(s) in the overview screen. Then click on an account to see an overview of all transfers to and from that account.
Step 3: transaction overview
You will now see an overview of all your recent payments and deposits. To go back to the overview of your accounts, click on My overview.
Step 4: new assignment
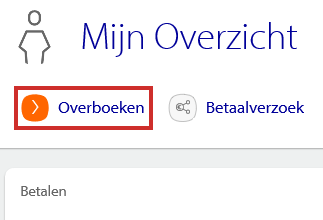
If you want to transfer money from your current account to someone else’s account, click under ‘My overview’ on transfer . 
Step 5: transfer money
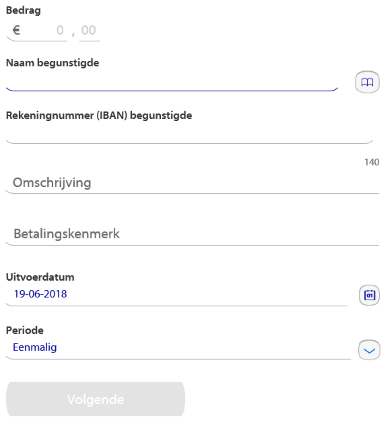
A screen will appear in which you can enter all the details: the amount you want to transfer, to whom, and when the transfer must take place. You can also enter a description of the payment or enter a payment reference in the case of a giro collection form.
- At the top is the account from which money is withdrawn. If necessary, click on the down arrow to choose another account.
- Enter the amount you want to transfer under ‘Amount’.
- Under ‘Beneficiary name’ you enter to whom you want to transfer money. If you have already transferred money to someone before, the name will appear on the screen as you type. Click on this. To transfer money to your own account, such as a savings account, click the address book icon. Then click on the desired account under ‘Own account’
- Under ‘Account number (IBAN) beneficiary’, enter the account number of the person to whom you want to transfer money.
- Under ‘Description’ you can indicate why you are transferring money, for example ‘Dinner’.
- You can adjust the dispatch date of the order by entering a date at ‘Execution date’. The transfer is then prepared in ‘Orders to be sent’ and processed on the selected date. You can change or revoke it up to the execution date. If you do not enter a date, the order will be executed immediately.
- At ‘Period’ you can indicate whether the payment will occur more often. You can choose whether this is for example weekly or monthly. By default, ‘Once’ is entered here.
- If you want to pay a giro collection form, do not forget to fill in the payment reference.

When you have filled in everything, click on Next one. Then you have several options:
- You click Sign with Rabo Scanner to send the payment order immediately.
- You click Save, New assignment to make another payment after this payment order. After this you choose Save, go to send > [aantal] send tasks to send the payment order.
Step 6: confirm transfer(s)
You are now going to send your payment orders definitively. Take the Rabo Scanner and the bank card again and follow the instructions on the screen. Finally click Sign and the payment orders have been sent.
Step 7: Logout
When you are done with internet banking, you must log out. You do this by clicking on the top right Log out .
Demonstration
Internet banking with Rabobank is explained in a fun and simple way on the Steffie website. You can even practice logging in and paying. You can find the part here: Steffie: internet banking.
More useful features
Click on your account in Rabo Internet Banking. Here are a few more features that may come in handy:
- Scheduled: overview of payments that will take place in the future.
- Download transactions / statement: get the payment details to your PC. Tick the format Rabobank if you want to import the data into an accounting program.
- Commands to be sent: overview of payment orders that still have to be sent.
Other Rabobank products
You can also view and change the details of other Rabobank products via the Rabobank internet banking website.
- For more information about arranging a pension, click on Pension.
- If you have a mortgage, investment or loan with Rabobank, you can view your details by clicking . after logging in Mortgages, Investing or To lend.
- Need car insurance or liability insurance? click on Insurances.
Knowing more?
In this article you learned the basics of internet banking at Rabobank and were introduced to some useful functions.
Did it go too fast, or do you want to know more? There are various possibilities:
- Due to the cooperation between SeniorWeb and Rabobank, you can follow a Rabobank internet banking course in many SeniorWeb teaching locations in the country.
- Steffie explains in clear language about debit cards, chips and internet banking.