
VPN servers are mainly encountered in the business world: employees can use this to access the company network safely on the road or from home. However, a VPN server can also come in handy when you are on the road and want to access the Internet more securely or access files on your home network.
Tip 01: VPN protocols
There are a lot of VPN services and some can even be used for free without too many restrictions, such as Proton VPN. You then connect to one of the offered VPN servers via client software on your mobile device or computer, after which you can continue on the internet via such a server.
The approach of this article is more ambitious: we are going to set up our own VPN server within our home network. Vpn stands for virtual private network, and that means that you connect networks that are physically separated from each other. Such a connection normally runs via the internet and that is not exactly the safest environment. That is why all data traffic is encrypted via such a VPN connection: a virtual tunnel is created between the two networks.
Various vpn protocols are available, including pptp, sstp, ikev2, l2tp / ipsec, OpenVPN and WireGuard. The latter is promising, but still under development and not yet widely supported. We choose OpenVPN here because it is open source, has strong encryption and is available on almost all platforms.
At the moment, OpenVPN is still seen as the better VPN protocol
Router
In fact, your router is the best place to set up a VPN server in your home network. After all, all data traffic from the websites that you visit en route will first go through your VPN server. If that is your router , then that traffic will immediately be transferred to your mobile device. If your vpn server is on a nas device or pc, the data traffic must first go from your router to that device and then back to your router. An extra intermediate step so, but in practice you will not notice much of this delay. NAS stands for network attached storage. A NAS device is connected to your network, so all users can access files from a central location easily. With a VPN installed on your NAS device all traffic will be sent over the VPN network, ensuring your files remain private and secure.
Unfortunately, many typical home routers do not have the option of setting up a VPN server. If a VPN service is indeed missing on your router, the DD-WRT firmware may still offer a way out. Surf here and enter your router model. With a little luck there is yes in the Supported column and you can download the firmware file to flash your router. Mind you, you perform such a sensitive operation entirely at your own risk! For instructions you can go here .

If necessary, add OpenVPN server functionality to your router using the DD-WRT firmware.
Tip 02: Installation on a nas
We first show you how to install an OpenVPN server on a nas. Well-known nas producers such as QNAP and Synology offer their own app for adding a VPN server. We look at how you approach that on a Synology nas with a recent version of DiskStation Manager (DSM). Make a connection to the DSM web interface, the default is the address : 5000 or : 5001.
Open it Package Center, catch up All packages looking for the app VPN Server and click here to install. After the installation click on To open: the server can handle a few vpn protocols in the list PPTP, L2TP / IPSec and OpenVPN. In principle, they can even be active at the same time, but we limit ourselves to the OpenVPN protocol. click on OpenVPN and place a checkmark Enable OpenVPN server. Set a virtual internal IP address for your VPN server. By default this is set to 10.8.0.1, which means that the vpn clients will in principle receive an address between 10.8.0.1 and 10.8.0.254. You can choose from an IP range between 10.0.0.1 and 10.255.255.1, between 172.16.0.1 and 172.31.255.1 and between 192.168.0.1 and 192.168.255.1. Make sure that the range does not overlap with IP addresses that are currently being used in your local network.

Tip 02 Enabling the OpenVPN server on your nas is nothing more than placing a check mark.
On some nas devices you have an OpenVPN server installed like this
Tip 03: Protocol selection
In the same configuration window you also determine the maximum number of simultaneous connections, as well as the port and the protocol. The default is the port 1194 and the protocol UDP and that usually works fine. If you already have a different service running on that port, then of course you set a different port number.
Furthermore, you can also choose TCP instead of UDP. Tcp has built-in error correction and checks whether every bit has arrived correctly. This ensures more connection stability, but is slightly slower. Udp, on the other hand, is a “stateless protocol” without error correction, which makes it more suitable for streaming services, where the loss of a number of bits is generally less serious.
Our advice: try it first with the udp. Optionally, you can experiment afterwards and, for example, choose TCP port 8080, or even the https port 443, because they are usually blocked less quickly by a (company) firewall. Bear in mind that you also have to set the selected protocol in the port forwarding settings (see tip 5).
You can normally leave the other options of the configuration window unchanged. Confirm your choices with To apply.

Tip 03 OpenVPN uses the udp protocol as standard, but you can also set tcp.
Tip 04: Export configuration
At the bottom of the window you will find the button Export configuration. With this you export a zip file that unpacks both a certificate (.crt) and a configuration profile (.ovpn). You need the ovpn file for your OpenVPN clients (see also tips 6 to 8). Open the ovpn file with the Notepad program. Replace the indication in the (third) line YOUR_SERVER_IP in remote YOUR_SERVER_IP 1194 by the external IP address of your router and the indication 1194 by the port that you had set in the OpenVPN configuration window. A quick way to find out this external IP address is when you go from your internal network to a site like www.whatismyip.com (see box “Ddns”). You can also replace this IP address with a host name, such as that of a DDNS service (see same box).
A little further in the ovpn file you see the line # redirect-gateway def1. Here you remove the hash, so redirect-gateway def1. This option ensures that in principle all network traffic along the VPN is redirected. If this causes problems, you put the original line back. You can find more information about this (and about other OpenVPN technical issues) here.
Save the edited file with the same extension.

Tip 04 You do have to make a few small changes to the OpenVPN profile file.
Ddns
From the outside, you usually access your home network via the public IP address of your router. You will know that address when you surf from your network to a site like www.whatismyip.com . Chances are that your provider has dynamically assigned this IP address, so you have no guarantee that this IP address will always remain the same. This is annoying if you regularly want to reach your network (and your OpenVPN server) from outside.
A dynamic dns service (ddns) offers a possible way out. This ensures that a fixed domain name is linked to that IP address and as soon as the address changes, the corresponding ddns tool (which runs locally somewhere in your network such as on your router, nas or PC) makes the new address known. to the ddns service, which immediately updates the link. One of the most flexible free ddns providers is Dynu .

Ddns solves the problem of a difficult to remember and possibly changing IP address.
Tip 05: Port forwarding
A message appears stating that you must check the port forwarding and firewall settings related to the set port (1194 udp by default).
We start with the firewall. You are supposed to access the OpenVPN server via udp port 1194 and you must be sure that your firewall is not blocking that port. You can find the firewall on your nas via Control Panel / Security / Firewall tab. With the firewall switched on, check with the button Edit rules or the relevant port is not locked. This also applies to the firewall on your router, if it is switched on.
The concept of port forwarding is more complex. If you want to access your OpenVPN server from outside your internal network, you will have to use your router’s public IP address. When you request an OpenVPN connection with udp port 1194 via this ip address, your router must know to which machine it must forward the request for that port traffic, and in our case that is the internal ip address of your nas.
Consult the manual of your router to find out how to set up or visit port forwarding properly https://portforward.com/router for more instructions.
In general it goes like this: log in to the web interface of your router, look for a (sub) section like Port forwarding and add an item with the following information: application name, nas IP address, internal port, external port and protocol. This could, for example, be the following: OpenVPN, 192.168.0.200, 1194, 1194, UDP. Confirm your changes.
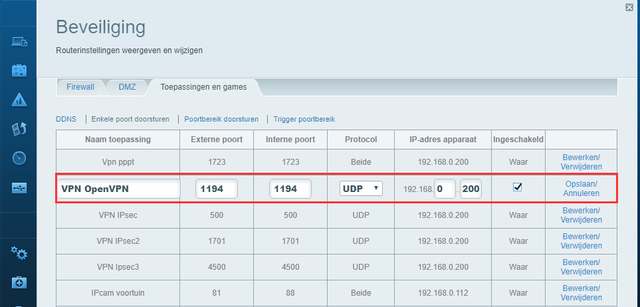
Tip 05 In the settings of your router you send the OpenVPN port to the internal IP address of your nas.
Your OpenVPN server may require some key work on the firewall and router
Separate OpenVPN server
If you do not have an nas and your router does not support OpenVPN, you can still set up such an OpenVPN server yourself on a computer running Linux or Windows.
Such a procedure does have some feet in the ground. You have to go through various steps and also under Windows that happens mainly from the Command Prompt. After installing the OpenVPN Server software (see tip 8) you need to create a CA certificate, followed by creating certificates for the server and the required OpenVPN clients. You also need so-called DH parameters (Diffie-Hellman) as well as a TLS key (transport layer security). Finally, you must also create and modify ovpn files here, and ensure that your server allows the necessary traffic.
Via this link you will find a step-by-step plan for Windows 10, for Ubuntu via this link .

Setting up an OpenVPN server via Windows or Linux is largely done via the command line.
Tip 06: Mobile client profile
Setting up an OpenVPN server is a first step, but then you have to connect to the server from one or more VPN clients (such as your laptop, phone or tablet). We start by connecting a mobile client.
For both iOS and Android, setting up a connection works easiest with an OpenVPN client app when it is free OpenVPN Connect. You can find this app in the official app stores of both Android and Apple.
We take Android as an example. Download and install the app. Before starting the app, make sure that the ovpn profile file is on your mobile device (see tip 4). If necessary, you do so via a detour via a service such as WeTransfer or a cloud storage service such as Dropbox or Google Drive. Start OpenVPN Connect on and choose OVPN Profile. Confirm with Allow, refer to the retrieved VPNconfig.ovpn file and select Import. If you want to add extra profiles afterwards, you can simply do so via the plus button.
Tip 07: Connect client
Give a suitable name to your VPN connection and enter the correct information Username and Password. These log-in details must of course have access to your vpn server, on the Synology nas you open at VPN Server the category Rights and place a check next to the intended user (s) OpenVPN. You may choose to have the password remembered, if you think it is safe enough. Confirm with Add. The profile has been added, tap it to start the connection.
The app may complain that the profile file does not have a client certificate (but a server certificate), since a Synology nas does not just generate it. Although that is somewhat less secure because it is not verified whether it is an authorized client, you obviously need the username and password to actually gain access. So you can go here Continue select. If all goes well, the connection will be established a little later. You can notice this by the key icon at the top of the home screen.
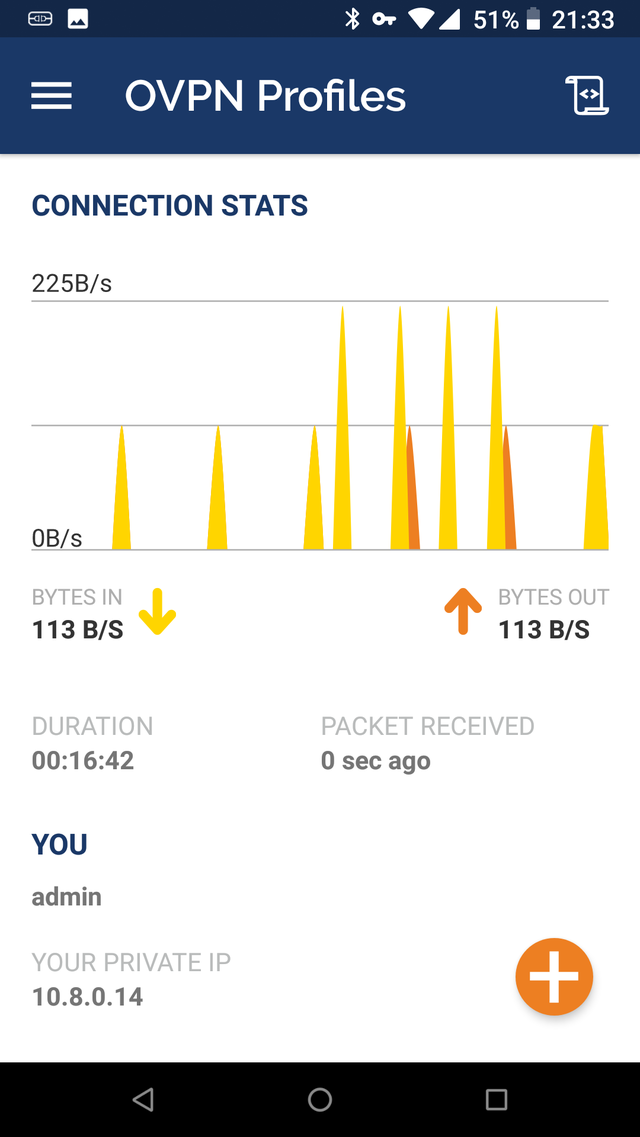
Tip 07 Via a status window you can see the data transfer from your OpenVPN connection.
Tip 08: Windows client
For Windows Download the Windows 10 installer from OpenVPN GUI, there is also a version for Windows 7 and 8 (.1). Install the tool. If you also plan to install an OpenVPN server in Windows (see box “Separate OpenVPN server”), place a checkmark at the installation EasyRSA 2 Certificate Management Scripts. If requested, also allow a TAP driver to be installed.
You will find the icon afterwards OpenVPN GUI on your desktop. If not, you start the program from the standard installation folder C: Program Files OpenVPN bin. The installation should ensure that you do not have to run the tool as an administrator. If, for whatever reason, this did not work, right-click on the program file and choose Run as administrator.
Show the program the way to your ovpn profile file (see tip 4). Right-click on the icon of OpenVPN GUI in the Windows system tray and choose Import file, after which you select VPNConfig.ovpn file. In the same menu you click on To connect and enter the required login details. In the status window you can follow the setup of the VPN connection and you can also read the assigned IP address below.
If you run into problems, click on in the menu View log file. By default, the OpenVPN service starts up with Windows: you control that via Settings, on the tab General. Also check that your firewall is not blocking the connection.
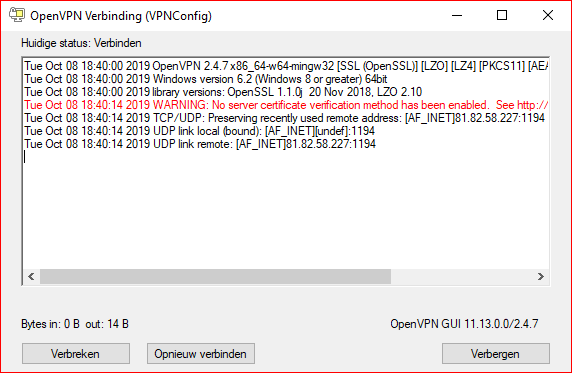
Tip 08 The OpenVPN client for Windows has established the connection.