 Word has over thousands of templates for all kinds of occasions. These sample documents are free to download and easy to use.
What is a template?
Those who use Word often start their work with a blank sheet of digital paper. Or a previously created or received file. But did you know that Word comes with a lot of nice, free templates by default? Templates are sample files for all kinds of occasions. From calendars to invitations and from schedules for everything to certificates.
If you want to create a document for a specific occasion, you can save yourself a lot of time and effort by first checking whether there is a template for it. A template has been given a certain design, but you can adjust it to your own liking. After finding and downloading a template, edit it until you are satisfied. Save the file in good time under a name of your choice, print it, e-mail it or do whatever you deem necessary with it. This article explains where to find the templates, how to download, edit and save them. The article is based on Word from Office 365, which corresponds to Word 2019.
Step 1: look up templates
If Word hasn’t started yet:
- Click the Start button.
- click on Become.
- Click on the right of the screen More templates.
Or from an open file:
- Click in the menu on File.
- click on New.
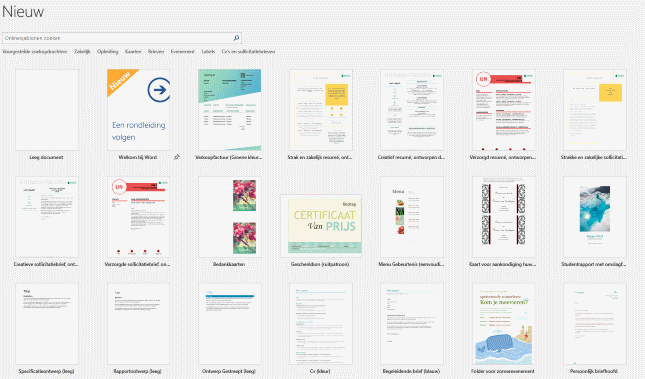
The template overview page opens.

Here is a small portion of the templates. It’s everything, and probably not just what you need. Let’s look up an invitation as an example.
- In the search bar at the top of the screen, type ‘Invitation’ (without quotes).
- Press the Enter key.
- Word searches and conjures up a whole series of invitations. In the middle of the screen is a selection of invitations. On the right side of the screen is a list of rubrics in gray. If you are looking for an invitation for a birthday or another special day, refine the selection by clicking on the relevant section. You will then only see the applicable templates.
Step 2: Download Template
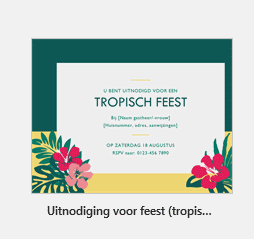
Hover over a template to learn a little more about it, such as its full name and how many pages the template has. We continue with the “Party Invitation (Tropical Theme)” template.

- In the search bar, type: ‘Party invitation’.
- Press the Enter key.
- A number of templates will appear. click on Party Invitation (Tropical Theme).
- A window with more information will appear. click on To make.
A new window opens in Word. The template is there. This can be edited entirely at your own discretion.
Step 3: Save Template
It is important that you immediately save the file on the PC, with a clear name:
- click on File.
- click on Save as.
- click on To leaf through.
- Browse to the location where the file should be saved, for example the folder ‘Documents’.
- In the box to the right of ‘File name’, type a name that is meaningful to you.
- click on Save.
Note: New versions of Office have the Autosave feature turned on. It updates a saved file every few minutes. This function is located in the top left corner of the blue bar. The slider to the right of ‘Save automatically’ is then white. If you do not want this, for example because you are experimenting with functions in Word, click on the white slider. The function is then switched off, possibly accompanied by a message.
Step 4: Edit data template
The file has been saved. Now the time has come to adapt the file to your own wishes. For example, are you not throwing a tropical party, but is it your birthday? And the telephone number on the template is of course an example number, so it is not correct either. You can customize just about anything about this template: the color scheme and the data on it. There is also a (disturbing) error on the template. The abbreviation for ‘please respond’ is not RSPV but RSVP. First we adjust the text:
- Click directly to the left for the T for tropical party.
- The cursor starts flashing. Press Delete on the keyboard several times to remove the letters from ‘tropical party’. You can also select words with the mouse and delete them completely with the Delete button.
- Type another word, such as “Birthday,” in capital letters to make it stand out.
- Select and delete [Naam gastheer/-vrouw].
- Type a different name, for example your own or the host or hostess concerned.
- Select and delete [Huisnummer, adres, aanwijzingen].
- Enter the necessary information, such as the address and any gift wishes.
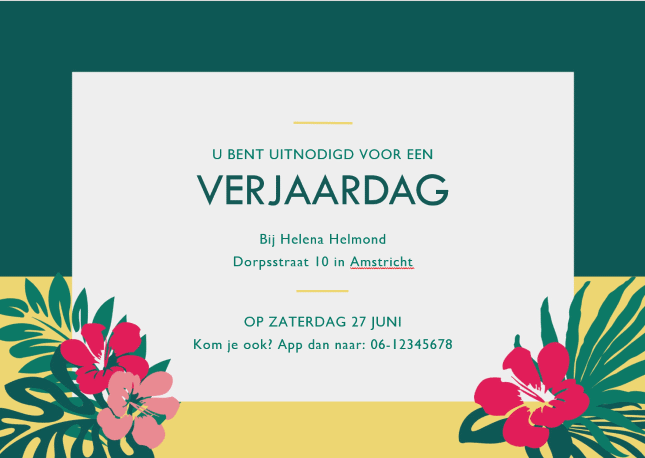
In the same way, adjust the other textual data, such as the date (don’t forget the start time!) and your phone number. For example, it could look like this:

Step 5: Adjust colors
Not only do you adjust the text, you can also choose other colors if you don’t like the standard colors or don’t like them.
- Click anywhere in the green box at the top of the screen.
- The ‘Image Format’ tab appears in the Ribbon. Click on the tab Image format.
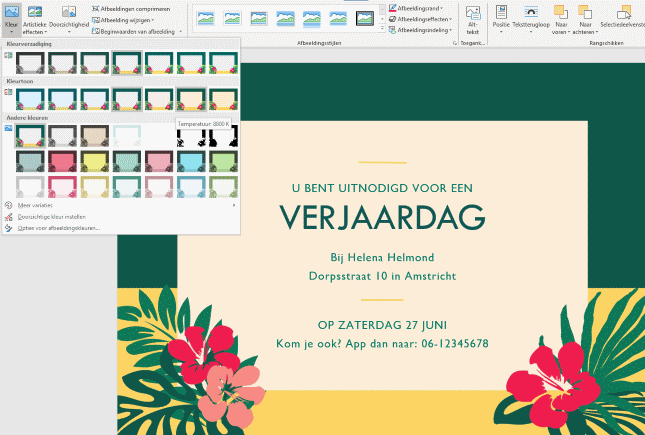
- In the ‘Edit’ group, click Colour.
- The menu opens. The top two rides are variations on the standard color theme. Below are variants in completely different colors. Point to an option and wait a while to see immediately what effect the option has.
- Don’t you like it? Then move the mouse away from the color menu to see the original again. Does an option appeal to you? Then click on it to apply the change immediately.

- Clicked wrong? Press the shortcut Ctrl+Z to undo the last action.
- Click outside the color menu on the gray Word background to close the color menu.
- In the same way, use the ‘Artistic effects’ option. The button is immediately to the right of the color menu on the ‘Image Format’ tab.
Has the ‘Image Format’ tab disappeared? Then click anywhere on the dark green border of the invitation.
Step 6: handy tips
Also nice is the ‘Picture Styles’ section on the ‘Format’ tab. This gives the invitation a playful frame or a nice border. A number of examples are shown by default. You can see more if you click on the triangles to the right of this section. Again, point to see a preview, and click to apply the selection.
You will already notice, by adjusting the text and formatting, you give a personal touch to a template. Each template has different parts to customize. It is best to choose a template that reasonably matches your needs. When you’re happy with the editing, save the file and do whatever you want with it: print it, email it, put it online… whatever you want.