IrfanView is a free photo editing program that allows you to perform some basic operations on a Windows computer, such as rotating, cropping and resizing a photo.
Download and install IrfanView
IrfanView is not installed by default on your computer. You can download and install the program for free using our software article ‘IrfanView’.
Open photo
- click on Start > IrfanView > IrfanView [versienummer] to open IrfanView. If you are using Windows 7, open IrfanView via Start > All programs > IrfanView > IrfanView [versienummer].
- click on File > To open.
- Browse to the location where the photo you want to edit is located.
- Click on the photo you want to open.
- click on To open.
rotate photo
Sometimes an upright photo, such as a portrait, is displayed landscape. You can change this by rotating the photo.
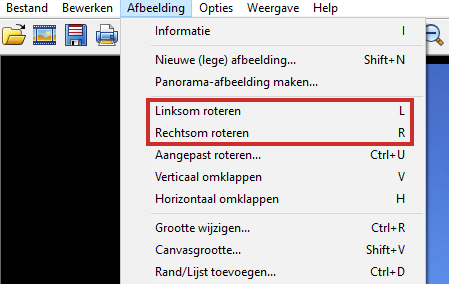
- click on Image.
- In the menu that opens you will find the option ‘Rotate left’ and the option ‘Rotate right’. Click the desired option to rotate the photo a quarter turn left or right.

You can repeat this step as many times as you want, the photo will be rotated a quarter turn each time.
Crop photo
You can extract a detail from a photo with Irfanview as follows:
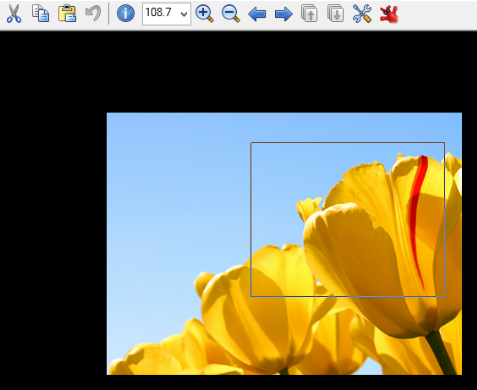
- Press the left mouse button and drag the mouse pointer over the area you want to cut out.

- Once you start moving the pointer, the size of the frame in pixels is shown at the very top of IrfanView. This is useful if you want to give your photo a certain size and sharpness, for example 800×600 pixels.
- Release the left mouse button. You will see that a rectangle is placed around the area.
- If you are not completely satisfied with the selection, go over one of the lines of that rectangle. The pointer changes to two arrows when you are on one of the lines.
- If you hold down the left mouse button, you can drag that line, making the rectangle larger or smaller. That way you can determine the exact crop.
- You can also move the frame. To do this, right-click within the frame. Hold down the right mouse button and drag the frame to the desired position. Release the right mouse button.
- If you are happy with the cutout, click To process > Crop selection.
Change size
You can reduce or enlarge a photo to any size. Please note that increasing the quality may decrease.
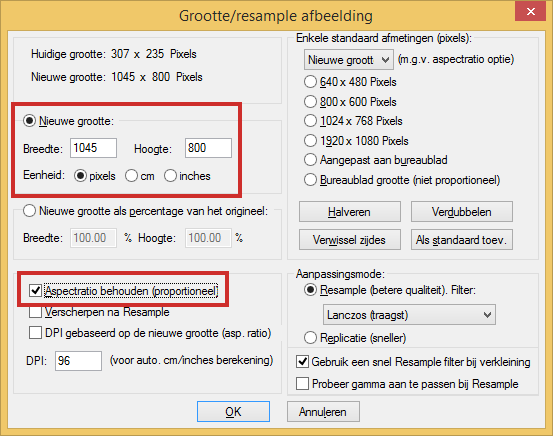
- Select from the menu Image> Change size.
- By default, under ‘New size’ the size is indicated in pixels. Change this by cm or inches to tick. If you keep pixels checked, you only change the sharpness of the photo.
- Enter the desired width at ‘Width’ or the desired height at ‘Height’. Only enter the width or height of the photo, the other side will be calculated automatically.
- Make sure at the bottom of the screen Preserve Aspect Ratio (Proportional) is checked. As a result, the proportions of the photo remain unchanged.

- click on OK.
Save photo
When you have finished editing the photo, save it as follows:
- click on File > Save (in original folder).
- If you want to replace the original photo with the edited version, click directly Save. You will then be asked if you want to replace the original photo, click on Yes.
- If you want to keep the original photo, type a new name behind ‘File name’ and save the photo in a different folder by clicking on the folder behind ‘Save in’ and browse to the desired location.
- click on Save.
Change file name
In IrfanView you can easily rename a photo.
- click on File > Change file name.
- Enter the desired name in the field under ‘New name’ and click OK.
The new name is now visible at the very top of IrfanView and in the Explorer.
What else can you do with IrfanView?
You can perform even more photo edits in IrfanView, for example:
- place a frame around the photo via the menu Pictures > Add Border/Frame.
- convert the photo to grayscale via Image > Convert to Grayscale.
- red eye removal via Image > Red-eye reduction (selection).
- add effects to a photo via Image > Effects.