Make labels in Word to get a letter out the door neatly, or to stick it on a gift, for example. To print labels, you need printable label sheets. Well-known brands are Xerox, Avery and Herma.
Other Word versions
In this article, we’ll discuss how to create labels in Word 2010.
Do you have Word 2016? Then read the article ‘Word: creating labels (Word 2016)’.
Do you have Word 2013? Then read the article ‘Word: creating labels (Word 2013)’.
Do you have Word 2007? Then read the article ‘Word: creating labels (Word 2007)’.
Not familiar with Word?
Not familiar with Word yet? Then it is advisable to first read the article ‘Word: the basics’.
Step 1: Same address on one or more labels (1)
To print an address on one label or the entire sheet of labels, do the following:
- Open a blank document in Word.
- Click on the tab Mailing Lists in the ‘Create’ group on labels.
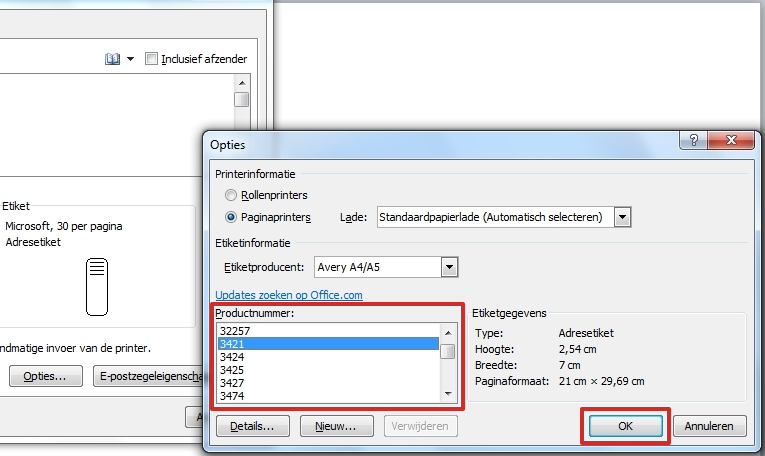
Click in the middle right on the box Label and set there what brand of label sheets you have and what its product number is. In the box ‘Label manufacturer’ we have chosen ‘Avery A4/A5’ with ‘Product number’ ‘3421’. You can have a different brand of label sheets, then you choose that.
Step 2: Same address on one or more labels (2)
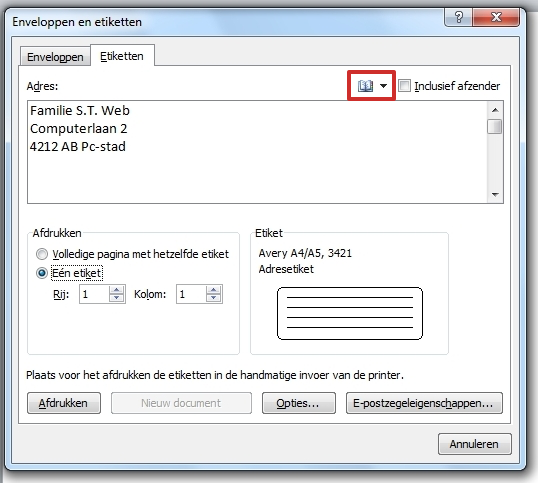
In the “Address” box, do one of the following:
- To create address labels, enter an address. Or you edit an existing address, which you can insert via an address book icon
 .
.

- If you also want to provide a sender address, check the box ‘Include sender’ and edit the sender address if needed.
If you are creating another type of label, such as a bookmark, type the text you want.
Step 3: Print
Then you can start printing the label:
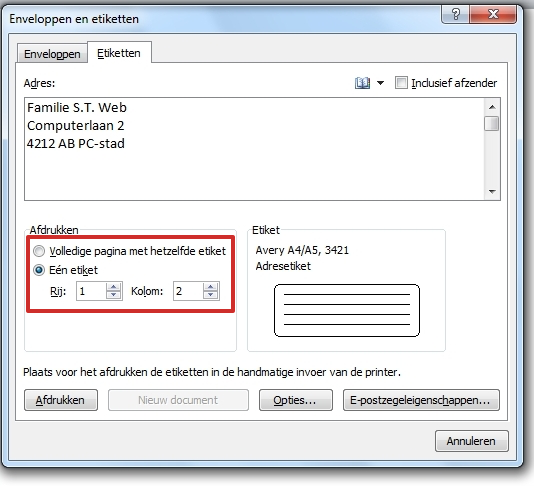
- In the “Print” box, do one of the following:
- To print a single address label, check A label at. Then type or select the row and column number of the label you want to print. This way you select which label of the label sheet the address will appear on.
- If you want to print the same data on every label in the label field, check Full page with the same label at. To change the printer label type or tray, click . at the bottom Options. Select the desired options and click OK.

- If your label type (found on the packaging of your labels) is not listed in the ‘Product number’ box, use one of the available labels. You can at Options also on New click to complete custom mailing label sizes.
- To print the labels, load a sheet of labels into the printer and click Print .
Tip: First, make a test print on A4 plain paper. Then you can see if the address ends up in the right place.
Step 4: Several addresses on one sheet (1)
If you want to print different addresses on a label sheet, there are several options. This way you can easily create one page with a number of different labels that you type in yourself. This goes like this:
- Click on the tab Mailing Lists on labels.
- click on Options.
- Choose the printer type and supplier of the label sheets on which you want to print the labels. Under ‘Product number’, select the number that appears on the packaging of the label sheets and then click OK.

Step 5: Several addresses on one sheet (2)
- kin the ‘Envelopes and Labels’ dialog box, click New document.
- A new label document opens.
- Type the desired information on the labels you want to use. You can also insert pictures for labels or tags. On the ‘File’ tab, click Print to print the labels.
- To save the label page for later editing or printing, in the ‘File’ tab, click Save as.
Things get a little trickier if you want to print multiple pages with different labels. We will not go further into this. To learn more about this, search Word’s Help for ‘Creating labels for a large-scale mailing’.