
In this workshop you can read that Faststone Photo Resizer is a surprisingly complete application if you want to reduce photos quickly and easily.
Wessel Sijl
 |
Many photographers have the desire to quickly and easily reduce large photo files to a format that is more convenient and better to use – for example – on mobile phones or tablets. Or to reduce a photo in such a way that it can be added to an email as a not too voluminous attachment. This can be done with almost all photo editing programs, and then often also in batches. The latter, working with batches, is useful if large amounts of photos have to be reduced at the same time. There are also numerous programs that have been designed (convert) or reduce photos especially for converting (converting). Many of them are even free or available as an open source application. But which application is a good choice? That is, that does the conversions of good quality, is quick and easy to use and offers possibilities for special wishes. Faststone Photo Resizer is a very pleasant, good, complete and free application. In addition to being easy and easy to handle, many photos (also of a large size, for example stored uncompressed as TIF) can be quickly reduced while retaining essential quality requirements.
Faststone Photo Resizer
Faststone Photo Resizer is, according to the maker, a tool for converting and renaming images. Users can convert photos with a fast and easy batch mode, rename (with serial number), enlarge or reduce, crop, rotate, change color depth and add text and water brands. It supports the following photo formats: JPEG, BMP, GIF, PNG, TIFF and JPEG2000.
The program is free (that is for private use), contains no adware or spyware and can be downloaded here:
https://www.faststone.org/fsresizerdownload.htm
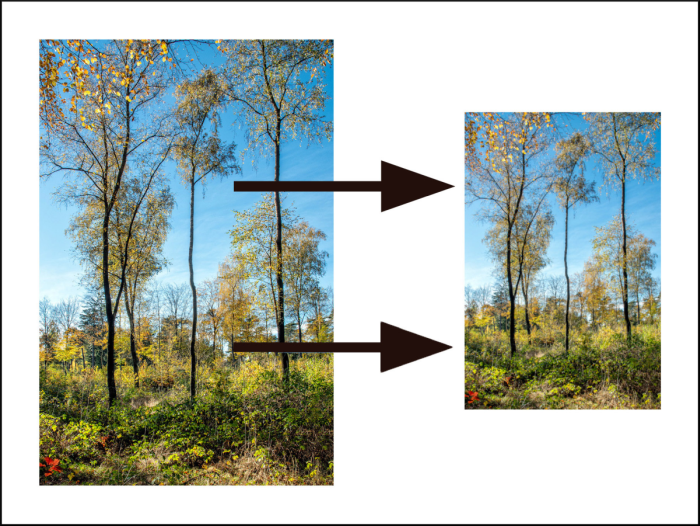 |
| From large to small is often desirable |
Once the program has been downloaded and installed (that points itself on its own), it’s time to open it. Then you will see the following screen:
 |
| Faststone Photo Resizer |
In fact, this is the central part of the program that always remains visible. In this example shown, a folder with large TIF photos is open. You can open files with the rule above the large compartment with the files shown. It is a well -known structure that is also used in many other programs.
At the top left is the tab Batch Convert clicked, which already indicates that the intention is to convert. The files can then be transferred to the white field on the right side. You can make a selection which photos should be converted and then click on ADD. You can also for Add all Choosing and with that all photos are automatically towed from the selected folder to the right field. Buttons Remove and Clear If desired, you can undo these steps again.
 |
| Setting the quality of the file format |
Preferences and storage
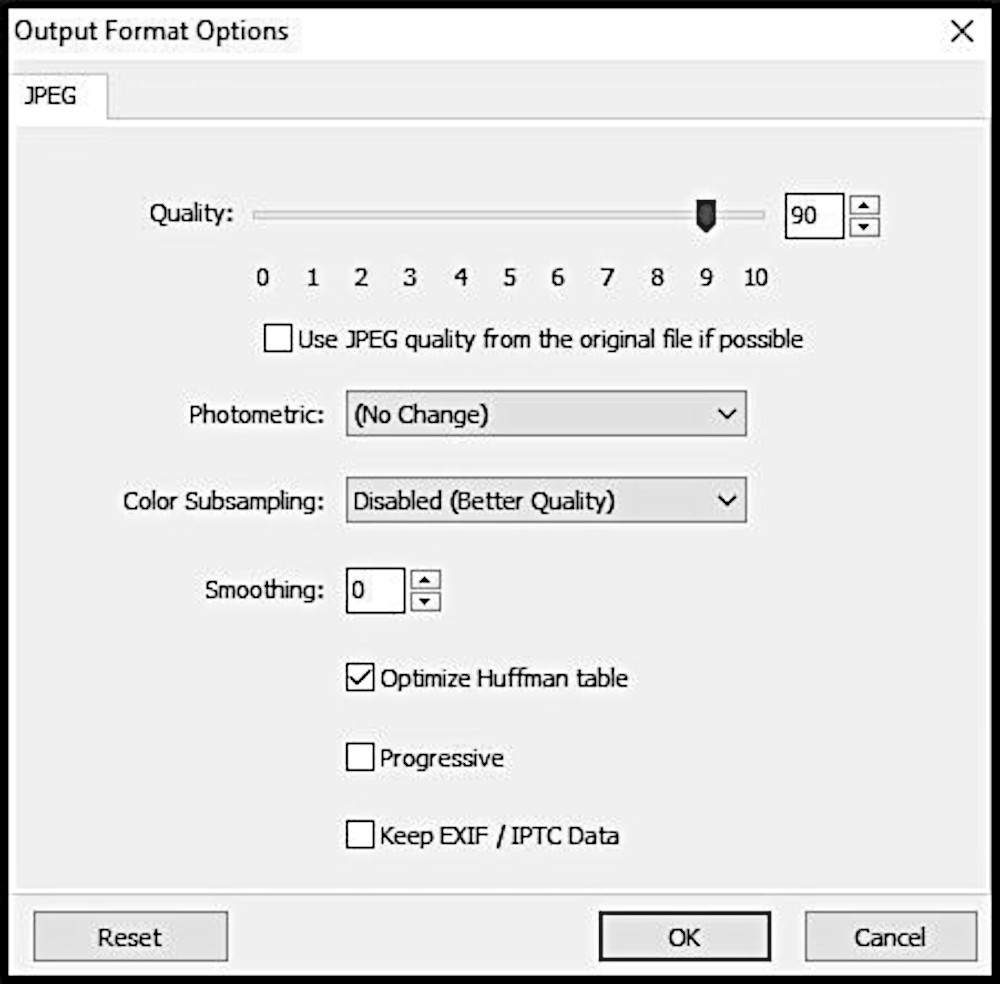
You can then set a large number of preferences on the part of the screen at the bottom right. To start, click on the roll menu to the right of Output format. This allows the desired new file format to be set. In this example, JPG was chosen; The program also shows this first. Click on the button on the right Settings And the next pop-up screen appears:
With this, a number of quality criteria of the chosen file format can be set as desired. Once that is done, click on OK. After that, the folder can be chosen under which the converted photos must be written away. That points out of it. Tip: create a special subfolder for this, falling under the folder in which the source photos are located. In this way you have everything, original and converted/reduced photos close together, but in separate folders. This prevents searching and confusion.
Further quality settings can then be made for the demanding photographer. Check the box Use advanced options and then click on the button to the right Advanced Options. The next screen appears:
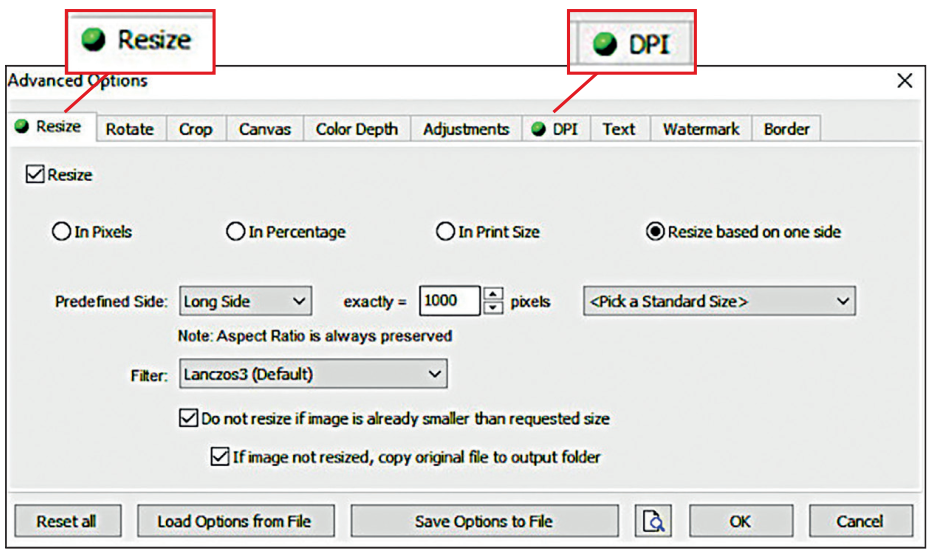 |
| The many options for advanced settings |
What is immediately noticeable – and that is the power of this application – is that quite a lot of preferences can be set. If you want to activate a certain tab, click on the check box at the top left of the sub -screen to be opened with it. In this example, two preferences are set: the size of the photos to be reduced to JPG, and the resolution. The tabs are for that Resize and DPI Activated, which is visible with the green point in the tab. The screen is standard Resize Already opened and the Expensive Preferences can be set. Here it was decided to transfer the batch photos from PC to a tablet. Experience shows that 1000 pixels on the longest side of the photo is sufficient for a fresh and sharp image on a tablet. Because it is nice to consistently maintain this dimensions, so always 1000 pixels on the longest side, regardless of whether a photo is standing (vertical) or lying (landscape), is the option Resize Based On One Side clicked. The other preferences speak for themselves.
Resolution
Subsequently, the resolution was set in this example. To do this, click on the activated tab (with green point) DPIafter which this screen appears:
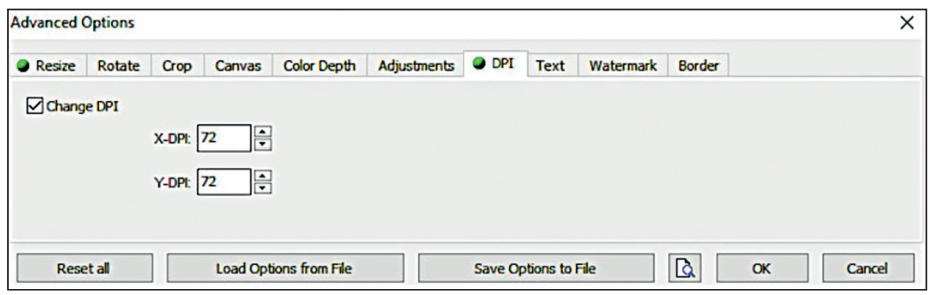 |
| Setting the resolution |
The value 72 was chosen here, which is sufficient for viewing on a tablet. Of course you can use the other tabs under Avanced Options Other preferences are set. This goes pretty far, among other things for the quality of the photo as with the tabs Color Depth and Adjustments. The critical photographer would rather make such adjustments (per photo) with his or her trusted photo editing programs. That is of course more time -consuming, but with a photo editing program this can be done more precisely. But for the convenience photographer who does not set too high demands, these types of jobs can also be done super fast with Faststone Photo Resizer.
Interesting options
Faststone Photo Resizer has with Border and Watermark Two more interesting options and are useful if, for example, you want to publish photos on a website. With border you can have beautiful edges made around the photos, with many variations in color and size and even edges that suggest depth or floating images. With the option Watermark You can add a watermark of photos in various ways. Below you can see the screen image of the option Border.
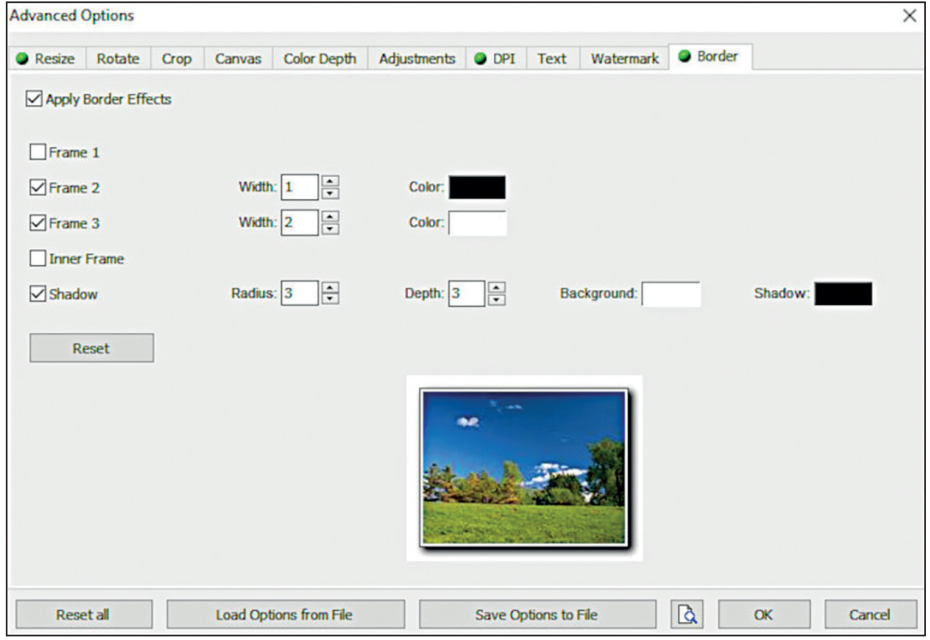 |
| Versatile option for making beautiful edges to photos |
Finally, you can set some last preferences in the main screen of this program, bottom right. This way you can go to the cruising box Rename Enter a special name for the converted photos. If all preferences have been processed, the conversion can be started. Click on this Convert. Converting is fairly fast and the progress is shown on the screen. A report also appears as soon as the conversion is ready.
Before you start the conversion, it is important to check (again) whether the original photos are not transferred. As mentioned here before, it is advisable to have the reduced photos write away to a specially made folder (the program offers the option to create a special folder). Furthermore, it is advisable to always choose Ask Before Overrite to leave. With this you will be warned if the source photo was mistakenly transferred.
Rename
What has not yet been explained is the option to rename the files. In the main screen you can do the tab for this Batch Rename click. This option only focuses on entering a different file name and no further preferences in terms of format, resolution, etc. are discussed.
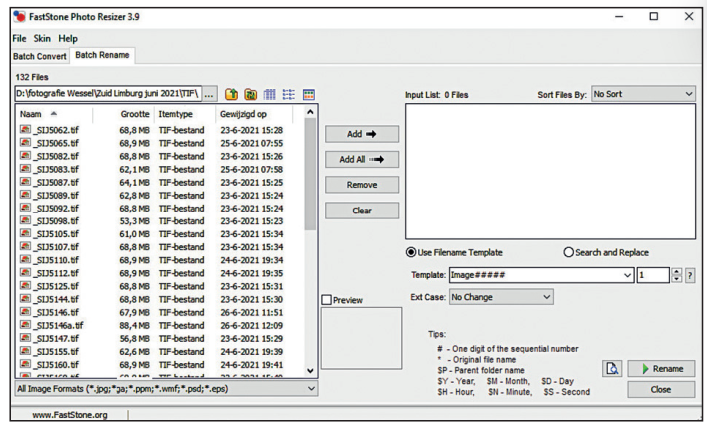 |
| Returning photos by batch |
This screen also points out of it. Bee Template the desired name can be entered. The program adds songs itself. Another option is to search for certain files by name and replace them with a file with a different name. Click on this Search and replace And fill in the preferences. Here too, the batch can be started with a mouse click for confirmation, on Rename. The conversion is also visible here on the screen and as soon as the job is done, the program indicates that neatly.
So far the introduction to this handy and versatile conversion program. If you want to try it out, just do it. After all, it costs nothing. It is also a great tool for the demanding photographer.