
Nowadays, almost everyone takes photos with their smartphone every day. For taking and editing better, more beautiful and more fun photos, we have collected interesting tips and tricks for you here. For more tips, tricks and explanations, go to one of the presentations in the context of the seasonal theme Photographing with your smartphone that will be given all over the country in the coming months.
Brigitte van Berkel and Rob Coenraads
Almost everyone has a smartphone, either an Android smartphone or an iPhone. One of the most popular and useful things to do with a smartphone is taking photos. These photos are stored on your smartphone or in the cloud; you can also use them immediately for and/or forward them via apps such as WhatsApp, Facebook and Instagram. However, taking the right photo(s) is not always possible. This may be because your smartphone does not have very good cameras, but it may also be that the wrong settings are used.
Seasonal theme
HCC receives many questions about taking photos with your smartphone. That is why presentations on this subject will be given all over the country in the coming months. This presentation was made by Brigitte van Berkel, volunteer at HCC!fotovideo and enthusiastic hobby photographer. This article discusses a number of subjects that are also in the presentation. However, the presentation is much more extensive and goes into more subjects in depth. In addition, you can also ask questions when you attend a presentation, so I cordially invite you to go to one of the presentations.
Different smartphones
As mentioned, there are Android smartphones and iPhones. iPhones have the iOS operating system, while Android smartphones are ‘controlled’ by… Android, the mobile operating system from Google. The fact that Android devices from Samsung, OnePlus, Xiaomi and other brands look and work differently is because each brand places its own layer over the software. Such a layer is also known as a peel. Google allows all these skins, so that brands can distinguish themselves from each other, but it does have a (non-public) list of requirements that such a skin must meet. One of them is very visible: the Google apps must be pre-installed and clearly visible.
Now it is not possible to discuss the settings of all the different skins and also the settings of both Android and iOS for smartphone photography. However, there are enough similarities for interesting articles, as you can read in this issue. PC-Active 337 will also pay attention to photographing with your smartphone.
Furthermore, the more expensive the phone, the better the lens and therefore better photos. Finally, it is advisable to regularly clean the lens with a soft glasses cloth.
Camera tips
 Here are some tips and tricks for your camera.
- Click on what you want to focus on:
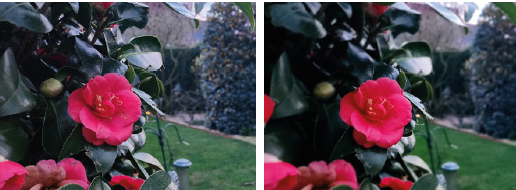
tap the subject you want to have in focus yourself instead of letting the smartphone camera decide. The photos of the blooming camellia show the difference in depth of field between the normal photo mode and the Food mode:
- Use different positions:

For example, use Portrait and Food modes to get a shallower depth of field, which makes for more powerful photos.
- Be creative with Panorama:
Hold your camera horizontally for a lengthwise shot or hold your camera vertically for a widthwise shot. A good example is the photo of the church in Panorama mode where you move your smartphone horizontally and from bottom to top.
- Continuous recording or burst mode:
This is ideal for use with groups or moving images. On iPhone usually used by dragging the shutter button to the left and releasing to stop. On Android usually used by dragging the shutter button down and releasing to stop.
- When taking selfies, use the timer and, if necessary, voice command:
When you use the timer on selfies, you still have time to put on your best face. Using voice commands like Smile and Cheese You need to turn this on in your settings and it prevents you from having to struggle to touch the shutter button when taking a selfie.
- Zoom in as little as possible if your camera does not have optical zoom:
Most cameras work with digital zoom, which is at the expense of quality. The difference between optical and digital zoom is that with digital zoom you zoom in on the image. This enlarges the pixels and makes the image less sharp. With optical zoom you zoom in on an object, for example, with the optical lens. The resolution of the image then remains the same, so you continue to have a sharp image.
Tips for light
Taking photos in light or dark conditions is a challenge for many people. But it also offers opportunities. We list a number of tips here:
- Morning and evening light is the most beautiful: use grazing light outside (if possible) in the morning or at the end of the afternoon, the light then has more color and is at its best. Morning and evening light give the image more atmosphere.
- Use the flash for harsh shadows caused by sunlight: Photograph as little as possible with the shadow directly in your back. The shadows will then hide behind the subject. So make use of the shadows to get relief and contrast in the photos, because they become much more interesting.
- Sometimes it is necessary to to flash during the dayfor example if someone is standing in front of a light background (white wall, sea) or to remove unwanted shadows. The result: fresh faces and sparkling eyes. The flash of a smartphone is much less powerful, so it will give little result at too great a distance. Keep this in mind or just test it out.
- When shooting against the light, use the exposure time of the sky, which gives nice silhouettes: to give a normal image more atmosphere, you can use backlighting. Make sure the sun is directly behind the subject and keep the exposure time of the sky. The subject is strongly underexposed and then a silhouette automatically appears.
- Use a tripod or set the camera down for low-light photos: use a tripod or place your smartphone on something when taking photos in the dark or at night. Because you have to work with long exposure times, the chance of motion blur is very high. You can also create very nice effects of moving lights (cars, bicycles) with long shutter speeds.
- Take photos even in rainy weatherdetails and reflections can produce very beautiful photos: in rainy weather most smartphones stay in the bag, but often atmospheric photos can be taken. Think for example of details of raindrops, reflections in the wet road surface, people with umbrellas, beautiful clouds or a photo through a wet window. If possible, in contrast to beautiful ominous clouds, leave gray skies out of the image because they can create a somewhat gloomy atmosphere.
 |
 |
Apps
There are hundreds of apps for taking and editing photos and videos. With the standard apps of Android and iOS you can do a lot, but there are differences between the various phones and their updates. For example, with most smartphones you can do the
- adjust exposure and color
- crop, rotate
- straighten and adjust perspective
- apply filter effects
- write, draw or stick stickers on it
- adjust size in pixels
The latest versions/updates have even more extensive features such as:
- delete objects
- make selections
- portrait/face adjustments
- partly black and white
- color adjustments
- apply artistic styles
Creative editing with Adobe Photoshop Camera
 Adobe Photoshop Camera is a free camera app that lets you add the best filters and effects to your photos. There are over 100 beautiful and interesting lens effects and filters inspired by famous artists and influencers. And the best part is: you don’t need any photo editing or Photoshop skills.
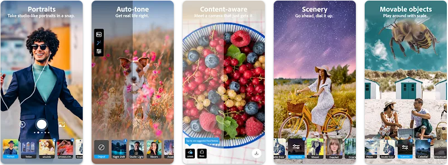
Photoshop Camera has a lot of fun and amazing AI-powered features that help you choose the right lens and create beautiful
Selfies, food and landscape shots, the perfect portrait and more. With quick auto-tone corrections and portrait controls, you can apply beautiful photo effects like background blur and fun filters to your photos to create high-quality photos with a simple tap or swipe of your finger.
 |
 |
|
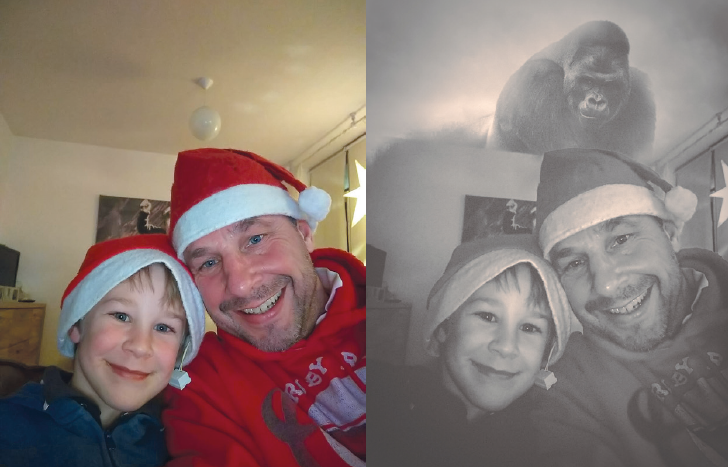
| An example of a facial effect |
There are two ways to work with Photoshop Camera. First, you can edit the photo afterwards; example of this are the 2 left photos above.:
You can also activate your camera with the app and then choose a filter. The result of the photo is then immediately with the filter applied.
Creative editing with Google Arts & Culture
 Are you curious to see what Van Gogh’s Starry Night looks like up close? Have you ever walked through ancient Mayan temples or met inspiring figures from African-American history? Want to learn more about Japan’s unique food culture or India’s spectacular railways?
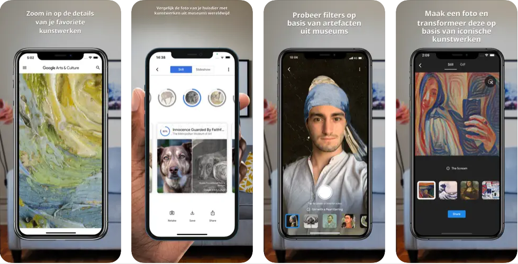
Google Arts & Culture puts the treasures, stories and knowledge of over 2,000 cultural institutions from 80 countries at your fingertips.  Discover stories about our cultural heritage, from the suffragettes who fought for women’s rights to the performing arts at the Paris Opera or the NASA archive of the most beautiful images from space.
This free platform is a great way to discover the art, history, people and wonders of our world.
The app is also known for its fun feature that allows you to ‘transform’ yourself using a selfie.