Also save the photos taken with your Android smartphone to the computer. There is then a good backup.
Backup smartphone photos
Transferring photos from an Android smartphone or tablet to the computer can be done in various ways: via the cloud (online storage space) or via the supplied cable.
Transfer photos via the cloud
If you don’t feel like fiddling with cables that don’t fit or are lost, it’s best to transfer photos via the cloud. You then save the photos on the internet, with a free or paid service. Because they are online, you can access the images from any device, including your computer.
There are many so-called cloud services you can use to transfer (or back up) photos, including the following:
Google Photos
Automatically copy photos and videos from tablet or smartphone to Google Photos using the “Back up with Google Photos (Android and iOS)” article. Then retrieve them from the cloud on the computer via the Photos website.
OneDrive
Put photos in the OneDrive cloud using the “Working with OneDrive (Android)” article. Get the images from the cloud and transfer them to the computer using the article ‘Working with OneDrive over the Internet’.
Dropbox
The same goes for the cloud service Dropbox. Transfer the photos to the Dropbox cloud via the app using the “Working with Dropbox on Android device” article. Use the “Working with Dropbox over the web” article to pull the photos and videos from the cloud to the computer.
Transfer photos via cable smartphone
Manually transferring photos from the Android smartphone to the computer is done with a USB cable. You received this cable with the telephone. This is the same cord that you use to charge the device. Transfer photos and videos from smartphone to computer as follows:
- Connect the phone to the computer via the USB cable.
- The phone will display the message ‘Allow access to device data’. Tap on To allow.
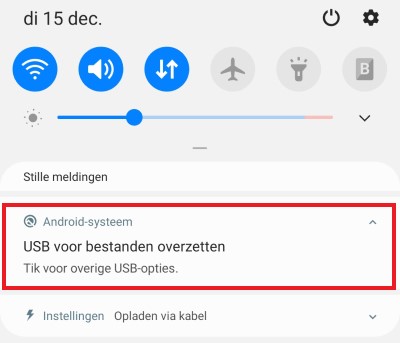
- If no notification appears, swipe down from the top edge of the screen. In the quick menu, tap USB for transferring files.

- Under ‘USB controlled by’, choose whether you want to control the smartphone from the computer when connected, or from the phone as usual.
- Under ‘Use USB for’, choose Transfer images.
- If no notification appears, swipe down from the top edge of the screen. In the quick menu, tap USB for transferring files.
- On the computer, open the Explorer.
- Click in the left column on This PC.
- The explorer shows the contents of ‘This PC’. Under ‘Devices and drives’ you will find the drives and external devices connected to the computer. In between is also the name of the phone. Double click on this.
- Every brand of phone uses different folder formats. Some phones have all the photos in the ‘Pictures’ folder. Optionally, browse the folders to find the folder with photos. On the Samsung Galaxy A50, double click on the folder phone > DCIM > Camera.
- Click on the photo you want to copy to the computer. To copy multiple photos, hold down the Ctrl key while clicking the photos.
- Right click on a selected image.
- In Windows 10, click To copy. In Windows 11, click the icon at the top of the menu To copy.
- In File Explorer, open the folder on the computer where you want to copy the photos.
- Right click on an empty (white) piece in the map.
- In Windows 10, click To stick. In Windows 11, click the icon at the top of the menu To stick.
The photos are placed in the folder. You can also use this method the other way around, i.e. to copy photos from the computer to the smartphone.
In this tip we assume a Samsung Galaxy A50 and a computer with Windows 10. But it works about the same on other Android devices and Windows versions.
Video: Transfer photos to PC
Also watch the steps in the video below.