Statement
New to Windows Live Mail?
Not yet familiar with Windows Live Mail? Then it is advisable to first read the article ‘Windows Live Mail: installing and sending e-mail’.
Attachments
In Windows Live Mail you can easily send one or more files with your e-mail. For example photos or texts. These attached files are called ‘attachments’. You may also receive emails from others with attached attachments. In the following steps you will learn how to send attachments and how to open attachments. But you will also learn a special case of sending e-mail with attachments, namely so-called photo messages.
Size of attachments
In principle, you can send unlimited attachments. Keep an eye on the size of the attachments. Usually a limit of 5MB per e-mail is used. Many providers reject emails that are too large. You will then receive an error message that your e-mail was too large for the recipient’s mailbox. You can then try to send the e-mail with fewer attachments or to spread the attachments over several e-mails.
Send attachments
You can send an attachment to your email as follows:
- Open Windows Live Mail via Start > All Programs > Windows Live Mail).
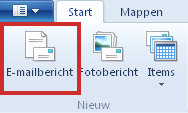
- Press the button Email message in the ‘Home’ tab.

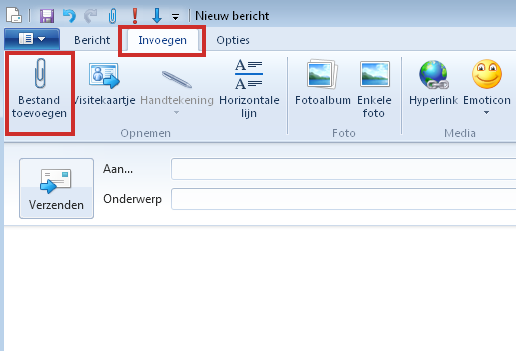
- click on Insert > Add File.

- A new window will appear. Locate the file you want to send as an attachment. This can be, for example, a Word document or an image. Select the desired file and click To open.
- The file will appear directly in your message, you will see it behind the paper clip. If you want to send more files, repeat these steps.
- You can now write and send your email in the usual way.
Open Received Attachment
If you receive an e-mail with an attachment, you can recognize this by a paperclip icon. When you open the e-mail, you will see the attachment under ‘To’. Open the attachment by double clicking on it. In the case of an image, the image often opens immediately. But it can also happen that you have to click once to open an attachment To open must click. This is a kind of security. Only open images where you trust the sender and the email.
Single image in an email message
You have read above how to send attachments to your e-mail message. You can also send images in your e-mail, so simply as a picture between the text. The desired image must be stored somewhere on your computer. You insert it like this:
- click on Email message to create a new message.
- Place the cursor in your email where you want to insert the image.
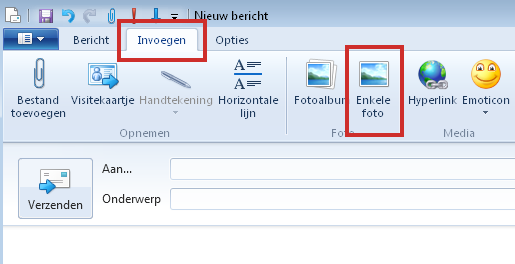
- click on Insert > Single Photo.

- Locate the file on the computer, click it, and then click To open.
- The image is now in your email. You can drag the image smaller at the corners, while holding down the Shift key so that the proportion of the image remains correct.
- In the ‘Layout’ tab (visible when the image in your email is selected) you have several formatting options. Feel free to try them out. What you will probably use the most is the alignment. This determines whether you want to place the image on the left, right or, for example, in the middle of your e-mail message. In the ‘Layout’ tab, in the ‘Alignment’ group, click the down arrow with the dash above it. Then you have all the options to align the image at your disposal. Click on an option and your image will be aligned instantly. You can try as many options until you are satisfied.
- You can also move the image by left-clicking and holding the image, dragging the photo to a different location, and then releasing the mouse button.
Create a photo message (1)
Windows Live Mail makes it easier to send photos. If you email with a Hotmail, Live address or Outlook.com address or if you have another email address linked to a Microsoft account, you can send extensive slideshows where you can save the photos on OneDrive for free. This is one of Microsoft’s servers. Only miniature versions of the photos are then sent via the actual mail, after which the recipient can see the large photos via the Internet.
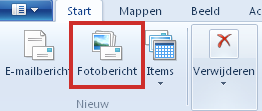
- Click in the ribbon for this Start and click photo message.

- If you are not already logged in to Microsoft, the login screen will now open. Enter your email address and password here and click To register.
Create a photo message (2)
You will now see a new, empty message. At the same time, an overview of your folders (Explorer) opens. Allows you to browse and select the desired photos. You can select multiple photos at once by clicking them while holding down the CTRL key.
- Select the photos.
- After selecting, click on To open. You will then see the selected photos appear in your email.
- below Layout choose a specific album style: all photos in a row or playfully side by side.
Switch between album and lyrics
- A photo message contains a photo album within the message. You can name the album by clicking Enter the name of the album here. Click above the photo frame to enter text. The ribbon changes with it and now displays options for text. Click the photos again to switch back to the photo album options.
- Finally, fill in an email address and a subject and your photo message is ready to send.