
Despite the fact that we do almost everything via e-mail nowadays, you cannot avoid sending a letter every once in a while. Whether that is a birthday card or a business letter. Of course you still have to address that letter. This can be done by hand, but a just printed label is a lot more professional and can be done in no time with the help of Word. This is how you can create labels in Word.
1. Set the label type
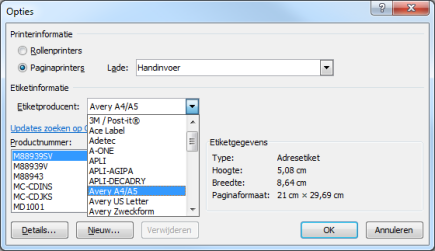
Labels are usually sold as sticker sheets with a number of rows and columns of separate labels. Before you can print a label you will have to set what type of label you have. You open the part in the ribbon Mailings. Then click on the button Labels. In the window that now opens, you can see on which type of label Become is set. This will likely be a Microsoft address label. To set the label you use, click Options. Click on the selection box next to Label producer and see if your label sheet manufacturer is listed. If you’re lucky, your label sheet manufacturer will be in the list and you can enter the input field Product number select the correct label based on the product number that you find on the packaging of your labels. If your label manufacturer or product number is not in the list, go to step 2 of this article, otherwise you go straight to step 3.
2. Set unknown label
If the manufacturer or product number of your labels is not in the list, you will have to add a template for your label type yourself. Click in the section in the ribbon Mailings press the button again Labels and click in the window that opens Options. Then click on the button New. You will now see a schematic representation of a label with which you can set the dimensions of the labels and the margins on the sticker sheet. It is important that you indicate the correct number of labels on your sticker sheet using the fields Number horizontal and Number vertically. You also need to specify the size of the sticker sheet itself at page width. This will often be A4, but it does not hurt to measure this. All dimensions and margins must be set correctly or your labels will not print correctly. As the last step, give your own template its own name in the field Label name and click on OK.

3. Print label (s)
If you want to print a label, click again in the ribbon Mailings and then on Labels. In the window Envelopes and labels that now opens, you can in the field Address enter the address details you want. You can quickly indent using the key combination Ctrl + Tab. By clicking on the right mouse button you can set the font used. You can choose a label sheet where all labels have the same address or just one printed label by specifying the correct row and column. Then click on Print. If you want to print a different address on each label, click the button New document.

A new document will now open in which you see a large table where each cell represents a label on the sticker sheet. An advantage, which can also be useful if you only want to print one label, is that things like a font are easy to set. Type the addresses in the cells and print the document on a label sheet.
.