
Nowadays you can use any mobile phone as Voice Recorderbut the quality of this is not always very good. Can we might craft something together, for example with a small Pico Zero W-board?
Wim Dewijngaert![]()
Nice crafting with a Pico Zero W plate, a hobbyist doesn’t turn his hand for that! But it turns out to be a bit spicier than expected: a Raspberry Pi cannot process the analog signal of a condenser microphone due to a lack of analogue ports. How do you get this done? How do you get this done?
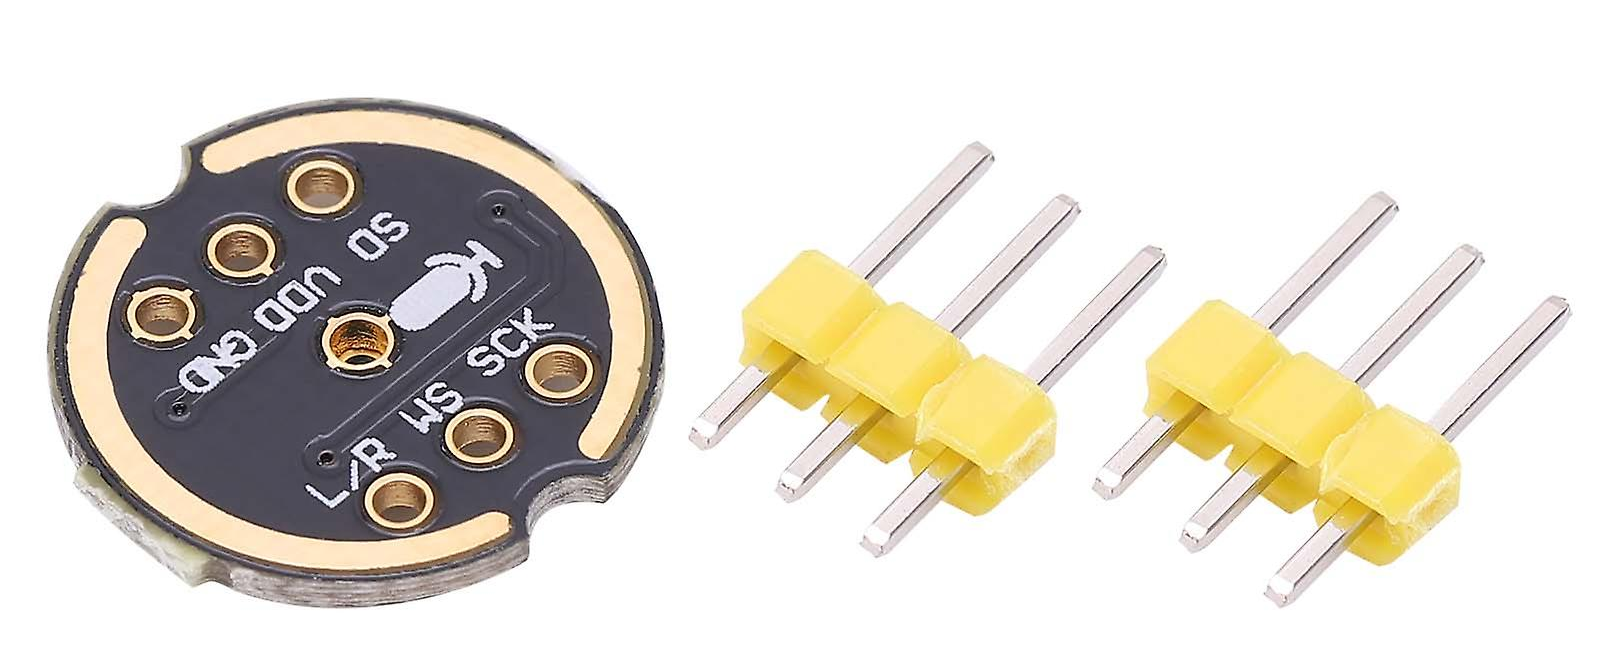
The solution lies in the use of a MEMS microphone, which immediately sends the signals digitally to our Raspberry Pi. This has the additional advantage that there are less noise and malfunctions of, for example, a food source in the sound. In our project we use an INMP441 from YouMile, easy to find on Amazon for Net 6 euros. A Pico Zero W with pre -soldered headers and accompanying food can be scored on the internet around 35 euros.
Installation operating system
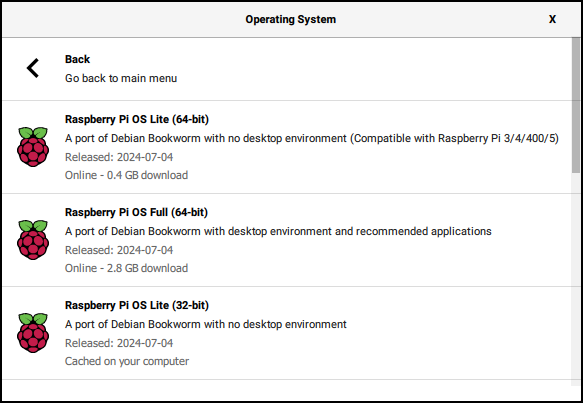
First we place the operating system on an SD card. For Windows users this is easiest with the Windows Raspberry Pi Imager (https://www.respberryPi.com/software). Place an SD card of at least 2GB in your Windows computer and start the program. Choose Raspberry Pi Device for Raspberry Pi Zero 2 W. When Os take your Raspberry Pi (Other) and then Raspberry Os Lite (32-bit) Bookworm.
Then the question arises as to whether you want to adjust the settings. Press Yes and then Customize settings. Choose a hostname (for example ‘Soundecorder’) and a username and password (use ‘PI’ and ‘Raspberry’ for the easy Settings). Finally, enter the details of your WiFi network. Also check if at Services the SSH on.
 When writing is ready, place the SD card in your Pico Zero. Then you link the power supply and wait a few minutes until the operating system starts and is connected to the network. We must now find the IP address of the Raspberry Pi. With the application Fing On your mobile phone you can easily do this on the basis of the host that you chose during the installation.
Then use Putty (or another SSH program) to connect to the Raspberry Pi, and bring the OS to the last position with the commands:
SUDO APT -GET -Y UPDATE
SUDO APT -Get -y Upgrade
Then install FFMPEG:
SUDO APT INSTAL FFMPEG
The GPIO pins on the Raspberry Pi can be switched to six alternative functions. To be able to use our digital microphone, we have fashion Alt0 required, using the GPIO pins 18, 19, 20 and 21 for the respectively Bit Clockthe Left/Right Clock,, ” Data in and Data Out of the I2S protocol. This is a fairly cumbersome procedure, so we take a shorter road and pretend that our microphone is part of the open-source project Google Voice Hat, which uses a similar microphone. With one adjustment in the configuration file, so much work is taken out of our hands.
Tap:
Sudo Nano/Boot/firmware/config.txt
And at the very bottom you add:
DTOLAY = GooglevoiceHAT soundcard
Connections
Remove the power from the Raspberry Pi and connect the microphone in the following way:
Vdd to pin 1
Gnd to pin 6
SCK to Pin 12 (GPIO 18)
L/R to Pin 14
WS to Pin 35 (GPIO 19)
SD to Pin 38 (GPIO 20)
By means of L/R with the ground To connect, we indicate that we want to use the microphone in mono-fashion (with a second microphone you can optionally also record a stereo sound image).
Last dots
Return the Raspberry Pi, create an SSH connection and now enter this command:
Arecord -l
If everything goes well, you get this answer, which means that the sound card has been found:
**** List of Capture Hardware Devices ****
Card 0: SNDRPIGOOGLEVOI [snd_rpi_googlevoicehat_soundcar]Device 0: Google Voice Soundcard Hifi VoiceHat-Hifi-0 [Google voiceHAT SoundCard HiFi voicehat-hifi-0]
Subdevices: 1/1
Subdevice #0: Subdevice #0
The sound volume of the recordings is in the first instance much too low. We can solve this by
Nano ~/.Asoundc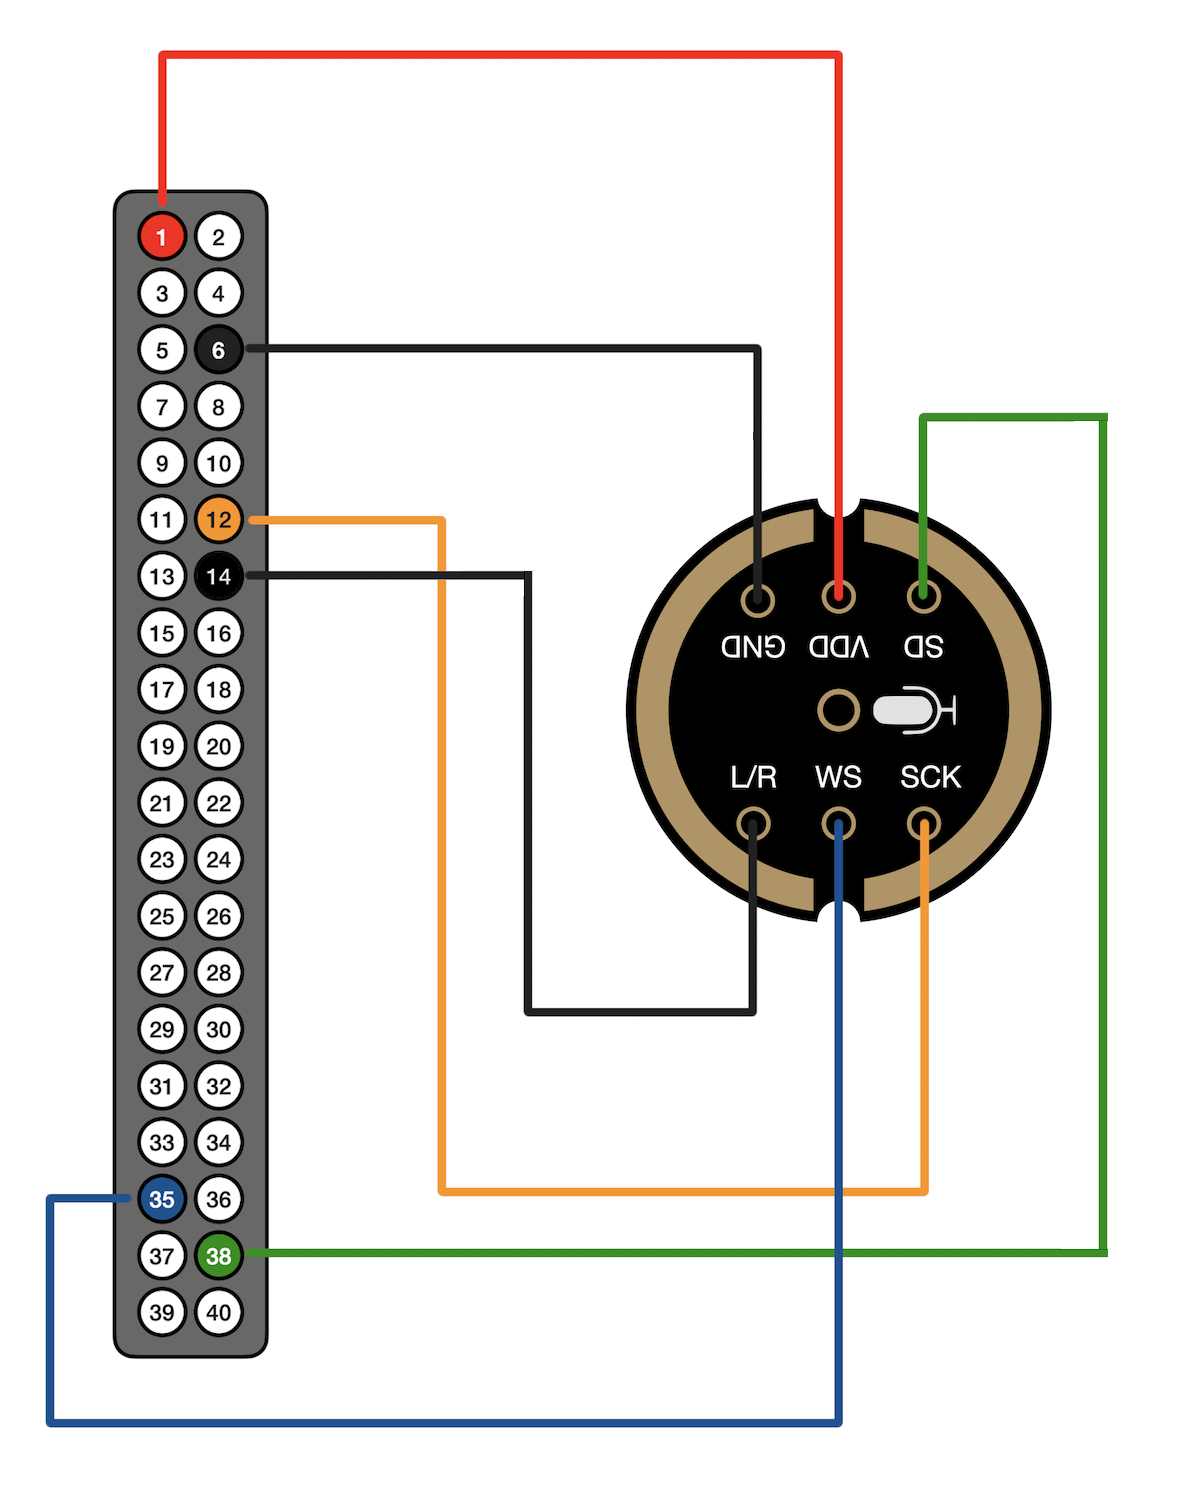
to tap and in it
next file to be placed:
pcm.Softvol {
Type Softvol
slave.pcm dmix
Control {
Name Master
Card 0
}
}
pcm.micboost {
Type of route
slave.pcm dsnoop
ttable {
0.0 35.0
1.1 35.0
}
}
PCM.! Default {
Type of asym
Playback.pcm “Plug: SoftVol”
Capture.pcm “Plug: Micboost”
}
CTL.! Default {
Type HW
Card 0
}
We then also copy this file to another location:
SUDO CP ~/.Asoundc /etc/asound.conf
FINISHED? ACTION!
Normally the program is made to make sound recordings arecord Recommended, but this software can only use the space-food WAV format. Of Ffmpeg We can keep our file in the MP3 format, but a bug is used by one hundred percent of the processor when writing away. With the extra parameter Readrate 1 We can still limit this.
To start a mono recording of 60 seconds in MP3 format, use the following command:
FFMPEG -Readrate 1 -f ALSA -i default -ar 22050 -t 60 -ac 1 -ab 128k File name.mp3
Of course you can experiment with the parameters to your heart’s content.