
You must have created many Word documents in your life. That is not that complicated, but when you want to make a book, thesis or report, there is more to it. Think of elements such as a cover, a preface, a table of contents, pagination and footnotes and endnotes. Do you want to make your own book in Word? We will discuss the most important aspects here.
We use for this article MS Word 365, but all techniques can be used in MS Word 2019 and 2016. Many tips can also be applied in older Word versions. We work in the order of your book as much as possible: from cover page, foreword and table of contents to text division, pagination, endnotes and index.
You don’t have to do this in this order, of course. We can imagine that, for example, the cover, the foreword and the content will receive the necessary attention afterwards. But it is good to read everything carefully before you start with your magnum opus.
Add cover
We assume that you also print the cover page on a home printer. You can of course create your cover with a graphic design program like MS Publisher or the free Inkscape. You can even use a photo editing tool, but we’ll stick with MS Word here.
A fast and attractive way to add a cover page is via the menu Insert, where you left on Pages clicks and Cover Sheet select. You can choose from sixteen designs here. Then replace the sample text with your own text. You can safely move and scale the page elements.

Working with a master document
It is important to consider whether you save your book in one Word document or whether you create a separate document for each chapter. A single document is easier to manage, but it becomes more logger to work with over time. In principle you can split the book into fairly arbitrary parts, of course based on the same style template. Later you can bring the various documents together with a view to the parts just mentioned.
We also want to point out the concept of main document as Word understands it. Create a new document and name it for example main document.docx. Then you open the menu Statue and click Overview. Now fill in the different (sub) titles of your book. Make use of the offered levels (Level 1 until 9), left on the ribbon. Choose View document once you are done with this. Press Ctrl + A to select all, click To make, after which you save the document again.

You will see that each chapter is included in its own box and ends up in a separate file. Now click on Close outline view, position the text cursor at the top of your document, open the menu References, click on Index and choose an automatic table of contents.
Close and recall the saved document. You can now click through to the subdocuments from here (via Ctrl + mouse click) and provide them with content.

Then open the overview view of your main document and click Expand subdocuments. Close the outline view, select your table of contents and choose Update table. If this concept seems like something to you, you can further compile your book based on it.
Create table of contents in Word
We’ll stick to the table of contents for a while. Manually creating a table of contents is not convenient. You have to adjust this yourself with every change. Fortunately, the table of contents can be automated in Word. But that only works well if you have maintained a consistent layout style in the various (sub) chapters.
In the menu Start, at the rubric Styles you can do this Cup 1, Cup 2, et cetera. As soon as you have applied Heading 2, Heading 3 will also appear and then the rest.
You can also use other styles for your document hierarchy, but then you have to indicate which style Word should consider level 1, 2, 3…. Place your text cursor in the text part for this, open the tab References, choose Add text and indicate the desired level.

To place your table of contents, you prefer to use an empty page. Go to again References and click Itable of contents, where you indicate an appropriate layout. The table of contents appears almost immediately. click on Table of Contents, Custom Table of Contents if you want to tweak anything else.
To edit changed text in your table of contents, select at References the option Update, Update in its entirety.
Pages without page number
It is often the case that no pagination is included with a preface or at least a deviating pagination. How do you get the desired page numbers on specific pages?
You could in principle start from a template that already provides the desired numbering. In that case, open File, New and looking for page numbering Bee Search online templates. Of course you can also indicate the desired numbering yourself.
Normally you add page numbers from a header or footer. We assume that you want a different layout at the bottom of the odd and even pages (so that the page number also appears on the outer edge in a double-sided print) and that you want some start pages, such as those of your preface, outside this page numbering to hold.
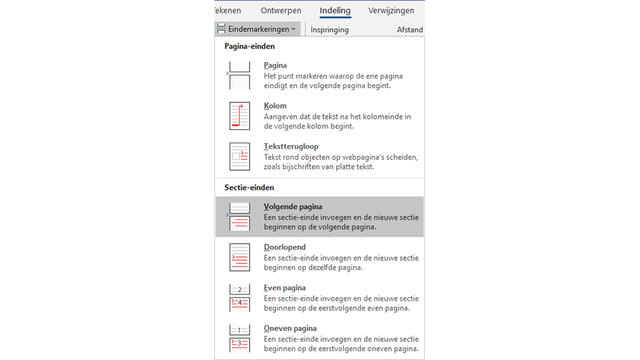
We’ll start with the latter. Position the cursor at the bottom of the last page of your preface, open the menu Layout and choose Insert, Break marks, Next page (Bee Section breaks). We recommend you in the menu Start the button ¶ (Display all) so that you see the (hidden) mark appear.
Then click in the footer area of the page that comes immediately after your preface. The options for Header and footer. Here you put a check mark Even and odd pages different and click Link to previous so that the indication Same as previous just above your footer disappears. Then click on the left Page number, Current position and choose a suitable number display.
Now press several times Tab until the number is correctly positioned. Click again Page number, choose Format page numbers and fill 1 in at Start at.

Double-click in your document to close the footer and repeat the procedure for the footer on an even page, this time leaving the footer linked to the previous one and now positioning the numbering at the far left.
You may also give separate page numbers to your preface. You can choose another type: bee Format page numbers, Numbering you can select Roman numerals, for example. You can also include other elements in your header or footer, such as a title, your name and the date.
Add footnotes and endnotes
In a (scientific) non-fiction text you may also want to add footnotes or endnotes. That is quite easy in Word. Click where you want to link a footnote or endnote. Open the menu References and choose Insert footnote or Insert endnote.
By default, a line appears at the bottom of the page (at footnote) or at the end of your document (at endnote), with a number below which you can enter the footnote or endnote. Double-click this number to return directly to the link in your document.
Of course you don’t have to be satisfied with the standard layout of these footnotes or endnotes. Go to the menu again References and click the arrow at the bottom right of the heading Footnotes On. A dialog box will appear where your Footnote or Endnote check box and adjust all settings as desired, such as type and whether or not the count should start over with each page or section. Bee Apply changes to determine whether the changes should only apply to the current section or to the entire document.

Create index
Finally, an index is a list of terms that have been covered in your book, including the page numbers where they can be found. You will understand that setting up such an index requires some preparation. In a first phase you mark all mentions in your text, preferably in order from beginning to end. Mark the word or text as you want it to appear in the index.
Open the menu References and click in the section Index on Mark item. Bee Main detail By default, the text you marked appears, but you can still change that here. Suppose you have the floor End marks , but in the index you just want to direct the reader to the term Sections, then you tick Cross-reference On. Here you enter See Sections so that in the index it will appear: End Marks -> See Sections.
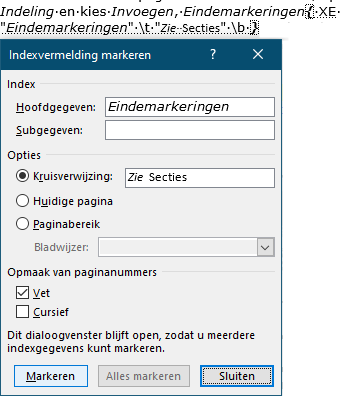
Immediately after you met To mark confirmed, Word shows all marks. They look like {XE “
Open again References and click in the section Index on Insert index. In the dialog you can set all kinds of formatting elements, such as the number of columns for your keywords, the alignment of the page numbers and the possible leader and the format (the style, for example Modern or Decorative. Confirm with OK.
Via the button ¶ (Display all) you can still make changes in the Start menu. Keep in mind that you still have to refresh the index after any adjustments: go to References and click on Update index in the section Index. Now your book is complete!
.