Make your favorite photos even more beautiful by editing them on your Mac in the Photos application. For example, adjust colors, crop or straighten the image.
Version macOS
A Mac works using the macOS operating system. This article is written for versions of Mac OS X 10.11 El Capitan through macOS 10.14 Mojave. Do you have macOS 10.15 Catalina or later? Then get started with the article ‘Edit photos on Mac (macOS Catalina)’.
Import and manage photos
In this article, we’ll discuss how to edit photos using the Photos program. Not using the program yet? First read the articles ‘Import photos on Mac’ and ‘Manage photos on the Mac (up to macOS Mojave)’. Here you can read how to put photos on the computer and then create an overview in your photo collection.
Photo editing
In early 2015, Apple introduced the Photos application as a replacement for long-time iPhoto. The program allows you to import, manage and edit photos. Always follow the steps below to edit a photo:
- Open the Photos program by clicking finder > Programs. Then double click on photos.
- Double click on the photo you want to edit.
- Click in the top right corner on the icon with the three lines
 .
.
The window will go black and all sorts of editing options will appear on the right side. These editing options are discussed in the sections below.
Improve
Quickly and easily improve the photo? With the ‘Enhance’ function, the program itself analyzes and improves the photo.
- Follow the steps in the ‘Edit photo’ section.
- Press the button improve.
- The photo will be adjusted immediately. click on Ready if you are satisfied with the result and on Restore original if you are not.
rotate
It regularly happens that a photo does not appear correctly in the photo overview, for example on the side. That is easy to solve.
- Follow the steps in the ‘Edit photo’ section.
- Press the button rotate.
- The photo rotates counterclockwise. Click the button as many times as necessary until the photo is in the right position.
- click on Ready.
crop
Cropping a photo is useful if you only want to use part of the photo.
- Follow the steps in the ‘Edit photo’ section.
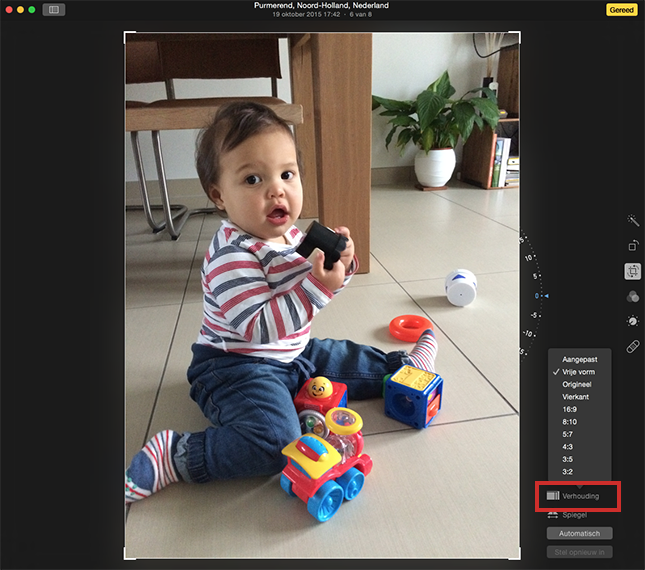
- Press the button crop.
- click on Ratio to select the format you want to use. You can choose one of the fixed ratios. If you want more freedom, choose ‘Free form’. We click on Square.

- The photo is adjusted. You can still adjust the crop by clicking on the photo, holding down the mouse button and dragging the mouse.
- click on Ready if the cut is to your liking.
Crop video
Also watch the steps to crop a photo on the Mac in the video below.
Add filter
Make your favorite photos even more beautiful by adding a filter.
- Follow the steps in the ‘Edit photo’ section.
- Press the button Filters.
- Click on a filter.
- The processing starts immediately. Click on the different filters to see which one you like best.
- click on Ready once you have the right filter.
To adjust
Is the photo too light or too dark? This can also be adjusted in the Photos program.
- Follow the steps in the ‘Edit photo’ section.
- Press the button Customize.
- Below each other you will see options for ‘Light’, ‘Color’ and ‘Black & White’. Move the sliders below the options to adjust the color.
- click on Ready if you are satisfied.
retouch
Fix blemishes and blemishes with the retouch tool in the Photos program.
- Follow the steps in the ‘Edit photo’ section.
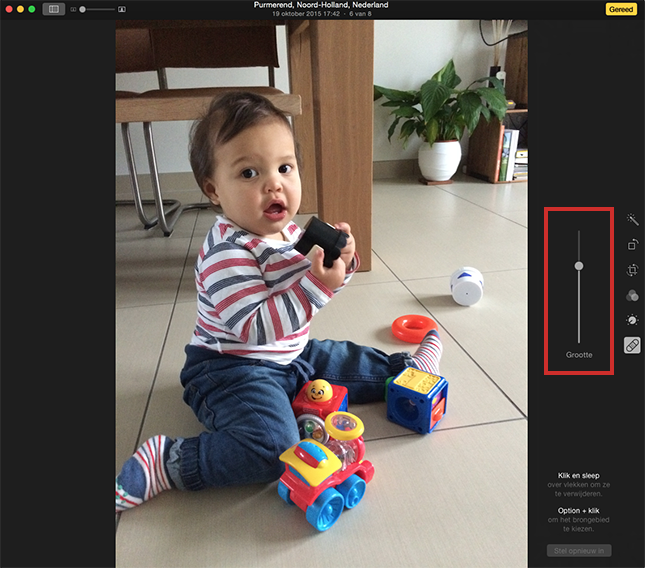
- Press the button retouch.
- Move the slider above ‘Size’ to determine the size of the tool you use to edit the photo.

- Click on the disruptive element you want to remove. Do this until the element is gone.
- click on Ready.
Undo edit
You can always undo the edits.
- Click on the picture.
- Click on the icon with the three dashes
 .
. - click on Restore original > Ready.