
Smartphones and tablets have become indispensable devices. Not only for calling and texting, but also for photographing and filming. In fact, they do it so well that you may wonder whether you still need a separate photo and video camera.
Filming with the Camera app
First, open the Camera app. This can be done if the phone screen is black (i.e. the screen is not activated yet) by pressing the Home button. Or the button on the right side of the device. Then drag the screen to the left with your finger. You have now turned on the camera.
Is the screen already on? Then tap the Camera app  .
.
Make video
The camera allows you to take photos and videos. At the bottom of the screen (iPhone) or to the right of it (iPad) you will see a scroll bar. The scroll bar includes the word ‘video’. Tap to select that option. When ‘video’ is selected, the letters will turn yellow and the large (record) button will turn red. You can now start recording a video.
Using the record button
At the bottom of the screen you will see a large red button: the record button. This is shown on the right on the iPad. Tap it to start recording. The red button changes to a stop button. Tap to end recording. At the top of the screen is a counter, which indicates how long the recording has already taken.
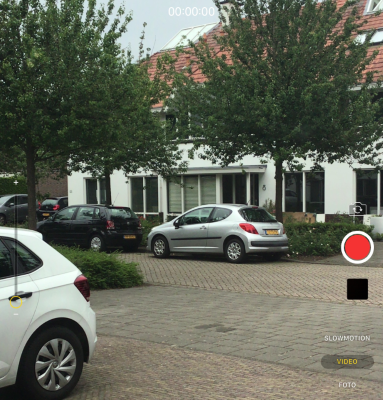
Phone upright or turned
Most people hold their phone or tablet upright when filming. Logical, because that’s how you often hold the device. This results in so-called standing videos, which are popular on social media. But don’t you want to use the video for that? Then it is always recommended to tilt the phone. So keep it horizontal, also called ‘landscape’. It’s annoying if your device still rotates the video when playing and you can’t watch it properly later.
Focus
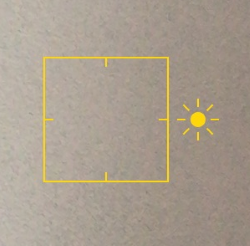
When you start recording, the camera focuses on the subject you are shooting. But sometimes the device could use some help with that. Tap once on the screen where you want to focus. A yellow square with a sun next to it will appear. The camera is now focused on the area inside the square.
How light the image is then changes immediately. Do you think the image is too light or too dark? Then swipe up or down on the screen. The camera immediately adjusts the amount of light:
Zoom in and out
If you want to highlight a certain part in the video, you can zoom in. You do this by placing two fingers next to each other on the screen and then moving them apart. The image is magnified. You can zoom out by moving two fingers together on the screen. With the iPad you can also use the scroll bar on the left of the screen.
Keep in mind that zooming in with a phone only magnifies the image. This does not affect the quality of the recording. You can also move a little closer to the movie subject instead of zooming in.
Taking photos while filming
You can also take photos while you are filming. If you have rotated the smartphone horizontally (landscape) and the record button is on the right, you will see a white round button at the bottom right. Tap that and you’ll take a photo while filming continues. Unfortunately this is not possible on the iPad.
take a selfie
The icon of two arrows in a circle allows you to activate the front camera. This allows you to easily make a recording of yourself; a so-called selfie.
Watch video
You can watch it right after you create a video. To do this, tap the square image next to the record button. Would you like to watch the video later? Then you will find it in the Photos app  .
.
Resolution and frames per second
How smoothly your video plays depends on the number of frames per second. They ensure that your video does not become jerky when playing. If you watch a movie at normal playback speed, there is little noticeable about this. But if you play the video in slow motion, for example, the number of frames per second does matter. The more images per second the device records, the smoother the images will merge. By default, your phone or tablet is set to 30 frames per second, abbreviated fps. The other options are 24 and 60. At 24 the video looks a bit slower, 60 fps is a lot. You can set the fps settings yourself. More about that below.
In addition to images per second, resolution also plays a role. You can also set that yourself. The options are 720p HD, 1080p HD and 4K. You may know 1080 from television, which stands for ‘full-HD’ or: high-resolution image. 4K is the new standard. Your phone or tablet can record in 4K. But to be able to view 4K filmed images, a 4K device is also needed. There aren’t that many of those yet.
Change the resolution and fps settings like this:
- Tap on Institutions.
- Tap on Camera.
- Tap on Record video.
- Tap the desired combination of resolution and frames per second.
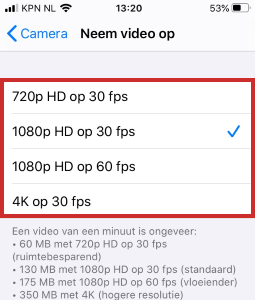
Note: the higher these settings, the more memory space the videos will take up on the device.
Edit video afterwards
Since iOS 13 / iPadOS 13, it is possible to (simple) edit a video. The image can be straightened or rotated, the video can be given a color filter and can be shortened. Can’t mount. To edit a video, do the following:
- Tap the app photos.
- Tap the video you want to edit.
- Tap on Change.
The format changes. There are four buttons to change the settings. On the iPhone these are at the bottom, on the iPad on the side.
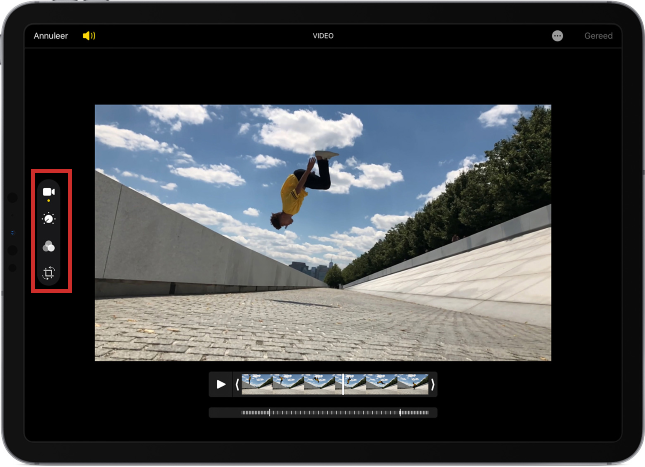
The icons have the following function:
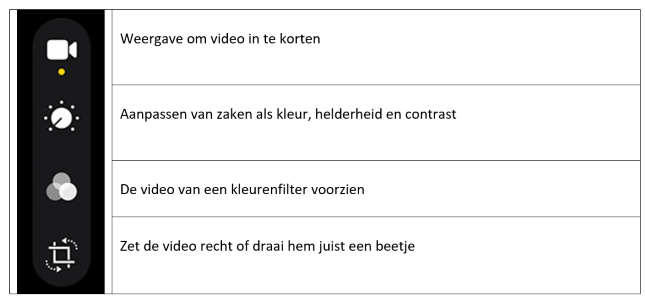
Trim video
At the bottom of the screen are all the recorded images of the video. To the left and right of it are two handles. Slide this to trim the video. Slide the left handle to the right to start the video later. Slide the right handle to the left to shorten the end. Tap the play button (triangle) to play the edited video.
Other operations
The other operations are self explanatory. You tap an option and make a choice, for example for a specific filter. You will see the result immediately. With a tap cancel undo the change.
Are you ready?
- Tap on Ready.
- Tap on Save video or Save video as a new fragment. With this last option, the original video is also preserved.
Good to know: if you store photos and videos via iCloud, videos stored there will first be downloaded to your device before you can edit the video.