
Looking for a reliable and stable operating system for an old PC or laptop? Do not immediately purchase an expensive Windows license. The light operating system MX Linux is excellent for most computer tasks. We explain how installing MX Linux works and what you can do with it.
Although MX Linux has only been around since 2013, it has built up a high reputation in a relatively short period of time. After installation, you can use the internet, e-mail, text processing, correct photos and play games within a Dutch-language user environment.
The operating system is relatively easy to use. The installation procedure from a USB stick is not very complicated, so that you can get started after roughly an hour.
Furthermore, the clear user environment is well developed, partly thanks to the smooth navigation structure. You start every computer session with the start button at the bottom left, just like you do Windows are used to. Finally, there are a lot of well-known programs for MX Linux available. A number of them are already installed and you can easily add additional applications.
Anyone who wants to try out a lightweight Windows alternative will find a reliable partner in MX Linux. We present to you this promising Linux distribution!
MX Linux system requirements
In addition to a reasonable processor from Intel or AMD, you need a system with at least 1 GB of ram and 6 GB of free disk space. Incidentally, the makers of MX Linux advise to reserve at least 2 GB of ram and 20 GB of free disk space. You can be sure that the Linux distribution runs like a charm. You also need a free USB port.
Finally, find out if your system includes a 32bit or 64bit processor architecture. You will then know which version of MX Linux you can install. Is Windows still running on the machine? Open the search field and type System information. Press Enter and view behind System type whether it is a 32bit (x86) or 64bit (x64) processor architecture.
Download MX Linux and put it on USB stick
To prepare for the installation of MX Linux, first create a bootable USB stick with any Windows computer. Download MX Linux here. As you can see, there are all kinds of versions. If you need a 64bit version, click MX-19.4_x64. For a 32bit version, click the download link MX-19.4_386 On.
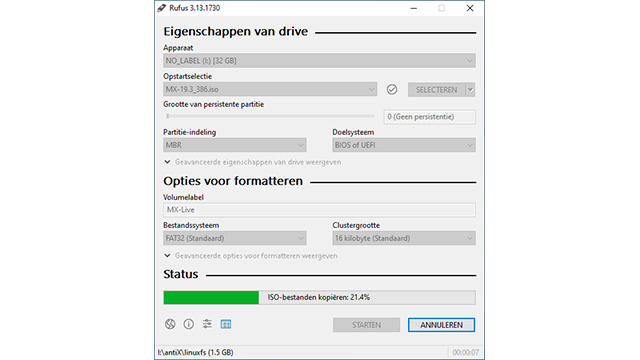
When in doubt, it is best to choose 32 bit. Incidentally, the version numbers may differ slightly at the time of publication of this article. Save the MX Linux ISO file somewhere on your system. Now it is time to create a bootable USB stick. This is possible with Rufus. Download this program and open the .exe file. No installation is necessary.
Now poke an empty USB stick in the computer case. You check in Rufus or at Device the correct USB stick is highlighted. Point via Selecting the iso file of MX Linux and confirm with To open. You leave the other settings unchanged, after which you press Starting write the iso file to the USB stick.
Boot from USB stick
You will now start the installation with the prepared USB stick. For this it is important that you open the system menu of the computer, i.e. the bios or the uefi. Turn on the computer you want to install MX Linux on and press the appropriate key during the boot process to open the system menu. Depending on the computer used, this is usually F2, F10 or Delete. Often it also briefly shows which key you can use for this.
Once you have arrived in the system menu, navigate to the start-up settings. Manufacturers usually refer to this menu as Boot. Select the USB stick as the first boot disk and perform a reboot.
After a few moments, the installation menu will appear. Press F2 and use the arrow keys to select English. Then confirm with Enter. You will see the version number and publication date of MX Linux at the top of the installation menu. Select this option and press Enter.

Complete installation
After a while, the operating system’s live environment will appear. Here you can already try out the user environment, although live environments are often slow. Therefore, click on the desktop Install to immediately start the installation procedure. Through Next one you decide on which partition you want to install the operating system. The option Automatic installation on the entire disk is obvious.
Confirm with Next one and Yes, after which the installation will finally begin.
In the meantime, you go through the other settings of the installation menu. In the next step, think of a computer name without obligation and select the desired country and time settings. You also set a username and password. Leave all other settings unchanged.
Finally confirm with Complete and hit Enter. The system will reboot. It is important that the computer always boots from the hard drive (and not from the USB stick), so open the system menu (bios or uefi) again if necessary to arrange this.
First impression and install updates
If the installation went well, you will see a login window after the restart. Log in with the previously created password. A welcome window will appear with all kinds of information about the operating system, such as a manual and links to forums. On the left side is a narrow side panel with various applications such as Internet access, file management, volume, network connections, language settings and battery status.
In addition, you can log off, shut down or restart the system with the green button at the top left. The side panel also functions as a taskbar, because open programs can be called up from this part. Finally, click the black MX Linux logo at the bottom left to open the start menu. Here you have access to all pre-installed applications and operating system settings.

After this, make sure MX Linux is fully up to date. In the side panel, click the green icon with the expanded box to open the utility MX Updater to open. Check the option Automatically answer ‘yes’ to all questions during upgrade and confirm with Upgrading. Enter the password to start the update process. You follow the progress in a command window.

Software and tools for MX Linux
Unlike many other well-known Linux distributions, MX Linux develops a complete toolbox with settings. You can adjust almost everything to your own taste. Just click on the start menu MX Tools and go through the settings at your leisure.
For example, you can free up disk space with a clean-up action and adjust the start menu. In addition, change the design and make one system backup. You can also perform recovery work in the event of damage to the operating system.
A big plus is that the operating system itself already has all kinds of useful software in house. Who knows, a number of names may sound familiar to you. For example, you use the popular browser Firefox to surf the web, while LibreOffice gives you access to a full-fledged office suite. Create text documents, spreadsheets, drawings and presentations, among other things.
Furthermore, use GIMP for photo fixes, Thunderbird for email and VLC for videos. There are even some games pre-installed. In short, you can go in several directions directly from the installation.

Do you still want to install additional applications despite the wide range of standard applications? No problem, because the operating system picks the desired programs directly from the web. Open from the start menu MX package installer and enter the password. View under the tab Popular uses the wide range.
The available tools are divided into different sections. In this overview you will encounter Audacity, Opera, Inkscape, Caliber, Steam, TeamViewer, Kdenlive, Dropbox, Kodi and Plex. All excellent programs! If necessary, use the search function to find something. Tick the relevant programs and confirm with Install.
After this short tour, you will hopefully have mastered the basics of MX Linux. Have fun with your new operating system!
.