Excel is a powerful program that allows you to create overviews, keep data and make calculations. But before you get started with complex tasks, it is smart to first master the standard functions of Office Excel.
The possibilities of Excel are endless, so it has many functions that can save you a lot of time when performing calculations and formulas, creating graphs or analyzing data. Because of the many functions you can use the program in many different environments. Whether it is at home to keep your household booklet or to create and keep an address file, or at work to make budgets, for example. Excel offers something for everyone.
01 Briefcase
When you start Excel, the start or welcome screen opens. You can start with one of the built-in templates, but in this course we choose a blank workbook. Click on this Empty briefcase at the top of the home screen. The new, empty file becomes standard in Excel Folder 1 called; this name is in the title bar at the top of the window.
If you already have an existing workbook in view and you also want to open a new, empty workbook, click on the tab File. click on New to open the home screen. Then click on Empty briefcase. A new workbook in Excel gets – if one or more workbooks are already open – consecutive numbers. In this case the name then becomes Folder 2.

In our online course Word, Excel and PowerPoint we will teach you everything about the basics, but also the advanced options of this software. The course is also with book to obtain.
Quickly open new workbook
Are you already working on a workbook in Excel and want to quickly open a new one? Then use the key combination Ctrl + N, this will immediately open a new worksheet without having to use the menu.
02 Explore the worksheet
The worksheet is the characteristic of Excel and is also called a spreadsheet. You should actually think of a worksheet as a huge, infinite table. The boxes in that table are called cells. Each cell can contain information such as a name, a number, an amount, a date, a time, or a formula with a calculation.

03 Thinking in columns and rows
Cells arranged one below the other form a column. In Excel, each column is identified by the letter above it. In the picture is column E marked. A series of cells side by side across the full width is called a row. Each row has a number on the left. In the picture is row 7 marked. Each cell is identified by a letter and a number, such as the boxes on a map or chessboard. So cell E7, for example, is on column E, row 7. The designation E7 you call the address of the cell. If you click on a cell, the outline of that cell becomes thick and dark green and the column letter and the row number get a color accent. The address of that cell can be found in the box at the top left (the so-called Name box).

04 Navigate through the worksheet
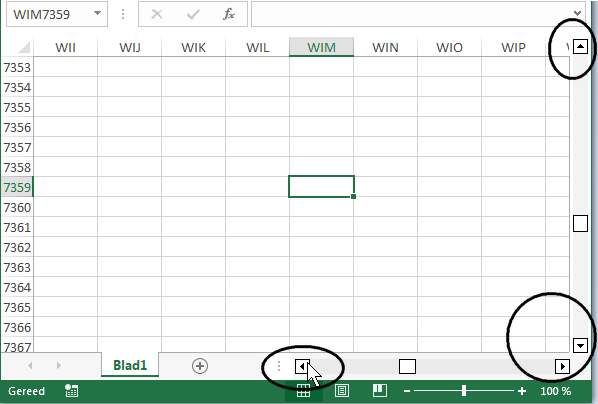
When you open a new worksheet, it is cell A1 selected by default and you can edit it. If you want to edit another cell, you can access it with the navigation keys on your keyboard or by clicking with the left mouse button on the cell you want to use. If you want to go further to the right in the worksheet than what is visible, drag the block of the horizontal scroll bar at the bottom of the screen, or press the arrow to the right (on your keyboard); the worksheet will then move automatically. The same applies to down, but logically you use the down arrow. In the vertical direction you can also use the scroll function of your mouse (with advanced mice sometimes also in the horizontal direction).
05 Save the workbook
If you have entered data or formulas in the worksheet, you can save the file. You can always work on it later. click on Save file. Or press the shortcut Ctrl + S. A window will appear with options where you can save your workbook. At least it says This PC. It may also include OneDrive if you’re signed in to Microsoft. In this example we choose This PC to save the file to the hard disk. You can also go for it Browse choose and navigate to a specific folder on your PC, connected USB stick, network and the like. Do you want to save your file from Excel to a location of your choice? Then use F12. This will open it immediately Save as-window.

Pin file
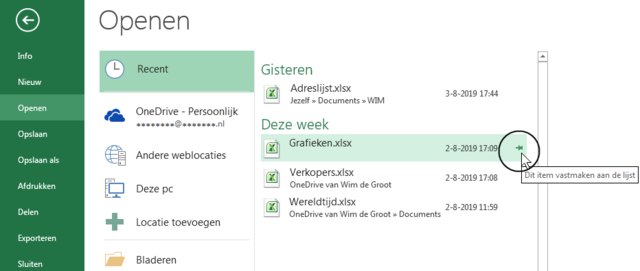
The window To open shows the option Recent. That contains a list of files that you have opened recently. If your file is listed here, look no further in the folders on your PC. It is useful that you can attach a file to this list so that it always remains at the top. Click on the pushpin to the right of the file name.
06 Save regularly
It is good practice to save the workbook you are working on regularly. If your PC or Excel crashes unexpectedly or if the power goes out, you may have worked for hours for free. First add the button Save to the toolbar Fast access (this is the bar at the very top of your window). Click the arrow to the right of the Quick Access Toolbar; a menu opens where you can check the option Save. You can then save your work regularly by clicking that button or, if you prefer to just work with the keyboard, Ctrl + S. If you have added important information, entered a large number of data or have drawn up a formula, get used to having a quick answer in between Save clicking or pressing Ctrl + S.

07 Ribbon and formula bar
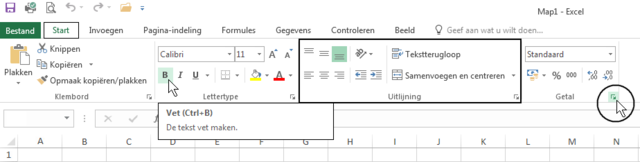
You can operate Excel with the wide band at the top of the window (the ribbon). The ribbon contains a number of tabs. If you click on such a tab, you will see a large number of buttons. The buttons in the ribbon are compact or large, depending on the width of your screen. The buttons are arranged in groups. In some groups there is a diagonal arrow at the bottom right. This will open a new window with more options.
The white line below the ribbon is the formula bar. Here you will find the contents of the cell you are in. If there is a formula in that cell, you will see the formula in this bar and the result of the calculation in the cell. You can also edit the formulas in this formula bar.
08 Fast access
We previously wrote about the Quick Access Toolbar, which is located above the ribbon. You will see the buttons there Save, Undo and Again already standing. But you can customize this toolbar. For example, to add the Open button to the Quick Access Toolbar, take the following steps:
1. Click the arrow to the right of the Quick Access Toolbar; a menu opens.
2. Tick To open On; the button with the icon of an open folder is now in the small toolbar.
This way you can add buttons to the toolbar of functions that you use a lot.

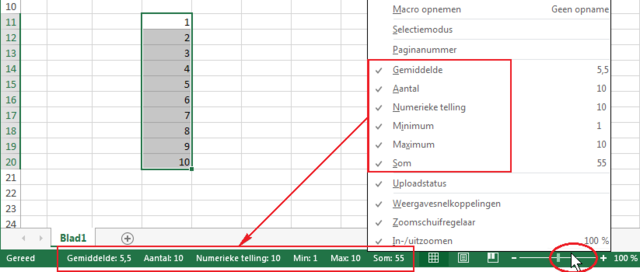
09 The status bar
At the very bottom is the status bar. You use it to set the image and to view information in cells. Right-click on the status bar to open a menu. In any case, switch the series Average through Som in. This allows you to quickly read the average, sum, and so on, of a group of cells without having to drop a formula on it. Select a number of cells and you will immediately see the result in the status bar.
10 Select cell, row and column
You can format, move and copy cells in Excel. But before you can do anything with a cell, you have to select them first. Selecting one cell is simple: click on it and the cell is selected. Select more cells by clicking on the first cell you want to select, holding down the mouse button and dragging. Sideways, up, down and even diagonally. If you drag diagonally, a rectangle of cells is selected. You can then edit the selected area.
If you want to select an entire column, click on the column letter at the top. If you want to select more whole columns, click on a column letter and drag sideways over the other column letters with the mouse button pressed.
To select one row, click on the row number. Selecting multiple rows is the same as for columns. You can drag over multiple row numbers with the mouse button pressed.
Finally, you can select the entire worksheet at once by clicking on the top left area of cell A1, the one with the triangle in it.

11 Move a cell, column, or row
Sometimes you want to move one or more cells, rows or columns because they don’t appear to be in the right place. For this you can use the buttons in the ribbon or press a shortcut. To perform the actions below, you need the Home tab.
You can move one cell as follows:
1. Click on the cell.
2. Click in the tab Start on To cut; a dotted line appears around the cell.
3. Click on the cell where you want to move this cell.
4. Click in the tab Start on the button To stick (the clipboard) so that the content is placed in the new place.
You can easily move a complete column:
1. Select the column by clicking the column letter.
2. Click on To cut.
3. Click on the letter of the column where you want to place this column.
4. Click the button To stick or press Enter.
If you do not want to move a column, but copy it, do not click To cut but on To copy, then a copy of the copied column will be placed in the new location.
To move a row, first select the row by clicking on the row number. click on To cut, click on the number of the row where this row should be and click To stick.

12 Move or copy with shortcut keys
Using the Home tab every time to move or copy a cell, row, or column is ultimately inconvenient. Then you would much rather be able to work faster by using keyboard shortcuts.
1. To move or copy a cell, click on it.
2. Then press the shortcut Ctrl + X (cut) or Ctrl + C (copy).
3. Click on the cell where you want to move this cell.
4. Press Enter or Ctrl + V (paste). The content is now in the other place.
This way you can also move a group of cells. Suppose you want to move cells B2 through D4 four cells to the right and one cell down:
1. Select the cells B2 up to and including D4.
2. Press Ctrl + X.
3. Click in cell F3; this cell will end up in the top left corner of the group.
4. Press Enter or Ctrl + V.
If you want to copy the group of cells instead of moving, click Ctrl + C instead of Ctrl + X.
16 Add worksheet
Each worksheet in Excel has its own name. You can read this at the bottom, on the line above the status bar. The worksheets of a new workbook are called Page 1 and – depending on the version of Excel – two extra worksheets, Sheet 2 and Leaf 3. The tab of the worksheet you are working on is white and that name is green and bold. You go to another worksheet by clicking on the tab of the desired worksheet, for example Sheet2 or Sheet3.
To add a new worksheet to the workbook, click the plus sign to the right of the existing worksheets (the button New sheet); the new worksheet is called “Sheet” with a serial number. It is a good idea to change the name of the worksheet afterwards so that you also know later what is on that worksheet for data. This is very simple. You double-click on the sheet tab and you can give the tab a clearer name.

17 Move or copy a worksheet
If you want to change the order of the worksheets within the workbook, do the following:
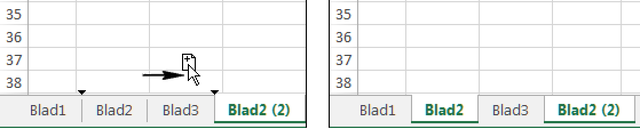
1. Click the sheet tab of the sheet you want to move.
2. Hold down the mouse button; at the mouse pointer the icon of a separate page appears and you see a black arrow. This arrow shows you where the worksheet ends up when you drag it.
3. Drag aside and release the mouse button. The worksheet has been moved.
Copying a worksheet is of course also possible.
1. Hold down the Ctrl key and click the sheet tab; at the mouse pointer the same characters will appear as when you want to move a tab.
2. With the left mouse button pressed, drag the sheet tab to the side.
3. Release at the destination.
You now have a copy of the worksheet with the suffix (2) after the sheet name. Then change the name of the tab by double-clicking it.