Outlook.com is Microsoft’s webmail service. Can you already create folders and sort mail in this mail environment?
Supplies
In this article we describe how Outlook.com works. To use the mail service and all other online services from Microsoft, you need a Microsoft account. This consists of an email address (such as from Hotmail, Live or Outlook.com) and a password. Are you new to Outlook.com? Read the article ‘Outlook.com: starting with email’.
Step 1: Folders in Outlook.com
To sign in to Outlook.com, go to www.outlook.com. Click on To register. Enter your email address and click Next one. Then enter your password and click To register.
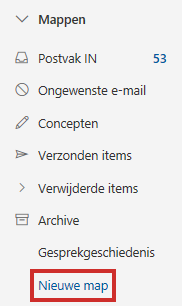
On the left you will see the ‘Favorites’ and ‘Folders’ menus with different folders where emails are stored. Your favorite folders are listed under ‘Favorites’. All folders are listed under ‘Folders’. Outlook.com has a number of default folders:
- Inbox: Emails sent to you generally end up in this folder.
- Junk Email: Emails that Outlook.com doesn’t trust end up in this folder.
- Drafts: Emails you are writing and want to keep can be found in this folder.
- Sent Items: All emails you have sent can be found in this folder.
- Deleted Items: Emails you have deleted will end up in this folder.
- Archive or Archive: here you can use received e-mails that you want to keep.
Step 2: create new folder
Create folder
You can create folders yourself to store (incoming) mails. This is how you do it:
- Click under ‘Folders’ on New map.

- Type the name of the new folder.
- Press the Enter key.
The folder appears in the list with the default folders.
subfolder
You can place a newly created folder in another folder. It then becomes a subfolder of a root folder. Think of the ‘SeniorWeb’ subfolder that falls under the ‘Inbox’ folder. This is how you do it:
- Click on the folder and hold down the mouse button.
- Drag the folder to the root folder where you want the folder to fall.
- Release the mouse button.
Favorite folders
If necessary, adjust the folders under ‘Favorites’. To add a folder to ‘Favorites’:
- Click on the name of the folder.
- A star icon appears at the top next to the folder name
 . Click on this.
 - The folder appears in the list under ‘Favorites’. Do you want to undo this? Then click again next to the folder name on the blue star icon
 .
.
Step 3: Move emails
To keep your mailbox organized, you can move e-mails to folders you have created yourself. This is how you do it:
- Click on the folder containing the email, for example Inbox.
- Move the mouse pointer over the desired e-mail and click on the empty dot next to the message title of the e-mail.
- Click at the top Move to.
- A window will appear. Click the name of the folder where you want to move the email. If you don’t see the folder, click on All folders.
The email will now be moved. You can view it again by clicking on the map in the left menu.
Step 4: Always move emails
You can set Outlook.com to automatically send messages from a specific sender to a specific folder. Handy if, for example, you are a member of all kinds of newsletters, they are automatically always together. This is how you set it up:
- Go to the folder containing the email.
- Put a check in front of the correct email. To do this, hover the mouse pointer over the relevant email. Then click on the empty ball next to the message title of the email.
- Click on the three dots icon at the top
 .
. - click on Advanced actions.
- click on make rule.
- click on Select folder.
- Click on the folder where messages from the sender should automatically end up. If you don’t see the folder, click on All folders.
- click on OK > OK.
From now on, the e-mails will be automatically placed in the correct folder.
Step 5: Create a signature
You can create a signature that will be automatically added to all emails you write. It is not a real signature, but a message that will appear at the bottom of your message. Such as: ‘Greetings, Henk and Marijke’.
- Click the gear icon at the top right
.png) .
. - click on View all Outlook settings.
- click on E-mail > Compose and answer.
- Click in the white area below ‘Email signature’.
- Create a signature.
- If you want to add a signature to every new message you compose, check it Automatically add my signature to new messages I compose.
- Put a check in front of it Automatically add my signature to messages I forward or reply to when you want it.
- Click at the bottom Save.
- Click on the cross. Then click New message to write an email containing your new signature.
Step 6: Junk Email
Outlook.com uses technology that blocks unwanted email before it reaches your inbox. However, it is possible that unwanted messages appear in your mailbox, or that desired messages are put in the ‘Junk E-mail’ folder.
- Do you get a message that you think is spam? Then hover the mouse pointer over the e-mail and click on the empty dot next to the message title.
- Then click on the menu at the top Spam.
- Do you get a message in the Junk E-mail folder that doesn’t belong there? Then click on the map Spam.
- Hover over the e-mail and click on the empty dot next to the message title. Click in the menu on No junk e-mail > No junk e-mail.