
With the introduction of PipeWire, the Linux audio system has become significantly more powerful. It is transparent to the common user and makes it considerably easier for the professional user to use more audio interfaces simultaneously.
Ton Valkenburgh
SoftwareBusThis article was previously published in SoftwareBus, the magazine of the interest group CompUsers. |
||
Audio under Linux is about to change. This solves a number of limitations and simultaneously includes video streaming. This article covers the audio part.
Those who are actively involved with music under Linux have to deal with three audio systems. In the Linux kernel, ALSA (Advanced Audio Sound Architecture) integrated, on top of that there is PulseAudio for the consumer side and Jack Audio Connection Kit (Jack) for professionals. Unfortunately, these two cannot be used simultaneously.
PipeWire
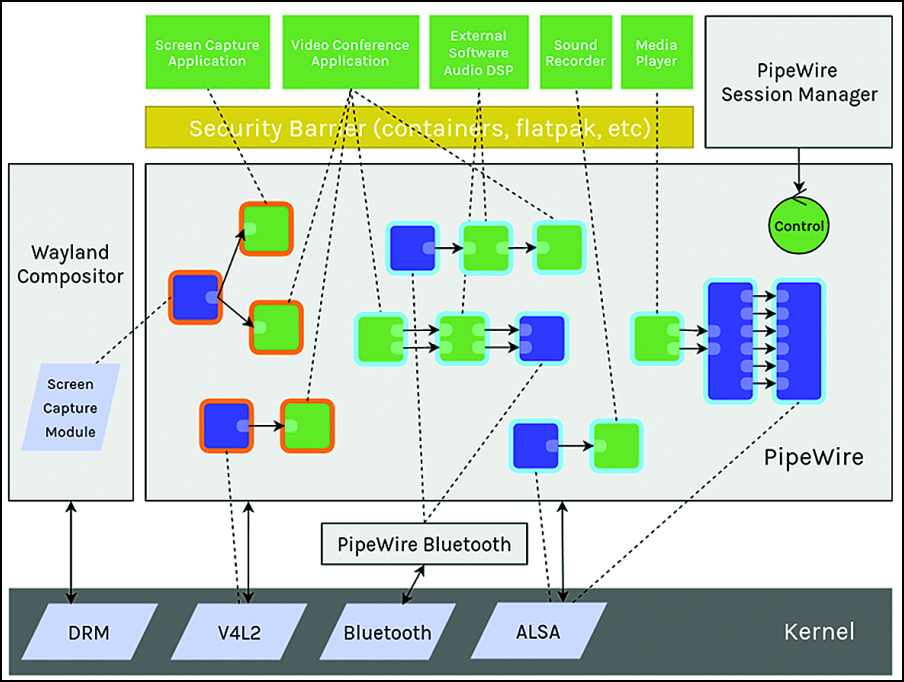
This is solved with the introduction of PipeWire (https://pipewire.org). PipeWire is a server and interface for multimedia applications and includes audio and video streaming. PipeWire is a with Jack and PulseAudio compatible solution that makes the musician’s life easier. So it replaces PulseAudio and Jack. Figure 1 shows this graphically. PipeWire is standard in the Ubuntu 22.10 distribution.
 |
|
Figure 1: Pipewire |
Ubuntu Studio is the platform for the Linux musician. The settings that you would otherwise have to make yourself have been taken care of for you. Since Ubuntu Studio moved to the Plasma desktop, there’s also the Ubuntu Studio Installer. This means that Ubuntu Studio can be made available under any Ubuntu variant and therefore also under Linux Mint Cinnamon. The Jack Audio Connection Kit however, is still used in it. However, installing PipeWire makes working with more than one audio interface more enjoyable. Jack can be removed after installing PipeWire. Ubuntu Studio is beyond the scope of this article and will not be discussed here.
PipeWire development started with video streaming. Later more attention was paid to audio streaming. The video applications are very interesting in themselves, especially for webinars. In this article, however, we will limit ourselves to the audio aspects. We will discuss the use with video later in an article.
Install PipeWire
PipeWire is already installed with Linux Mint Cinnamon 21.1. Unfortunately, this version appears to have problems with, among other things, the internal audio interface. So we start by uninstalling this version. We do that through Program management remove all PipeWire modules. After the removal we have a clean slate and we can really start.
Not only do we need to install PipeWire (https://github.com/mikeroyal/PipeWire-Guide), but also additional libraries to use some of the interfaces. Let’s go first Personal Package Archive (PPA) from PipeWire. Enter the following command in the terminal.
sudo add-apt-repository ppa:pipewire-debian/pipewire-upstream
Then install PipeWire, the pipewire audio client libraries, and additional libraries for using bluetooth, GStreamer, or JACK devices:
sudo apt update
sudo apt install pipewire pipewire-audio-client-libraries gstreamer1.0-pipewire
libpipewire-0.3-{0,dev,modules} libspa-0.2-{bluetooth,dev,jack,modules}
pipewire{,-{audio-client-libraries,pulse,media-session,bin,locales,tests}}
After installation, we reload the daemon in systemd with the following command:
systemctl --user daemon-reload
We can now disable PulseAudio, we no longer need it.
For that we issue the command:
systemctl --user --now disable pulseaudio.service pulseaudio.socket
You can always reactivate PulseAudio with:
systemctl --user --now enable pipewire pipewire-pulse
Restart the computer and test if it worked with the command:
pactl info
In the message must then be on the line Server name state the following:
PulseAudio (on PipeWire 0.3…)
PipeWire is now up and running and is for both PulseAudio if Jackapplications available.
However, it is useful to be able to make the necessary connections through a graphical user interface. For that Qt PipeWire Graph (link ) a handy tool.
Install Qt PipeWire Graph
You can find Qt PipeWire Graph in the repository. Start Program management and enter in the search field: qpwgraph. If found, choose: to install.
An alternative way is the following: first we install flatpak with the command:
sudo apt install flatpak
Then we issue the following commands:
flatpak remote-add --if-not-exists flathub
https://flathub.org/repo/flathub.flatpakrepo
flatpak install flathub org.rncbc.qpwgraph
You can start qpwgraph via: Menu > Sound & Video > qpwgraph. You then get a graphical overview of the connected devices and possible applications.
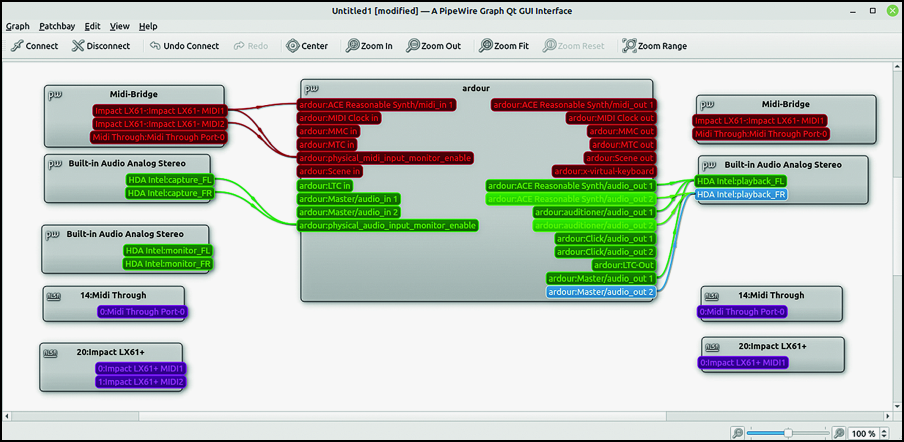
As an example I connected a USB MIDI controller (Nektar LX 61+) and started up the Digital Audio Station Ardor. To be fair, I’ve removed some connections to keep it a bit organized (see image 2).
 |
|
Figure 2: Ot Pipewire Graph |
You can see that the MIDI controller LX61+ is connected to Ardor via a MIDI bridge. The Reasonable Synthesizer in Ardor is connected to the audio playback outputs. Normally you connect the synthesizer outputs and the auditional outputs to the master inputs. The master output then goes to the audio playback outputs. That way you can use Ardor’s internal mixer. These connections that I have removed are normally established automatically.
What I have not shown here is that you can connect more audio interfaces and use them simultaneously. The image would then become even fuller and completely unreadable. You can improve the view by moving the modules. Configurations can be saved for later use. Ardor saves its configuration itself. That was already the case when using Jack.
Configure
The PipeWire settings (https://gitlab.freedesktop.org/pipewire/pipewire/-/wikis/home) are stored in configuration files. These configuration files are located in /usr/share/pipewire/. To easily adjust the configuration, it is useful to delete the folder pipewire to copy to ~/.config/. The dot (.) before the folder name .config indicates that it is a hidden file. You can make hidden files visible with the key combination Ctrl + h. You can also hide them again with Ctrl + h.
For example, if we open the Jack.config file, we can find the following lines, among others:
#node.latency = 1024/48000#node.rate = 1/48000#node.quantum = 1024/48000
Behind the hash (#) are the default values. rate is the sampling rate, quantum is the buffer size and node.latency indicates the buffer size at a given sample rate. Changing the sampling rate also changes the buffer size.
To get a lower latency, you can adjust the values by, for example, entering the following without hash (#). We immediately adjusted the sampling frequency to 44,100 Hz.
node.latency = 256/44100node.rate = 1/44100
So we have now set to a buffer of 256 at a sampling rate of 44,100 Hz. We also set the sampling rate to the CD quality of 44,100 Hz by node.rate. You can retrieve the values with the command in the terminal:
pw-metadata -n settings
However, you can also change the default settings to, for example, 48000 Hz with the command:
pw-metadata -n settings 0 clock.rate 48000
Temporarily we can change the setting to, for example, 44,100 Hz with:
pw-metadata -n settings 0 clock.force-rate 44100
Both the DSP processor and devices will immediately switch to the new values. Active streams will be resampled to match the new value.
You can set the default buffer size to, for example, 1024 with:
pw-metadata -n settings 0 clock.quantum 1024
Temporarily setting a fixed buffer size to, for example, 256 is done with the command:
pw-metadata -n settings 0 clock.force-quantum 256
To go back to the default values, use the commands:
pw-metadata -n settings 0 clock.force-quantum 0pw-metadata -n settings 0 clock.force-rate 0
When we request the settings afterwards, we see:
deelnemer@WS2:~$ pw-metadata -n settings Found "settings" metadata 30 update: id:0 key:'log.level' value:'2' type:'' update: id:0 key:'clock.rate' value:'48000' type:'' update: id:0 key:'clock.allowed-rates' value:'[ 48000 ]' type:'' update: id:0 key:'clock.quantum' value:'1024' type:'0' update: id:0 key:'clock.min-quantum' value:'16' type:'' update: id:0 key:'clock.max-quantum' value:'2048' type:'' update: id:0 key:'clock.force-quantum' value:'256' type:'' update: id:0 key:'clock.force-rate' value:'44100' type:'' deelnemer@WS2:~$
Actually, this should be possible with a graphical interface. So there is still some development work to be done. However, the fact that we can now dynamically change these settings is a big improvement over what was going on with Jack. Then we had to restart Jack and thus the running application.
Finally
So I have not shown the video streaming functions and will be discussed in another article. With PipeWire, connections can also be made via the network and that is also a good subject for a subsequent article.