USB sticks are handy little things. They are compact, quiet and robust and can be used to store (temporary) data. With a few small tips and tools you can work even safer, faster or simply better with your stick(s).
Show Van Dale
At the beginning of this century, the first USB sticks appeared flash drives and they rapidly conquered the market. A decent USB 3.0 stick of 256 GB, for example, now costs not even 35 euros. It is understandable that just about every computer user has several sticks at home. Take advantage of our various tips and tools!
Remove safely
Removing a USB stick from your PC is not without risk, at least not when data is still being written to the stick. That’s why it’s safer first on the icon Safely remove hardware and eject media in the system tray, at the bottom right of the Windows taskbar. Then click here
 |
|
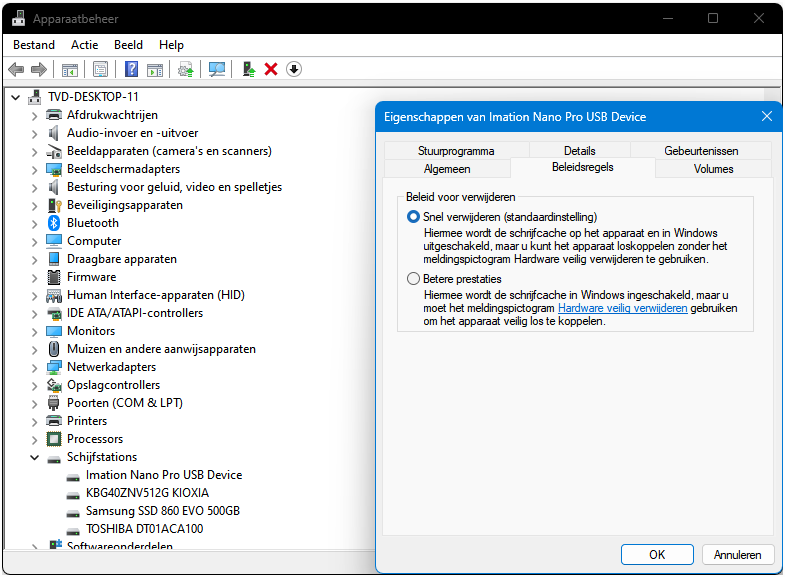
Choose ‘Quick remove’ to reduce the risk when you unplug a USB stick |
If you ever fail to do this, check whether your Windows PC is optimally set up for ‘quick removal’. Press Windows-test + R and type the command devmgmt.msc in so that the window of Device Manager appears. Open here Disk drivesright click on the stick name and choose Characteristics. On the tab Policies then select Remove quickly (and therefore not Better ones performance). Confirm with OK.
Own icon
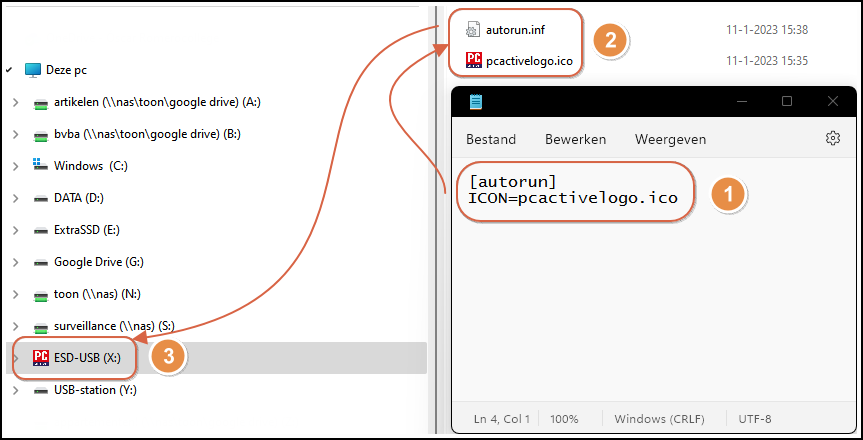
Do you like to see an appropriate icon appear in the Explorer as soon as you insert a certain USB stick into your PC? Then first retrieve an ico file, for example from https://icon-icons.com. Select the picture, open the tab ICO and click Download ICO. Or you first upload a jpg image to https://convertio.co/nl/jpg-ico and click on To convert. Place the downloaded ico icon file in the root folder of your stick.
Then start Notepad and type in the following lines of text:
[autorun]
ICON=<naambestand>.ico
Of course you replace <naambestand> by the correct name of your ico file.
Choose File / Save Asselect from the drop-down menu Save as the option All files (*.*)name your file autorun.inf and also save this in the root folder of your stick. Remove the stick and plug it back in.
 |
|
From now on, the Explorer will show your own stick icon via a simple text file |
Suppose you have downloaded an MS-DOS game, for example one from the online collection at https://www.myabandonware.com/browse/platform/dos/, and you now want to play this game on your PC. Then launch LaunchBox, click the hamburger button and choose Tools / Import Games / MS-DOS Games. Press Next one and choose Add folder. Point to the folder where you extracted the downloaded game and confirm with Select folderchoose (for example) Copy the files to my LaunchBox games folderPress Next one (4x) and on End. A little later the game is added and you can start it from LaunchBox.
Drive letter
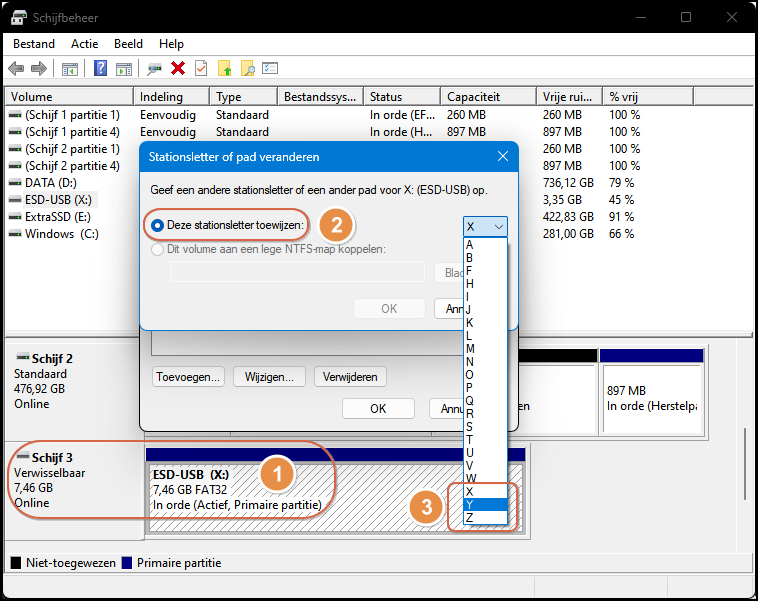
If you always use the same stick to store data (backups), it is useful if that stick always retains the same drive letter. The chances are greater if you assign this stick a letter high in the alphabet, such as y: or z:.
Press Windows-test + R and tap diskmgmt.msc in, after which the window of Disk management appears. At the bottom, right-click on the stick partition, choose Change drive letter and pathspress Modify and select the desired, free drive letter from the drop-down menu. Confirm with OK and with Yes.
An even more flexible tool for this is the free USBDLM (www.uwe-sieber.de/usbdlm_e.html), but this configuration is rather laborious and we will therefore not discuss it further.
 |
|
A drive letter high in the alphabet is less likely to change inadvertently |
Write protect (system)
If others also use your PC more often and you want to prevent them from secretly copying data to USB sticks, you can enable ‘write protection’. To do this, carefully follow the instructions below.
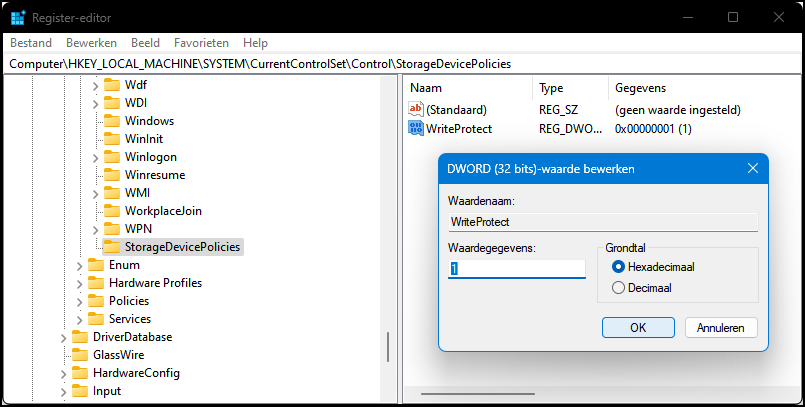
Press Windows-test + R and tap Reg edit in. In the window of the Registry Editor navigate to the following item:
HKEY_LOCAL_MACHINESYSTEMCurrentControlSetControl.
Select this key, go to the menu To processchoose New / Key and name it StorageDevicePolicies. Select this new key, go to To process and choose New / DWORD value (32 bits). Name this item WriteProtect and double click on it, after which you give this the value 1 gives. Confirm with OK and close Reg edit off.
Writing to (newly plugged in) sticks is now no longer possible, unless you delete the WriteProtectvalue back to 0 (or the item WriteProtect with the Deletekey from the key).
 |
|
You can block writing attempts to USB sticks via a registration procedure |
Write protect (stick)
If you don’t like the previous tip, you can also set such a write protection on the stick itself so that only that stick is protected against changes. This is safe if the stick contains data that you do not want to change or delete just like that.
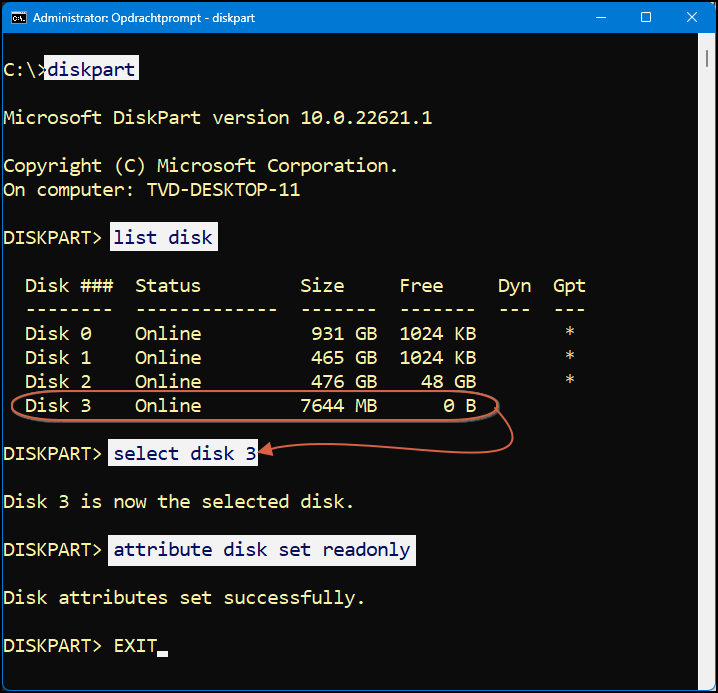
Plug in your stick, right-click in the Windows start menu Command Promptchoose Run as administrator and confirm with Yes. Now enter on the command line diskpart off, confirmed with the Enter-test. A moment later, the diskpart prompt appears and you type in the following commands in succession:
list disk
select disk x
attribute disk set readonly
You replace the letter x with the correct disk number of the target stick, as it appeared after you ran the list disk command, such as select disk 3.
 |
|
With a few instructions you can make a specific stick write-protected |
The write protection is immediately active. To cancel it, repeat this procedure but change the last instruction attribute disk clear readonly.
You leave the diskpart and command prompt environment again with the command exit (2x).
System lock
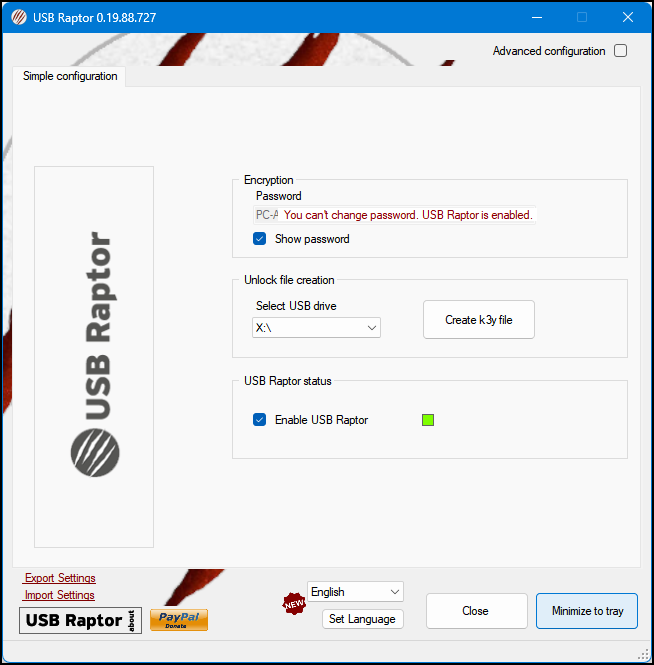
You can also use your USB stick as a system lock: as soon as you remove the stick from your PC, the system is locked and only a screen saver is visible. For this you need the free tool USB Raptor. You download it from https://sourceforge.net/projects/usbraptor. Unzip the downloaded zip file in Explorer, open the folder and double-click USB Raptor.exe. Make sure your stick is in the PC. click on I agree for the configuration window, place a check mark Show password and enter a password. Select the USB drive and press Create K3yfile. Then place a check mark Enable USB Raptor and click Minimize to tray, so that the tool remains active in the background. As soon as you remove the stick, Windows will lock itself. Replace the stick to continue or double-click on the screen saver and enter your password. If you want the tool to always be active, place a check mark at the top right of the configuration window Advanced configuration and then at Run USB Raptor at Windows startup.
 |
|
Your USB stick acts as a lock to Windows |
Antivirus
Some viruses are so cunning that they hide from your antivirus tool. There is little else to do than boot your PC from a USB stick and run an antivirus app from there. We show you how to prepare such a stick to put Kaspersky on it. First download Kaspersky Rescue Disk (www.kaspersky.nl/downloads/free-rescue-disk; 640 MB) and then get the free tool Rufus Portable at (https://rufus.ie/en). Plug in a USB stick and run the downloaded exe file. Bee Device select your stick; make sure it does not contain any important data. Press Selecting and refer to the downloaded Kaspersky file (krd.iso). You should preferably leave the other options untouched, such as MBR, BIOS or UEFI and FAT32. Press Startleave Write in ISO image mode selected and confirm (several times) your choice.
When finished, press Close and you can start a PC with this stick and have a virus check carried out a little later.
 |
|
With Rufus and Kaspersky you can quickly put together a live antivirus stick |
Launchpad
There are hundreds of free ‘portable’ apps that you can start from a USB stick, usually also on PCs where you are not an administrator yourself.
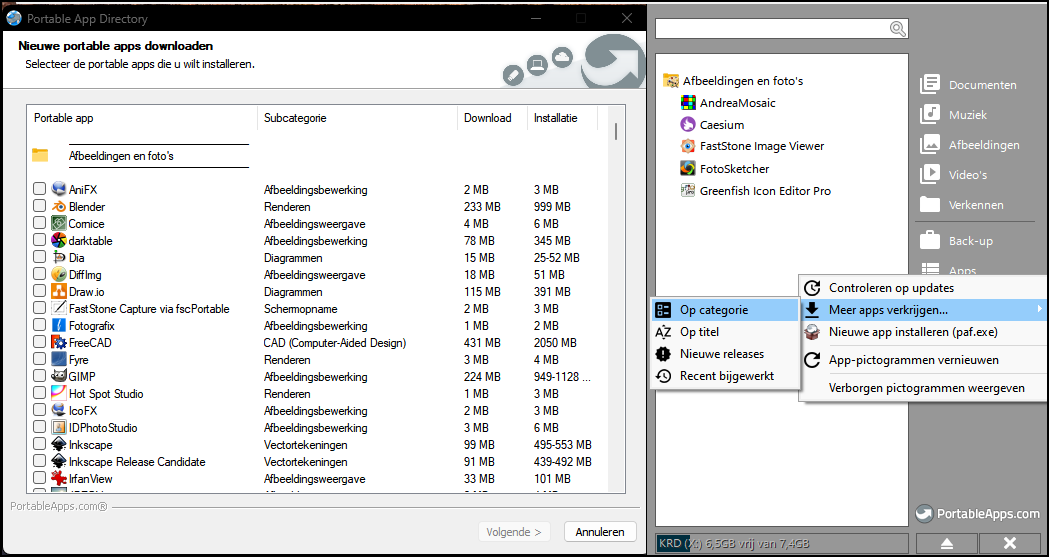
Go to www.portableapps.com/download, click Download from PortableApps.com and launch the downloaded exefile on . In the installation wizard, press Next one and on Agree and choose you New installation. Press Next one and choose Portable – install on a portable device. Insert an (empty) USB stick with sufficient capacity into your PC, press again Next one and select your stick. Confirm with Next one and with to install.
Leave the check mark Launch PortableApps.com Platform and press Complete.
A moment later the window appears Portable App Directory and you can choose from hundreds of portable apps. Place a check mark next to the desired apps and press Next one. The tool now downloads the selected apps – this can take a while –, puts them on a stick and neatly includes them in the launch pad. The latter is visible when you move from the stick PortableApps.com starts up and clicks on the corresponding icon in the Windows notification area, on the right side of the taskbar. Click here to install new apps Apps / Get more apps.
 |
|
You can put hundreds of apps on your stick and launch and manage them |