Libraries
Libraries are part of the Explorer. If you want to learn more about File Explorer first, read the article ‘Windows 7: Files and Folders’.
You may already know the concept of ‘library’ from the Picasa program: that searches all photos on your computer and places them in well-arranged folders. You see the photos as if they are all together in a folder, while they are stored in various places on the computer. Windows 7 does that too. The Libraries can be found in the Explorer. By default there are four Libraries: Documents, Videos, Pictures and Music. These are, as it were, the ‘sections’ in which the files on your computer are grouped.

Let’s say you want to create a family album of photos on an external hard drive, your partner’s computer, and your work laptop. Previously, searching for certain photos was a chore. In Windows 7 you can easily create a Library with, for example, the name Family pictures and specify in Windows which widely distributed folders this new Library should contain. Your photos are still physically located in three different locations, but are now displayed in one window. That’s how a library works.
Just like a normal folder?
A Library is similar to a normal folder in a number of ways. For example, when you open a Library, you see one or more files. Unlike a folder, however, a Library collects files that are stored in different locations. That’s a subtle but important difference. Libraries don’t actually store files. Libraries are used to track the folders containing your files and allow you to access the files. For example, if you have music files stored on the hard drive and on a USB stick, you can access all music files at once with the Music Library.
Note: gone = gone
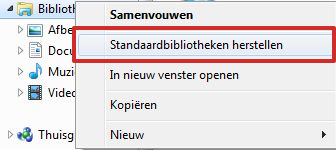
When you delete a Library, only the Library itself is moved to the Recycle Bin, not the content you accessed through the Library. The files and folders that you were able to access through the Library are not deleted because they are stored in other locations. If you accidentally delete one of the four default libraries (Documents, Music, Pictures and Videos), you can restore to them in File Explorer: right-click on Libraries and then click Restore Default Libraries.

But be careful: if you delete files or folders from a Library, the files or folders in their original locations are also deleted. So don’t just throw anything away!
Sort library
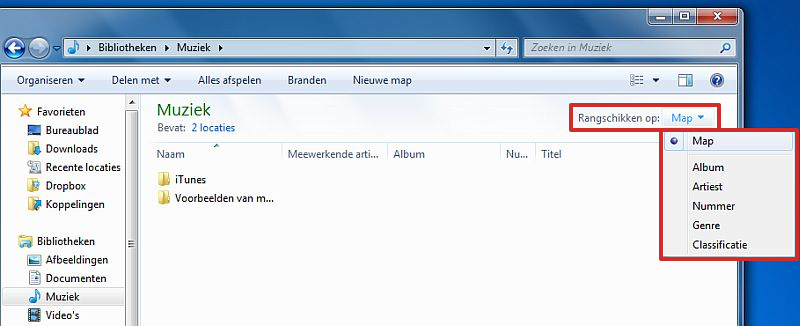
You can organize items in a Library in several ways using the menu sort by. This menu is included in the Library window that appears above the file list in open libraries. For example, you can organize the Music Library by artist if you want to quickly find a song by a particular artist.

Content of a Library
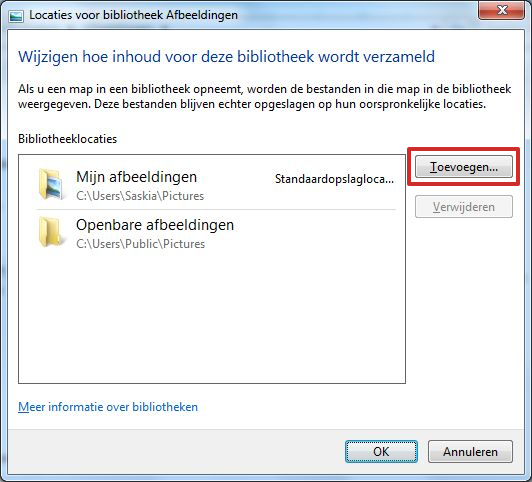
Each default library contains some preset locations where the Library “searches” for new files. For example, click on the Pictures Library. At the top right is Contains: 2 locations . This means that the Library has two locations to search for images. Click on that notification to see an overview of the locations. Windows 7 is looking at your folder in this case My pictures and also a folder Public images .
Add new location
You can add a custom folder to an existing Library. If you have a folder in which you keep, for example, all vacation photos, you can add that folder to the Pictures Library. You do this as follows:
- Start the Explorer and click on the Library > Pictures.
- Click on Contains: 2 locations (If you have a different number it doesn’t matter.)
- Press the button Add.

- Browse to the desired folder, select the folder and click Record folder. The folder has been added to the Library.
The files in the Library are displayed grouped by location. You will see that you can view files from multiple folders at once.
Create new library
Windows 7 has default libraries for Pictures, Documents, Music and Videos. However, you can also create a Library with its own name. You do this as follows:
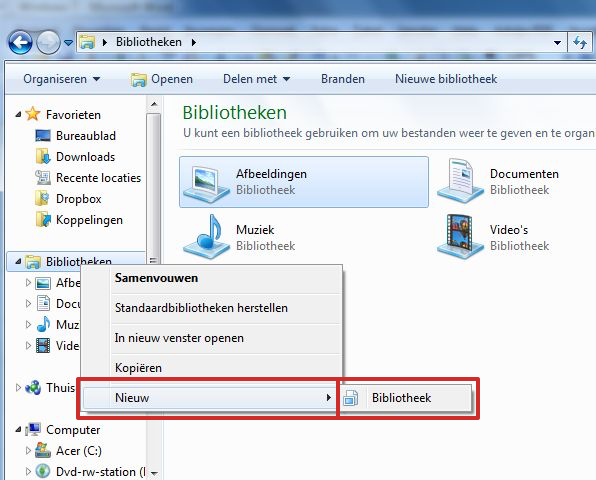
- Right click on Libraries.
- click on New > Library.

- Give the Library a name. The new name appears in the Libraries list.
- Click on the new Library.
- If a Library is still empty, a button will appear Record a folder. Use this button to add your own folder. Adding more folders is done in the way described above.
File Explorer: Create New Folder
The Libraries concept now holds few secrets for you. That’s why we’re going to take a closer look at working with folders in the Explorer. Open the Start menu and click the computer name in the top right. Your personal collection folder will appear, containing folders such as My Documents. If you are just starting to use your computer, those folders are still empty. To maintain structure, we recommend that you create subfolders for the different types of documents you will be creating. Will you be creating a lot of text files, such as letters to family or computer club instructions? Then create new folders to save them in. You do this as follows:
- Open File Explorer and navigate to the folder where you want to create subfolders.
- Click at the top of the menu New map.
A new, empty folder will now appear in the right window. The name box will flash, and you can type in a good name, such as Correspondence. You can create as many (sub)folders as you think you need. You can also add these subfolders back to the Libraries mentioned earlier.
Move files
The Explorer is widely used to move files. That goes through the functions Selecting, Copy/Cut and To stick. To copy is exactly what the word says: you select a certain file, you make a copy of it. You can save that copy in another location. The function To cut is for moving a file from one location to another.
An example: on our computer we accidentally put an image in My Documents. We would like to move it to the My Pictures folder. Then we go to Start > My Documents. We see the image and select it by pointing at it with the mouse and clicking the left mouse button. Then we go to the menu Organize and we click To cut. We go back to the File Explorer and browse to the My Pictures folder. Then we go to the menu Organize and we choose To stick. The image we selected will now appear in this folder. It has now been moved from one folder to another.
You can also copy files instead of cutting them. Then you make a copy of the file to save it elsewhere. We don’t recommend this: you can easily get confused because there are multiple versions of the same file on your computer.
Create files
The most common way to create new files is with a program. For example, you can create a text document in a word processing program. Saving a specific file is done from the associated application. Suppose you are typing a letter in Word, then in Word you go to the menu File > Save As , or use the Office button at the top left to save your file. You choose a folder for the file, and give it a name. Then click with the mouse on Save . The file is now safely stored. You can open it again later in Word. You can also use File Explorer to locate the file. Then double click on the file name to open it. It will then open automatically in the Word program.
Delete files
If you no longer need a file, you can delete it from your computer’s hard drive using File Explorer. This saves space and prevents your computer from becoming full of unwanted files. To delete a file, open the folder where the file is stored in File Explorer. Then select the file. Press on the button delete and in the new window click Yes to delete the file. (This method is not intended to uninstall programs. It is quite different, which is through the Control Panel.)