.jpg)
Getting started with Word? Discover the basic functions. Create a new document, type texts and then format it neatly.
Start Word
Start Word
In order to use Word, you must first start the program. You do this as follows:
- click on Start (the Windows logo in the taskbar).
- Scroll down and click Become.
- Word opens. On the left you will see a menu. The ‘Home’ tab is automatically open. Here you choose what kind of file you want to open.
- click on Empty document.
The ribbon
When you start Word, you see an empty white ‘sheet of paper’ with all kinds of buttons and menus above it. These are housed in the so-called Ribbon. There are several tabs in the Ribbon, such as ‘Home’ and ‘Insert’. In addition, the Ribbon is context sensitive: it can adapt to the task you are currently performing.

With the buttons on the Ribbon you activate the functions you need for word processing and formatting the texts. Many buttons (eg under ‘Paste’ on the ‘Home’ tab) have a small black arrow. Click this and more options in the same category will appear.
Create a new document
A new document is a blank white sheet on which you can type and format text. There are several ways to create a new document:
- Click in the Ribbon on File > New > Empty document. Click on To make.
- Use the shortcut Ctrl+N (press the Ctrl key and the letter N at the same time).
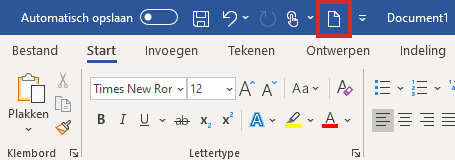
- Click the icon New from the Quick Access toolbar (left, above the Ribbon).

Note: By default, this icon is not in the Quick Access toolbar. To add this icon to the Quick Access Toolbar, click the arrow to the right of the Quick Access Toolbar and New to click.

The result is always the same: Word opens a blank page.
Type and insert text
- Once you have a blank document in front of you, you can start typing. The text you entered appears on the screen. Unlike a typewriter, you don’t have to press the Enter key at the end of a line on the computer. Word automatically continues on a new line at the end of the line.
- You create a space between words by pressing the wide space bar at the bottom of your keyboard. If you are creating paragraphs and want to start on a new line, just press the Enter key. The cursor (the thick vertical line in the text that indicates where you are) then jumps to the next line.
- You create a capital letter by holding down the Shift key and then typing a letter. Word creates capital letters at the beginning of a sentence.
Select and delete text
To edit or delete large chunks of text at once, you can select the word or phrases. This can be done in several ways. The selected text will then have a gray background:
- Select one word: double click on the word.
- Select a single paragraph: Click three times within the paragraph.
- More words or lines: drag the mouse over the part you want to select while holding down the left mouse button.
- Instead of the above three options, you can also hold down the Shift key and use the arrow keys.
- Select the whole document: click the tab Start. In the ‘Edit’ group, click Selecting > Select all. You can also use the keyboard shortcut Ctrl+A.
You can delete large parts of text in one go by first selecting the text and then pressing the Delete key. You can deselect (deselect) by clicking anywhere in the text.
Formatting text
You can format text in many ways. Color letters, highlight them, fill out the text (spread across the line), or change the font or font size. The most commonly used methods of formatting text can be found together on the ‘Home’ tab, which is visible by default when opening a document.
- Select the text you want to format.
- Choose the formatting tool you want to apply.
You will immediately see the result. Below you can read about some commonly used formatting features.
letter format
The second group on the ‘Home’ tab is called ‘Font’. Here you will find the ‘Font’ and ‘Font size’ options.
- Font: Click on the arrow and select the font of your taste. You can see examples of the available fonts.
- Font size: Click on the arrow and select the font size.
In the same “Font” group, you’ll find buttons for bold, italics, and underline.
make fat
Click the button with the icon B to make the text bold (bold). If you had selected text, it will now be bold. If you had not selected any text, but start typing after clicking the button, the text you type will automatically be bolded. By pressing the button again B Clicking disables the feature and reverts to typing normal text.
You can also use a keyboard shortcut to make text bold: Ctrl+B. For the shortcut also applies: first select the text and then make it bold, or first press the shortcut, then type the bold text. If you then press the hotkey again, you continue typing in normal text.
Make italic
Click the button with the icon I to make the text italic (in italics). The same applies to italics as to bold. The combination for the shortcut is then Ctrl+I. You can also combine functions by, for example, clicking both the buttons for Bold and Italic. The text will then be bold and italicized.
underline
Click the button with the icon YOU in the toolbar to underline the text. The effect is also the same as with bold and italics. You can also combine this function with the previous two.
Highlight text
To make text really stand out, you can highlight it. You can compare this to marking text with a brightly colored marker. In the Font group, click the arrow next to the Highlighter button (“Text Highlight Color”) to choose a color. Then use the mouse to select the text you want to highlight in the chosen color. To unmark, select the highlighted piece of text and click on ‘Text Highlight Color’ No colour.
Color letters
You can also color the letters themselves. To do this, click on the arrow next to the button with the ‘Text color’ icon, also found in the ‘Font’ group. You will see a window where you can choose one of the standard colors. With ‘More colors’ you can choose a color from a color wheel.
align text
Alignment means that the text is ‘pressed’ to a certain margin, or appears exactly in the middle of a page. The alignment buttons can be found on the ‘Home’ tab under the ‘Paragraph’ group.

- First button: The text aligns to the left side of the page. This is enabled by default in a new document.
- Second button: The text is in the middle of the page.
- Third button: The text aligns to the right side of the page.
- Last button: The text is spread across the entire width of the page. Some people think that looks nice. Justified text can be difficult to read because the space between the words varies.
Other text formatting options
You can use the other buttons in the ‘Paragraph’ group if, for example, you want to number text or give it a different line spacing:
- Bullets Icon Button
 : Creates unnumbered lists of selected text area. Each new paragraph gets a bullet or other bullet point.
 - Numbering icon button
 : Creates numbered lists of selected text area. Each new paragraph is numbered.
 - Increase Indent icon button
 : Increases the indent at the beginning of a selected section of text.
 - Decrease Indent icon button
 : Decreases the indent at the beginning of a selected section of text.
 - Change line spacing icon button
 : Choose how much space there should be between the lines of the selected section of text.
 - Create Border icon button
 : Choose which side(s) of a selected section of text to apply borders.
Save file
When you are done working on a document, you need to save it. You then save it on the computer or in the cloud of OneDrive. That is Microsoft’s online storage service. Later, you can reopen the saved document and continue working on it. You can also save documents that you receive from others, for example via e-mail.
It is important that different documents are given different names. Word overwrites files that have the same name, so that only the latest version is kept. So every new document you work on has to be saved under a different name. For example, you can use the ‘Documents’ folder on your computer as a storage location.
To save a document:
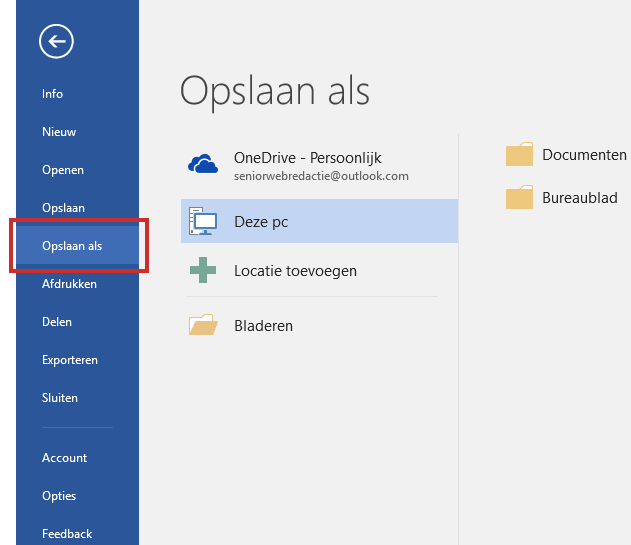
- Click on the tab File > Save as.

- Choose a location for the document. In Office 365, after signing in with your Microsoft account, you can choose whether to save the document to your computer or to OneDrive. Are you logged in and do you also want to be able to access the document from other computers? Then choose OneDrive. Without logging in can save only on the computer itself. You will then not be able to access your document from other computers.
- In the “File name” box, type an appropriate name.
- click on Save. The document will be stored in the location of your choice.
If you have worked in the same document before, but want to keep the previous version of the document separately, save the new version under a new name. You do this as follows:
- Click on the tab File > Save as.
- You can then enter a new name for the document so that your previous version is not overwritten.
- click on Save.
Open an existing document
Documents you’ve saved can be reopened at a later time to read, print, or edit them. Open a document like this:
- Click on the tab File > To open.
- Find the location where the file is saved (for example, in your “My Documents” folder or in your folder on OneDrive).
- Click on the file you want to open.
- click on To open.