
To allow a computer to do something, the device needs a program. But writing such a program or programming is pretty complicated for many. With Scratch you can easily take the very first steps. Nice for (grand) parents and their (grand) children.
René sugar
|
This text is a shortened version of an article that previously appeared in more extensive form in the Magazine Softwarebus from HCC! Compusers |
Scratch is the world’s largest coding community for children and a coding language with a simple visual interface with which young people can make digital stories, games and animations. Scratch has been designed, developed and made available by the Scratch Foundation, an SUPPLAY -MARK organization. You can therefore use Scratch for free. And free is really free here, without spam. You use Scratch online and it’s all at MIT (Massachusetts Institute of Technology), in my opinion the best Technical University in the world. Two MIT professors recently received a Nobel Prize. You can come to Scratch via https://scratch.mit.edu. Create a free account there and then you can start.

The home screen
The home screen
When you are logged in, the home screen looks about it as in the image above.
At (a) you see the URL: https://scratch.mit.edu and at (b) you see the menu bar. When you click on the Scratch symbol, you will also end up on this page. With (c) and (d) you see dynamic content. With (c) that is ‘what happens’ and to my knowledge they are the last public activities within my network. If I change the page, it can already look very different again. At (D) you see Scratchnieuws And that is news from Scratch itself. At (e) you see that I am logged in and as a ‘software bus’. That is one of my accounts and the account that I use the most when I am writing articles. When I click on ‘Softwarebus’ I get a profile submenu, about which more in the next paragraph. At (f) you can see that one message is ready for me. In this case this is a message that someone follows me, but they can be different types of messages. At (G) you can search, both in a name of a fellow Scratcher and on a project such as something else, such as a studio. At (H) you get, also dynamically, an overview of a number of ‘highlighted projects’, within which you can also scroll. This is based on your personal preferences. And with (i) you have, again dynamically, an overview of featured studios.
Projects are therefore single Scratch programs; Every scratch program is in fact a project. If you click on ‘Create’ in the menu bar (B), a new project will be created. In the meantime, there are more than a trillion projects within Scratch, so more than a thousand billion. Studios are in fact groups of projects. As a scratcher you can create and manage multiple studios and you can also sometimes be asked to manage studios from others. We can treat the concept of studios another time. For now it is enough that you know that you can place your projects in studios. That way you can organize your projects thematically.
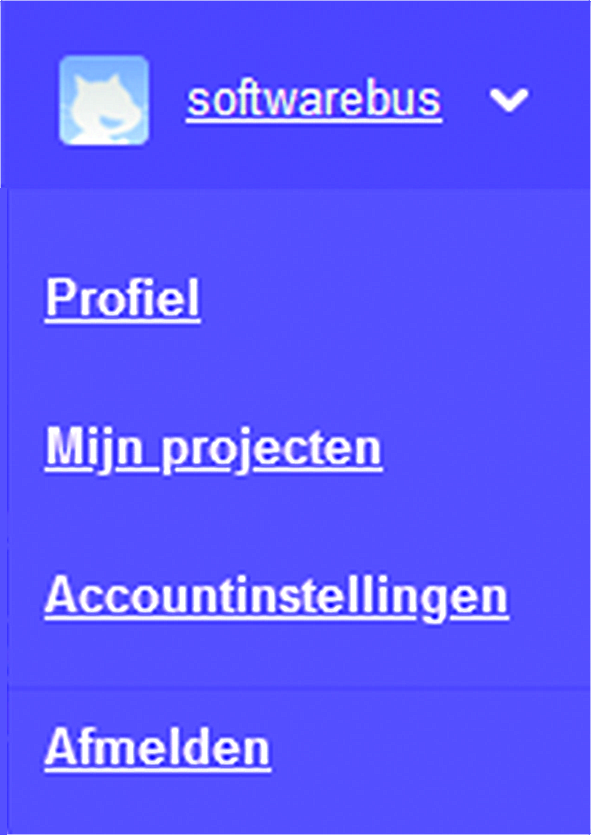 |
| Profile submenu |
Profile submenu
I would come back to the Submenu profile, so if you would click on ‘Softwarebus’ in the previous screen. You will then see this submenu.
So here you can click on a number of options. Not very exciting, but it indicates that you can find all your projects again, you can unsubscribe and you can maintain some information about yourself. By My projects Do you also arrive My studiosat least there you will find a submenu with studios as one of the options in addition to the projects.
Project
To start with a new project, click on the menu bar (see (b) in the first image) Make. Then you get a lot of options. We walk past the options. In Figgur 3 – New project.
At (1) you see the URL. This is now a bit longer, because the project code is also in the URL. Also at the end editorso that you know that you are in the processing fashion. If you click on (2), you will come to the same URL minus the piece editor And then you see descriptive page. That is certainly not exciting for a new project. At (3) you see the link to Lesson To learn scratch on the Scratch site. Here you can find around 25 manuals on different aspects of Scratch. Feel free to take a look around, it’s worth it. At (4) you will find the option to share your project. As I said before: this is appreciated by the scratch community. The idea is that together you can do more than alone. If you are really still at the start of your project, sharing is not really looking forward to it, but if you have completed your project and you want to show it others, then you will have to share it because otherwise nobody can add it. And if you have shared it, then others can also look at your project and they can even make a copy of it, which they can then further edit. Their project page will then state that their project is based on your work. So they borrow your work, but you will get the credits for.
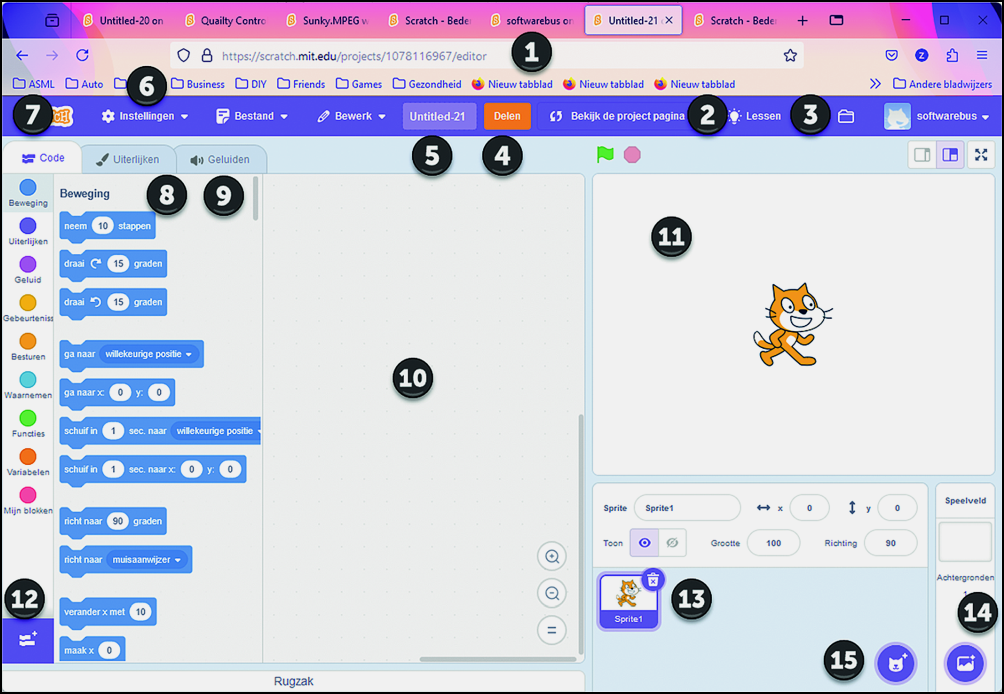
Fig 3 – New project
At (5) you give your project a name, because they are all called by default Untitled-XX whereby XX A serial number indicates. So apparently I have already made 20 projects as a software bus. For Scratch it does not really matter if you call all your projects the same, because it distinguishes the projects based on the serial number in the URL. It is only confusing for yourself, so it is better to choose a logical name.
At (6) you will find the Institutions. Previously this was the globe, where you could set the language. That is still possible and there is still an excess of languages available, but you can also set a color scheme here. Under (7) you see three tabs and the left is the tab Code. Here you can see the different groups of commands that you can use in your program in different colors. At (8) you will find Outthose are the forms of the objects (sprites) that you use in your program. At (9) you will find the sounds that are through you sprites can be produced. You can also link sounds to your background.
The commands are therefore subdivided into a number of groups, which are recognizable by a color code. The colored balls let you jump to a category, because the list of commands is simply among each other, but sorted by category. With these blocks you put together your program in the work area (10).
At (11) you will find the playing field. All activities take place here. You can also maximize this with the icon at the top right in the playing field (with the four arrows). When your program is finished, you can play it a bit bigger.
At (12) you will find a button to switch on some extra modules. When we went from version 2 to version 3, the pen suddenly disappeared from the standard. Apparently it was not used very much by the scratchers, so the pen commands moved to a separate module. If you want to use it, you will have to add it. That is not a lot of work: you press the icon at (12) and you select the pen commands. A child can do the laundry.
At (13) you will find the sprites Being part of your project. Above the selected sprite (In this case there is only one) you see some parameters concerning the spritesuch as the name, the position and some parameters. At (14) you can show backgrounds that participate. With the buttons at (15) you can sprites Add backgrounds respectively. You can choose from available materials, draw or upload yourself. For example, you can design a fantastic background in Blender and then import it into Scratch.
If you look closely at the work area (10), you will see the image of the Sprite in the top right corner. If you have multiple sprites, you will find the image of the selected Sprite in the work area. And in the work area you will find the code that belongs to that sprite. Each Sprite is its own object that can have its own code. Instead of traditional sequential programming, you now view what it should do per object.
And in this way you build your program for object. In this way we also build fairly compact programs. If we look back at ‘Bricks’, for example, that we discussed in a number of preceding numbers, then you may be able to imagine that, for example, you need a few tens of pages of code for that in, for example, basic. In Scratch you need about one page per active sprite and then the code blocks you use are still quite large.
Program
Scratch is therefore a programming language, so you can program your computer. The computer is in fact just a stupid device, because it literally carries out the instructions he receives. He never wonders if it makes sense what you want and is unable to read thoughts.
You can prepare a program by putting series of instructions one after the other. In fact, just like Lego stones, you have to click them together. If it does not ‘click’, then the combination of instructions in that order is not working. In fact, you cannot make mistakes in the syntax. In Basic, for example, you can make a mistake by not putting two loops around each other (that is good) but in fact allowing them to walk together. That is not possible, that gives a mistake. In Scratch you don’t get such a mistake. You can put a loop in a loop and inside another loop and so on. But you can’t put loops together so that they do weird things. It just won’t fit.
That does not mean that you could not make programming errors. You can still make mistakes, but then the computer still does what you say. And you can always stop your program with the red dot, even if you are in an eternal loop.
It is therefore important to keep thinking about what you do. And that is why there are also exercises, so that you gradually grow from absolute beginner to a reasonably advanced programmer. And so it is important to also perform the exercises, if you want to be active with Scratch and especially if you also want to explain your (grand) children.
Scratch at HCC
More ScratchRené Suiker is looking for people who think of ideas what we can build with Scratch. You may want to make a setup once and let it grow and bloom further here. Perhaps there are also specific topics that can be discussed here. You can send an email to rene@renesuiker.nl |
René Suiker is an enthusiastic user of Scratch within HCC! Compusers. There is also plenty of attention to Scratch within HCC! AI. And at HCC! Seniors Academy, Scratch is sometimes also treated, often in combination with hardware control. In addition, you can imagine that HCC! Programming will also pay attention to Scratch. Now that is not really the case, although Scratch will sometimes be discussed on some Friday evening sessions. Finally, the youth also get more and more interest in Scratch.