Make a Word document attractive with images. In this article, you will learn how to work with images in Word.
Article structure
Word distinguishes between pictures and other illustrations. In this article, we’ll only cover inserting and editing images and photos that are already on your computer. Read below how to proceed; from inserting an image to applying the most commonly used editing options.
You can read how the other clip art options work in Word in the “Draw with Word” article.
Insert an image
You can insert all kinds of images into Word, such as digital photos or pictures that you have obtained from the Internet. You do this as follows:
- In the Word document, click where you want to insert a picture.
- In the Ribbon, click on the tab Insert.
- Press the button Pictures.
- Scroll to the desired image and click on it.
- click on Insert.
The image you chose is now in the document. A new tab has been added to the Ribbon: ‘Image layout’. It contains functions to edit the image.
Buttons in Picture Format tab
You can adjust the image you have inserted in Word. For basic operations, such as resizing, this is excellent. If you want to perform multiple or advanced edits, such as straightening the horizon or removing red-eye, you must first edit your photos in a photo editing program.
The various image editing functions become active in Word when you click on the inserted image. If you click elsewhere in the document, the ‘Image format’ tab disappears. It will return if you click on the image again.
On the tab you will find several groups of formatting options:
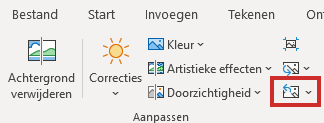
- In the ‘Adjust’ group, you will find buttons for ‘Remove Background’, ‘Corrections’, ‘Color’, ‘Artistic Effects’ and ‘Transparency’.
- In addition, you will find the ‘Picture Styles’ group. Here are options with which you can, for example, give the image a border.
- You control the position of the image in the ‘Arrange’ group.
- You can reduce and crop the image in the ‘Size’ group.
Below we’ll get started with a few commonly used options.
Brightness, contrast and sharpness
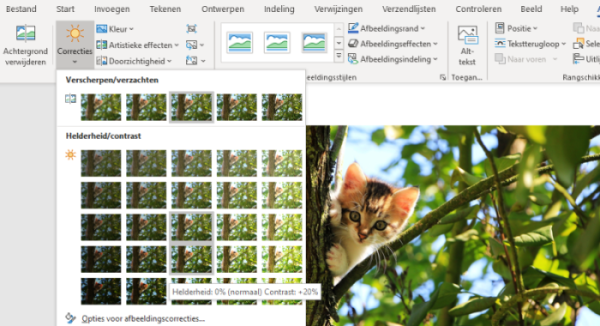
The ‘Corrections’ button makes a photo sharper or softer. You can also adjust the brightness (lighter and darker) and the contrast between the colors in one operation.
- In the ‘Edit’ group, click Corrections and mouse over the examples under ‘Sharpen and soften’. You can see the effect on the photo in the document. Click on the option you are happy with.
- In the ‘Edit’ group, click Corrections and mouse over the examples under ‘Brightness and contrast’. Here too you can see the effect of an option and you can click on the one that seems best to you.

Adjust image color
With the ‘Color’ button you can adjust the color saturation and hue of a photo and even choose a completely different color that is layered over the photo.
- In the ‘Edit’ group, click Colour.
.png)
- Choose one of the options. Hover over it and you will see the name and effect on your photo. For example, click Sepia for a photo with a nostalgic touch.
- In the same window you can choose even more colors under ‘More variations’. Whenever you hover your mouse over an option, you will see the result in the photo. When you like the color, click on it.
Add an effect
With the button ‘Artistic effects’ you give a special effect to the photo.
- In the ‘Edit’ group, click Artistic Effects.
- Click on one of the options, for example Paint strokes.
Back to the original
Have you experimented, but would you rather have the original photo back? This can be done as follows:
- Is the image no longer selected? Then click on it
- The ‘Image Format’ tab appears in the Ribbon. Click here.
- In the ‘Edit’ group, click Reset image.

(move) image
To place the image in the correct position in the text, do the following:
- In the ‘Arrange’ group, click the button Position.
- You choose one of the options to change the position of the image. The image can be on the left, right, bottom, top, or center of the text. By the way, you can also move a picture by clicking and dragging it while holding down the mouse button.
- Do you want to put the image behind the text? In the ‘Arrange’ group, click Text wrapping > Behind text.
Adjust size
You can enlarge or reduce the image while maintaining the correct proportion in these ways:
- In the ‘Size’ group, use the small arrows to adjust the number of centimeters (height and width).
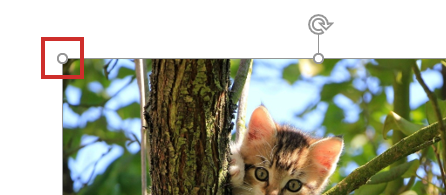
- Or use one of the circles on the corners of the picture. Click a circle in one of the corners and hold down the mouse button while dragging the mouse to make the image wider or taller.

Crop image
You crop if you only want to show part of the image.
- Click in the right group ‘Size’ on crop > crop.
- Black bars and corners appear around the image. Move the mouse pointer over it.
- When the mouse pointer changes to a black bar or black corner, click and hold the left mouse button.
- Move the pointer inward to crop the image.
- If necessary, undo the cropping by dragging the black bar or corner back out.
- Press the Enter key when you are satisfied.
- Unsatisfied? Use the shortcut Ctrl+Z to undo the action.