
Google Calendar is an excellent tool, but it is of course important to plan everything well. Discover here 10 top tips to get the most out of your agenda.
Toon van Daele
Google Calendar is an online service and that does offer some advantages. You can view and edit your calendar from virtually anywhere, and you can also share it with colleagues or acquaintances to make it easier to make appointments together.
A (free) Google account is required – if necessary, you can quickly arrange this via https://accounts.google.com/signup/. With such an account you can use the calendar via your browser at https://calendar.google.com or with the Google Calendar mobile app, available for Android and iO.
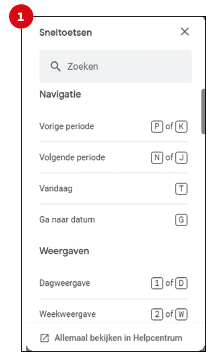 1 Shortcuts
When using Google Calendar on your computer, there are plenty of useful keyboard shortcuts to help you navigate faster, create or edit appointments, and so on. Press Shift + ? for a brief overview (Figure 1). Or visit https://support.google.com/calendar/answer/37034 for a more comprehensive list that you can print as cheat sheet. If this feature doesn’t work, you may need to enable it. Click on the gear icon at the top right, go to Settings / Shortcuts and activate Enable keyboard shortcuts.
Quick with your fingers?
Then save time with keyboard shortcuts
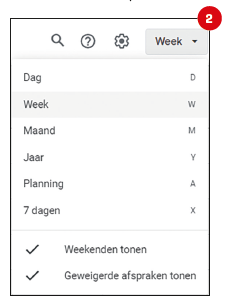
2 Views
By default, Google Calendar shows you a monthly overview, but you can quickly switch to, for example, a day, week or year overview via the arrow button at the top right or with keyboard shortcuts such as D, W, M and Y (image 2).
If you use multiple calendars (see also tip 5) and want to avoid overlapping appointments, use the day or schedule view and check all desired calendars in the left panel.
Do you prefer a more lively background? Then install the browser extension (for Chrome and Edge) via https://chrome.google.com/webstore/detail/custom-calendar-backgroun/acjecbgflnhmeldadcbblhfdimhifpki. After installation, press the corresponding button and choose Extension options to set a different background (also per month).
You choose how your calendar should be displayed
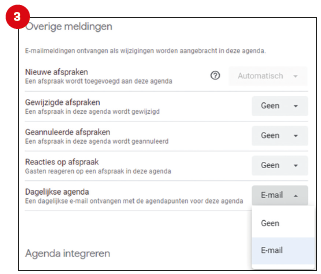 |
| Your daily agenda in your mailbox: very handy! |
3 Daily mail
If you don’t always feel like or have time to check your Google Calendar but still want to stay informed about appointments, you can automatically receive your daily planning by email. Click on the gear icon and choose Institutions. In the left pane, at Settings for my calendars, select the desired calendar. In the right pane, scroll to Other notifications. Choose at Daily agenda for E-mail (image 3). Here you can also set up to receive emails for Modified or Canceled appointments or at Responses by appointment.
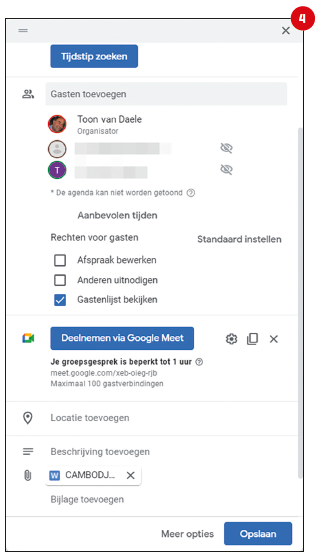
4 Appendices
Suppose you are planning a meeting, it would be useful if all those involved received the meeting agenda in advance, for example. This can be done directly from Google Calendar.
Click on the desired time in your calendar and fill in the required information. Then click Add guests and enter their email addresses. If necessary, adjust the Rights for guests on, like like Edit appointment, Others to invite and Edit guest list.
Click at the bottom of the window Add attachment (image 4). Choose My Drive or select upload for local files. Through Add Google Meet video meeting you can also add a link to a planned online meeting. Or click here Add description and add the web address of such a meeting yourself if you use a service other than Google Meet. Save with Save.
Invite guests and
immediately send them useful documents
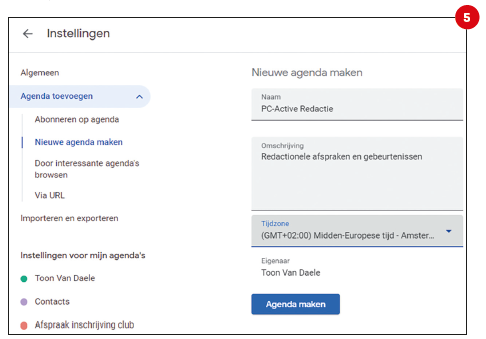
5 Multiple calendars
You probably don’t want personal matters and business appointments to be together in the same agenda. Multiple calendars then work much more clearly.
To create an additional calendar, click the plus button in the left panel Others agendas and you choose Create new calendar. Fill one Name and Description and confirm with Create calendar (image 5). Press the button next to a calendar to change its color. Place a check mark next to a calendar to make it visible.
 |
|
It is often clearer if you work with two (or more) calendars |
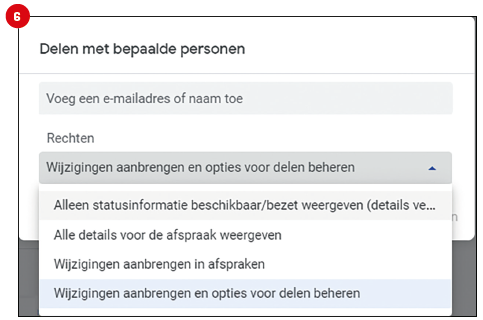
6 Share calendars
You can also make an agenda visible to others, which makes planning together easier. Press the button with the three dots next to the agenda, choose Institutions and share and scroll to Share with specific people or groups. Select Add people and groups and enter the email address (of a person or a Google group; more information about group management can be found at https://support.google.com/groups/answer/2464926). In the drop-down menu at Rights make it clear what that person can do with your agenda. This goes from Show only available/busy status information until Make changes and manage sharing options (Figure 6). Confirm your choices with Send.
 |
|
You decide what others can do with your shared agenda |
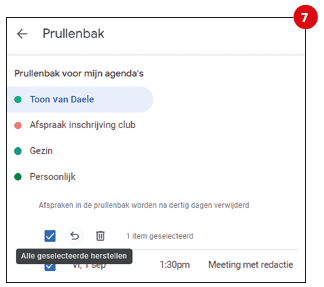
7 Recovery
It may happen that you accidentally delete one or more appointments or events from your calendar. Fortunately, you can still get it back. Click on the gear icon and choose Waste paper basket. Click on the desired agenda on the left. The deleted appointments will now appear on the right unless they were deleted more than 30 days ago. Select the items you want to restore by checking the box. Confirm your choice by clicking the arrow button Restore all selected to click,
Appointments deleted by mistake?
Fortunately, you can still get it back
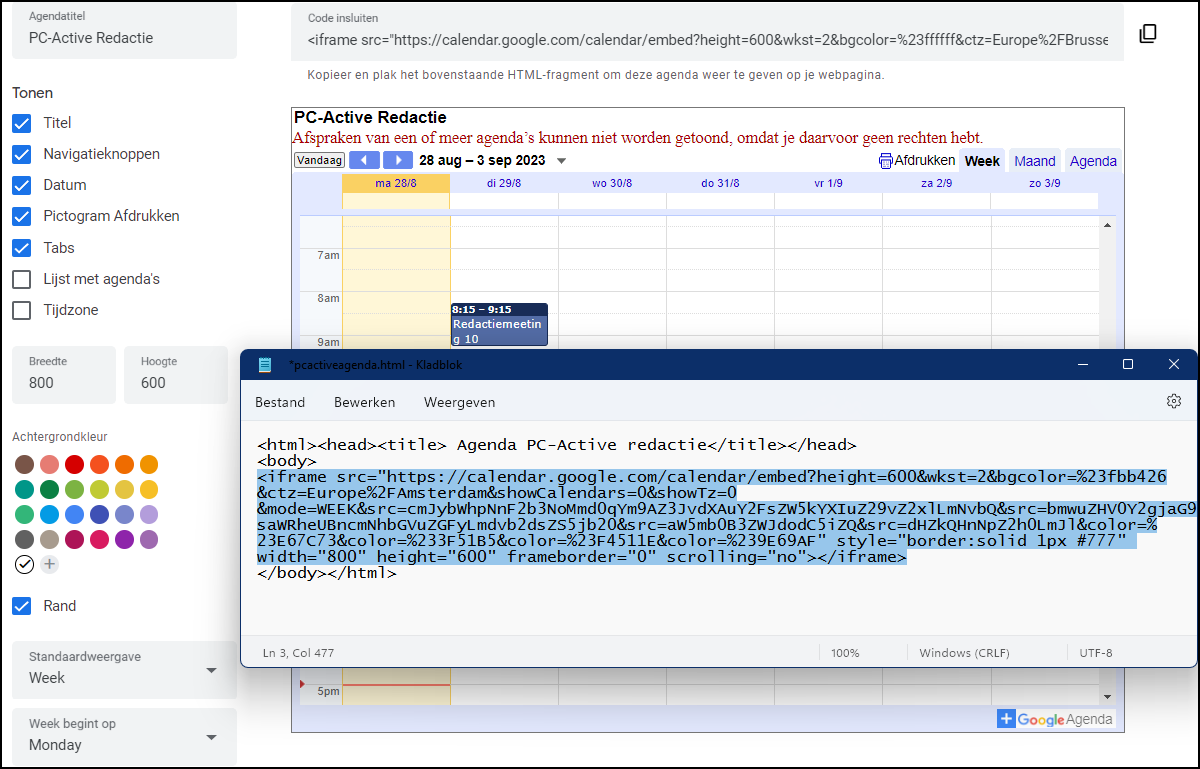
8 Website
Suppose you maintain the agenda of your club or association and you want to make it easily visible to all members, even if they do not use Google Calendar themselves. A useful alternative is to publish the agenda on your organization’s website.
Click on the button with the three dots next to the agenda and choose Settings and sharing. Scroll to Integrate calendar and click To adjust. On the left you choose the desired items, such as Title, Date etc., set the calendar dimensions, choose the background color (for example, via the plus button you can set the house color of your organization), the display, the language, and so on. On the right you see a preview (image below). If everything is as desired, click on the button with the rectangle at the top right to copy the corresponding code to the Windows clipboard. All you have to do is paste this at the desired location in the HTML code of the web page.
 |
|
Set everything as desired and paste the corresponding code into the code of your web page |
 |
| Set everything as desired and paste the corresponding code into the code of your web page. Finished. |
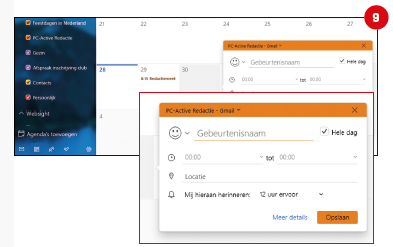
9 Desktop
If you prefer to manage your Google Calendar from your computer and find it inconvenient to always do it through your browser, you can easily create a shortcut in Chrome. Go to Google Calendar, click on the button with the three dots in the top right corner in Chrome and choose More tools / Create shortcut. Give a name to your shortcut, check (optional) Open as window on and confirm with To make. An icon will now appear on your desktop and with a double-click, Google Calendar will open much like a normal app.
If you prefer a full-fledged desktop app, you can also open Google Calendar with the standard one agendaapp, from the Windows program menu. Launch the app and click the gear icon at the bottom left. Choose Manage accounts / Add account / Google and sign in with your Google account. After your confirmation with Allow you can now also manage your Google Calendar from this app (image 9). If necessary, press the button with the three dots and choose Sync to coordinate everything directly.
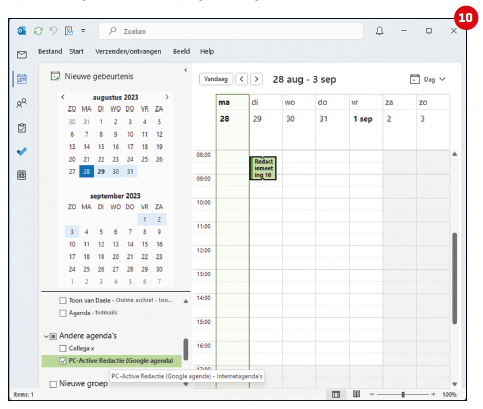
10 Outlook
If you prefer to work with Microsoft Outlook, but you also have a (shared) Google Calendar, you can also consult it in Outlook.
First open Google Calendar and press the button with the three dots next to the desired agenda. Choose Settings and sharingscroll to Integrate calendar and click on Secret address in iCal format on the icon Copy to clipboard.
 |
|
Set everything as desired and paste the corresponding code into the code of your web page. Finished. |
Then open your Outlook program, go to File / Account Settings / Account Settings. Open the tab Internet agendasclick on New and paste the iCal address into the field with Ctrl+C. click on Add and enter a folder name. After your confirmation with OK the calendar is added to Outlook (image 10). You can view the calendar in Outlook, but you must make changes via Google Calendar.