
There are tons of programs you can use to optimize or edit an image, such as scaling, converting, or watermarking it. Free programs that can do all those operations at once on a whole bunch of image files are thinner littered. In this article, we’ll introduce you to two different batch image editing tools, from very simple to very powerful.
ImagesMixer installation
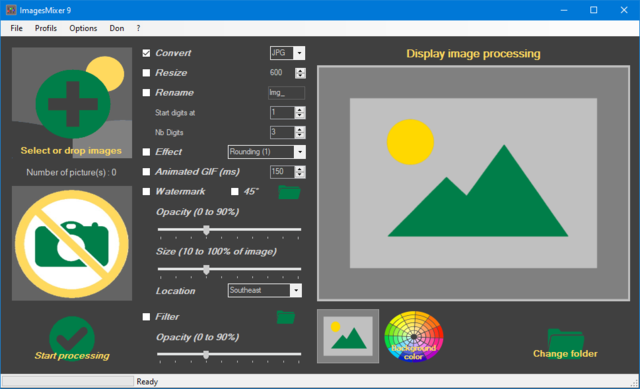
We start with ImagesMixer, an accessible program that can handle the most important image formats (jpg, png, gif and bmp) and can simply be controlled from a graphical interface. You can find it on www.tiny.cc/immix. With a few mouse clicks you have installed the tool and you can start it up. The interface looks quite colorful and somewhat cartoonish. In the middle you will find the different editing options: Convert, Resize, Rename, Effect, Animated GIF, Watermark and Filter.
Batch operation
You can add pictures in three ways: you drag them to the window, you go via File, Pictures, or you work with the big plus button. You will see a preview of the first image on the right.
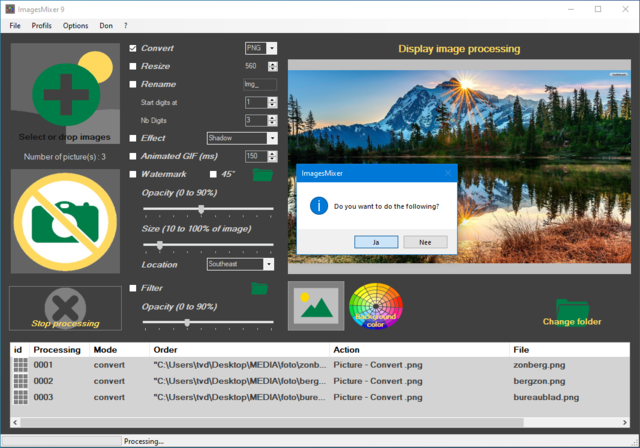
All you have to do is tick an available operation, set the necessary parameters and click Start processing to push. In the window at the bottom – if necessary, you can enlarge the program window a bit – you can read which actions are performed on which images as soon as you Yes confirms. Processing is not that fast, but during the process, the consecutive photos nice in the preview. By default, ImagesMixer saves the resulting images in the folder C: Users
Multiple operations
Performing multiple operations at the same time is a matter of placing a tick next to the desired manipulations.
Bee Resize you can only set the width (in pixels); the original aspect ratio is retained. Suppose you also want to rename the files as follows: Trip_01
ImagesMixer also provides all kinds of effects, such as Shadow, Sepia, Rounding, Pencil and so on: you just have to select them. The option Animated GIF is somewhat disappointing: normally you need a whole series of photos for a decent effect in which you have moved a certain object a little each time.
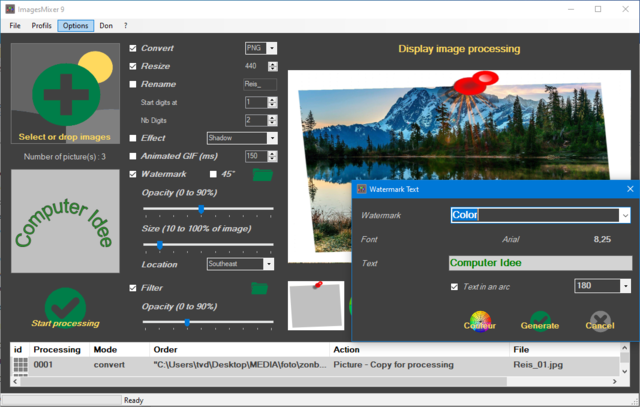
You can add a graphic watermark with Watermark, where you choose the desired copy via the green folder icon. You can rotate this watermark 45 degrees and also set the transparency level, size and location. If you prefer to use a text as a watermark, you can select from the menu Options the option Watermark Text. In addition to the font, color and degree of rotation, you can choose three more styles. Confirm with Generate.
Finally, there are a few dozen filters, which you can find via the corresponding folder icon Filter.
Installation of ImageMagick
If you find the possibilities of ImagesMixer too limited and the command line does not deter you, then ImageMagick is an extremely powerful image editor. With a few tricks you can also perform edits on several images at the same time.
ImageMagick is free, open source and available for multiple platforms. It has been around for several decades, but is still being developed further. The tool claims to support more than two hundred file formats and offers a wide range of (fast) editing.
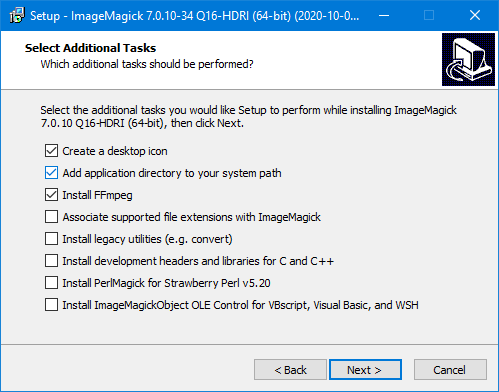
In this article we will limit ourselves to the Windows-variant. You can find it at the bottom of the ImageMagick download page, accessible via www.tiny.cc/imawin, in the section Windows Binary Release.
For Windows 64 bit, choose the file ImageMagick-7.0.10-34-Q16-HDRI-x64-dll.exe, for Windows 32 bit you choose ImageMagick-7.0.10-34-Q16-HDRI-x86-dll.exe (or a more recent version, if available). Note: Downloading may be slow.
Preferably, you run the exe file as an administrator. During the installation, the option is Add application directory to your system path checked: useful, because this way you can invoke the command line command magick from any folder. Also leave the check mark next to Install FFmpeg (a versatile multimedia framework). Then complete the installation.
Batch processing
ImageMagick has via www.tiny.cc/imaclp also a web page with an overwhelming list of all possible parameters. Take your time to browse through that entire page, in this article we give some examples. Suppose you want to extract a thumbnail image from photos, for example with a view to an overview list. You can do this from the Windows Command Prompt with the command:
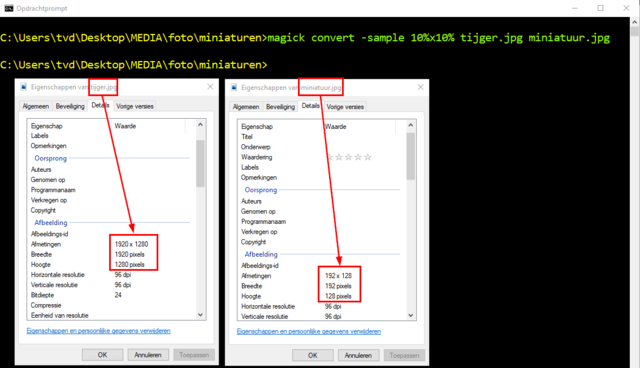
magick convert -sample 10% x10%
That could be something like:
magick convert -sample 10% x10% picture.jpg thumbnail.jpg
The size of thumbnail.jpg is here 10% of the original size.
We assume here that you run this command from the folder with the images. If you do not do that, you still have to state the correct path to the image (s) at
There are several ways to perform an operation like the above on multiple images at the same time. Perhaps the simplest is using wildcards:
magick convert -sample 15% x15% * .jpg thumbnail.jpg
ImageMagick will then make a thumbnail of all jpg files in that folder. The tool is smart enough to automatically place a counter with each new thumbnail: thumbnail-0.jpg, thumbnail-1.jpg and so on.
You can also adjust this numbering yourself with parameters:
magick convert -sample 10% x10% * .jpg thumbnail% 03d.jpg
In this case, ImageMagick generates jpg files with the following file names: miniature000.jpg, miniature001.jpg and so on.
It is even possible to save the thumbnail image as a png file with one command (even if the original is jpg):
magick convert -sample 10% x10% * .jpg thumbnail.png
Batch file with loop
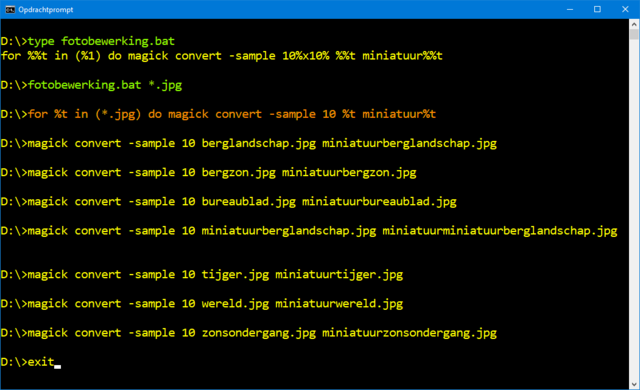
So you can perform an operation on multiple files by using wildcards (such as *.jpg or *.png), but there is another way that advanced users like to use in a batch file. Such a file has the extension.bat or .cmd and is also easy to create with Notepad. Such a file could contain the following two lines of text:
@echo off
for %% t in (% 1) do magick convert -sample 10% x10% %% t thumbnail %% t
This requires some explanation. With @echo off you avoid that all text output of the command also appears on the screen (you can safely omit this command).
Now suppose your batch file is called photo editing.bat and you start this from Command Prompt with the command:
photo editing.bat * .jpg.
This will cause the first jpg file in that directory to be picked up by the batch file via % 1 and in the variable %% t is accommodated. Is that file for example computertotaal.jpg, the following command is executed:
magick convert -sample 10% x10% computertotal.jpg miniature computertotal.jpg
The loop construct for […] do […] then checks if there are any other jpg files in the folder. If this is indeed the case, the second jpg file is now passed to the batch file. This continues until all jpg files have been processed.
Other manipulations
With the mentioned techniques you can also have many other magick commands executed simultaneously on a series of photo files. We limit ourselves here to a number of interesting examples.
Convert a photo to another image format, for example, as follows:
magick convert
For example, if you want to use an image as an icon (.ico) for a shortcut, you can create such an ico file with the command:
magic convert globe.jpg globe.ico
Then right click on that shortcut to open the context menu and click Properties / Shortcut tab / Different icon.
If your original image turns out to be too large for such an ico file, an error message will pop up. No problem, because then you simply reduce it during the conversion:
magick convert -resize 64×64 globe.jpg globe.ico
Be aware that ImageMagick stubbornly sticks to the original aspect ratio. Suppose it was 640 × 320 pixels, this command will result in an image size of 64 × 32 pixels. To force ImageMagick to use your chosen dimensions, add an exclamation mark after the size:
magick convert -resize 64×64! wereldbol.jpg wereldbol.ico
Now suppose the background color of your source file is black, but you prefer to give your ico file a transparent background, then you use this command:
magick convert -transparent black -fuzz
With the parameter –fuzz

Extract information from images
Not only can you use ImageMagick for photo editing, you can also extract a lot of detailed information from your image files. For example, try:
magick identify
Possibly using wildcards:
magick identify * .png
With the additional parameter –verbose you get a lot more technical details. You will no longer see a compact information line, but dozens of items such as Geometry, Colorspace, (Channel) Depth and so on. You can also limit yourself to very specific information. With this command you will only see the image dimensions (width × height):
magick identify format “% wx% h”
Or how about:
magick identify -format “%[fx:w/600*2.54] on%[fx:h/600*2.54] cm “
With this you can calculate the print size of an image at a given number of dpi (dots per inch) – in our example this is 600 dpi – converted to centimeters (1 inch = 2.54 cm).
In short, with ImageMagick almost anything is possible. You just need to know the right parameters and get a feel for the syntax. Through www.tiny.cc/imaclt you will find an overview of the available command line tools and via www.tiny.cc/imdisc knock on the door of an active community.
