The Excel program is suitable for keeping track of all kinds of things. Think of administration, a household book or the costs of a holiday. It is used by large companies, but also for people at home it has many useful functions. Start with Excel with this article.
General
Excel is a calculation program from Microsoft. It is part of the Office 365 package, which also includes Word. Excel is intended to keep track of all kinds of data with numbers ‘on graph paper’. This makes it a suitable program for all administration. “Unknown makes unloved” is a saying that applies to Excel. A lot of people don’t know it and that’s why they don’t use it. Once you’ve mastered the basics, you can have a lot of fun with it.
This article applies to Excel 2019. If the older versions have a different behavior, this is indicated.
Start Excel
click on Start > All Programs (this step is not there in Windows 10) > Excel. Excel opens. To open a blank document, click Empty workbook. You will see a blank checkered sheet.
Excel works on the basis of cells that are in a large worksheet. Each cell has a name, which consists of a letter and a number. The rows (from top to bottom) all have a different number and the columns (from left to right) all have a different letter. Cell A1 is the first cell at the top left, next to it you will find B1 and so on. A standard spreadsheet contains thousands of columns and rows, so you have plenty of room to include your data.
Each “sheet” of cells is called a “sheet,” and all of the sheets together are called a “workbook.” You can give the sheets different names to distinguish them from one another. You can also add sheets if you don’t have enough.
Save and open Excel sheet
In Excel, you can enter data on a blank spreadsheet or continue with a spreadsheet you created earlier.
Like other Office programs, Excel works with a Ribbon, a series of tabs that contain the program’s functions.

Default state Start selected. To its left is the word ‘File’. There you will find the functions for saving files. If you want to continue with a previously saved worksheet, you can open it via this menu. You can also control the printing of data in this menu. click on File > Close to close Excel or click on the white cross at the top right of the screen.
Enter data in Excel
You can type data in any cell; words or numbers. You can use the numbers in calculations. Excel does the calculations on the basis of formulas. They are very easy to use, and you can specify which numbers are used in the calculation.
Rename sheet
Each sheet of cells is called a worksheet. To work with multiple worksheets, follow these steps:
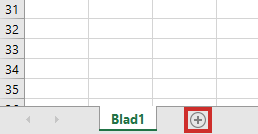
- Click on the plus sign at the bottom next to ‘Sheet1’.

- The extra worksheet ‘Sheet2’ opens.
- Change the name of the sheet by double clicking on the name of the tab.
- Type in another name and confirm with the Enter key.
- The worksheet now has a different name. This works the same in older versions of Excel. The only difference is that Excel starts with three worksheets instead of one.
Select column or row
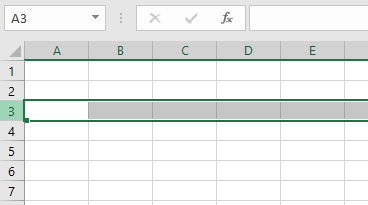
In Excel, you can navigate through the worksheet with the mouse. Select a column by clicking on the letter above it. You select a row by clicking on a number.

The intersection of a column and a row is called a cell. Each cell has a name, for example A1. The letter refers to the column containing the cell, the number refers to the row containing the cell.
Resize cells in Excel
Rows and columns can be adjusted in height and width if you find them too small. You do that with the mouse. To do this, place the mouse pointer on a side, top or bottom edge. The mouse pointer changes to a line with opposite arrows. Hold down the left mouse button and move the mouse left, right, up or down. The entire row or column then becomes larger or smaller. Release the mouse button when the size is to your liking.
Undo
If you do something in Excel that you were not supposed to do, you can undo it. At the top left of the screen you see two twisted arrows. The arrows are to undo the last action (left arrow) or to repeat the last action (right arrow).
Number format
With Excel, you can keep track of all kinds of data, such as percentages, dates, phone numbers, and amounts. You can set the corresponding notation yourself, which is useful when you start calculating with the numbers. For example, determine whether you set numbers as a monetary amount with a euro sign in front of it, or determine how many decimal places there are after the decimal point.
Excel is often used to calculate percentages. To set the percent format:
- Type a number in a cell, for example “0.37”. Then press Enter. Make sure you write commas and not periods. Numbers with points are not recognized by Excel as percentages.
- Select the cell with the mouse.
- Halfway through the ‘Home’ tab on the Ribbon is the ‘Number’ group with a number of icons above it. Click the button for Percent format with icon %. Click on it and the number will now be displayed as a percentage.
Decimals and currencies
You can also enter amounts in Excel:
- Type a number in a cell and select the cell with the mouse. Note that you write points if an amount has decimal places. Excel does not recognize numbers with commas as amounts.
- Above the ‘Number’ group you will see the ‘Financial number format’ icon
 . By default, this format is set to euros. The arrow next to the icon allows you to select other currencies. Click on the icon and the amount will get a euro sign.
 - By default, Excel puts two decimal places after an amount. You can adjust this yourself with the icons
.png) ‘More decimals’ and
‘More decimals’ and  ‘Fewer decimals’.
Date format
You can also display numbers as date. This is useful if, for example, you keep track of the meter readings and would like to use the data from the recordings. Or if you keep an administration and want to note the dates of expenditure. If you type in a date, such as 10/1/2020 and press Enter, the number is usually displayed correctly right away. Still, you can customize it even further if you want. You do this in the following way:
- Select the cell with the date in it.
- Click on the tab Start.
- In the ‘Number’ group, click the arrow next to ‘Date’. If Excel does not recognize the date as such, it says ‘Default’.
- A menu opens.
- You will see several options. Choose ‘Short date format’ or ‘Long date format’. If you click on one of these options, it will be adjusted immediately.
Read further
This article was an introduction to the basics of Excel. In the article “Excel: Formatting and Formulas” you can read how to format tables and create formulas.