 Skype can be used on any device. Likewise on the iPad. Exchange text messages or video call with other Skype users for free.
What is Skype?
Skype is best known for video calling. You start a conversation while you see the other person on the screen. But the camera does not have to be on, only sound is also possible. And if you don’t feel like talking, chatting with other Skype users is just as easy.
Download Skype
Skype starts with downloading the app. The Skype for iPad app is free to download from the App Store.
- Tap on To download.
- When the download is complete, you will see the button Open. Tap this.
- In the next window, tap Join.
Sign in to Skype
You can always open Skype from the Home screen. The first time the app opens with the login screen. You can sign in with an existing Skype or Microsoft account, or create a new Skype account.
Sign in with an existing account
If you already have a Skype or Microsoft account, you can sign in with it.
- Tap on Sign up or create.
- Tap on Skype, phone number or email address, enter your login details and tap Next one.
- Tap on password and type the corresponding password.
- Tap on To register.
- Tap on Get on.
- Allow Skype access to the contacts on the device. Tap on OK.
- Skype asks to choose a profile picture. That can also be done later. Tap on To skip.
- Tap on Get on.
- Allow Skype access to the microphone. Tap on OK.
- Decide if you want Skype to send notifications on the iPad. For example, if someone sends you a chat message when you are not online. Tap on do not allow or on Allow.
Was the login successful? Then you can skip the information below about creating a new Skype account.
Create new Skype account
If you don’t have an account yet, you can create one right away.
- Tap on Sign up or create.
- Tap on create one.
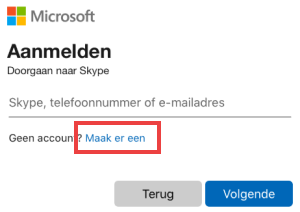
- Tap on Using your email address.
- Enter your email address (for example from Gmail, KPN or Ziggo) and tap Next one.
- Tap on make a password and type a made-up password.
- Tap on Next one.
- Tap on First Name and type a name. Do the same with Last name.
- Tap on Next one.
- Under “Date of Birth”, tap Day. Tap your birthday. If necessary, swipe from bottom to top over the numbers to reveal the correct number.
- Do the same with Month and Year and tap Next one.
- To verify that the email address you entered is correct, Skype will send it a code. Open your email program and click on the Microsoft account team email.
- Copy the code from the email (or write it down on a note).
- Go back to Skype and paste or type the code.
- Tap on Next one.
- Skype would like to verify that you are not a robot. Tap on Next one and run the command.
- Tap on Get on.
- Allow Skype access to the contacts on the device. Tap on OK.
- Skype asks to choose a profile picture. That can also be done later. Tap on To skip.
The account is created and Skype opens.
Set up profile for Skype
Every Skype user has a profile. You can view and edit your profile. For example, add a profile picture or change the previous one.
- Tap your profile at the top. This is a circle with your initials (or your profile picture) in it.
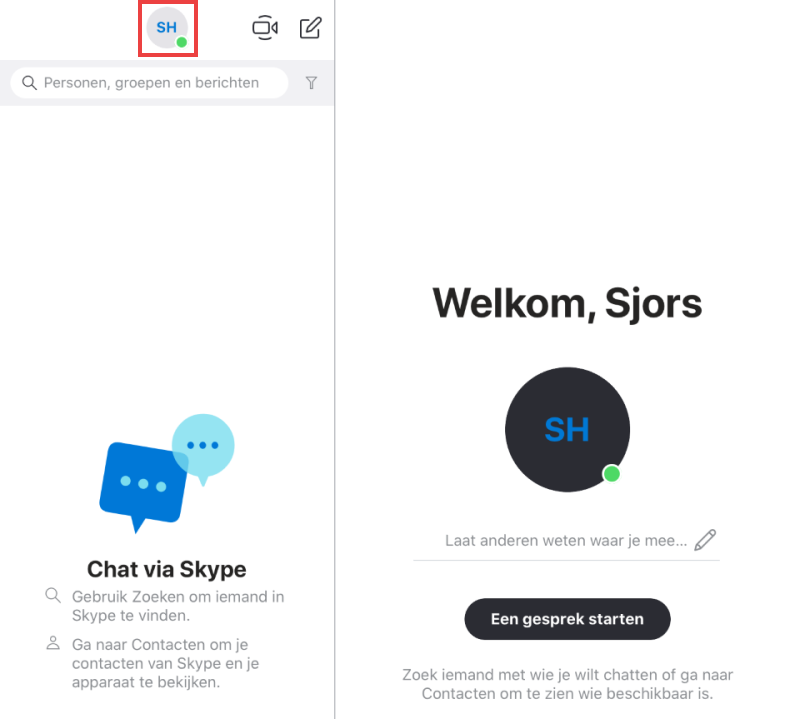
- Tap on Institutions.
- Tap on Profile Picture or on Add image.
- Tap on Upload photo. If there was already a photo, tap Upload photo to use an existing photo or tap To take a picture to take a new photo.
- If you are adding a profile picture for the first time, you can take a new picture or choose an existing picture. We want to use an existing photo, so we tap the square at the bottom left.
- Optionally tap OK to give Skype access to your photos.
- Scroll to the photo you want to use as your profile photo and tap it.
- Tap the check mark at the bottom right.
- Choose who can see the profile picture. Tap on Public or on Contacts only.
- Tap the cross to close the window.
The profile picture has been added or changed. Delete profile picture? Tap your profile > Institutions > Profile Picture > tap the photo > Remove picture.
Make a test call
Make a test call to make sure you can be heard during upcoming Skype calls.
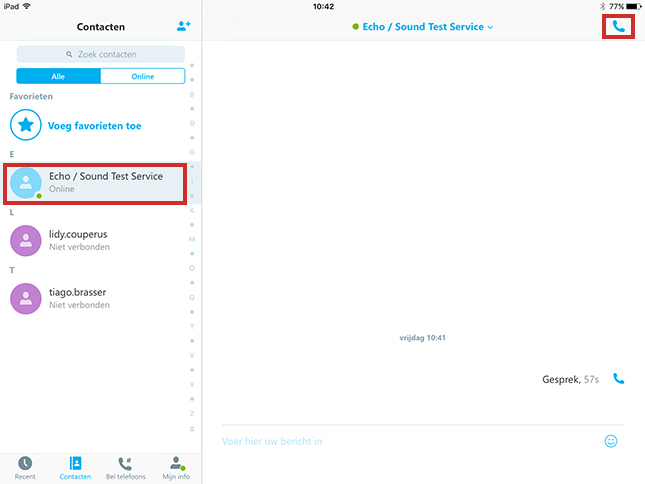
- Tap at the bottom of the screen Contacts.
- Tap on the right Echo / Sound Test Service.
- Tap a phone icon to connect.
- You will hear the instruction to say a short text after the beep, do this after the beep.
If you hear back what you have just recorded, Skype has been installed correctly. If you can’t hear yourself (and have checked that the sound is on on the iPad), the app probably doesn’t have access to your microphone. On an iPad with iOS 8 or later, do the following:
- On the Home screen, tap the app Institutions.
- Tap left on the app Skype (scroll down first if necessary).
- Tap the slider behind ‘Microphone’ so that the bar turns green.
On an iPad with iOS 7 it works like this:
- On the Home screen, tap Institutions.
- Tap on the left Privacy > Microphone.
- You will see all the apps that need access to your microphone. Tap the slider behind Skype so that the bar turns green.
Add contacts
Tap at the bottom Contacts, an overview of your contacts will appear. This overview is probably still quite empty in the beginning. But to use Skype, contacts are required. You can find it via the app. For example, if you know the Skype name of a family member or friend, you can invite them to use Skype together via the app. If someone is already active on Skype, you can add them.
Add a contact as follows:
- Tap at the bottom Contacts.
- At the top, tap the little figure icon with a plus sign
 .
. - Tap in the search field where it says ‘Search people’.
- Type the name of the person you want to skype with.
- Names that match appear below. Tap on a name if you want to see the corresponding picture a bit larger.
- If someone is already using Skype, it will say ‘Add’. If not, it will say ‘Invite’. Tap this.
- When you tap Invite, you may need to choose whether to invite someone via their phone number or email address.
- Tapping on the phone number will take you to the Messages app. Send a text message here as usual. There is a standard message ready with a link to Skype.
- If you tap on the email address, the Mail app will open. Send the email as usual. There is a standard message ready with a link to Skype.
- Depending on whether the other person accepts the invitation, you can communicate via Skype.
Received an invitation
When another Skype user wants to add you to their contacts, you will be notified. Tap ‘Chats’ at the bottom of the screen and you will see the name of the Skype user who wants to contact you. There is an orange circle behind the name. Tap the name. You can accept the request by tapping Accept or discard by tapping To block.
Which contacts are online?
If you have many contacts on Skype, it is useful to only have the people in view who are also on Skype at that time.
- Tap at the bottom Contacts.
- On the left of the screen is a search bar with a small funnel icon next to it. Tap this.
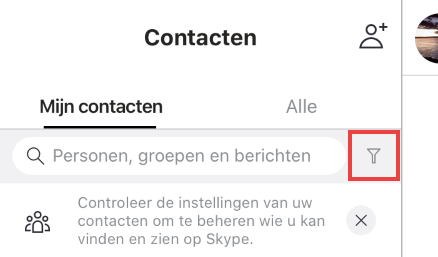
- Tap on Show active contacts only.
Video calling with Skype
Time to get in touch! You can make (video) calls with someone who is online at the same time.
- If necessary, first tap Contacts.
- Tap the contact you want to talk to.
At the top you can see whether the person is indeed online, there is a green dot next to his profile picture. Start a conversation or video call.
- Tap the video camera icon to see each other. Tap a phone icon if you want to talk to each other without a picture.
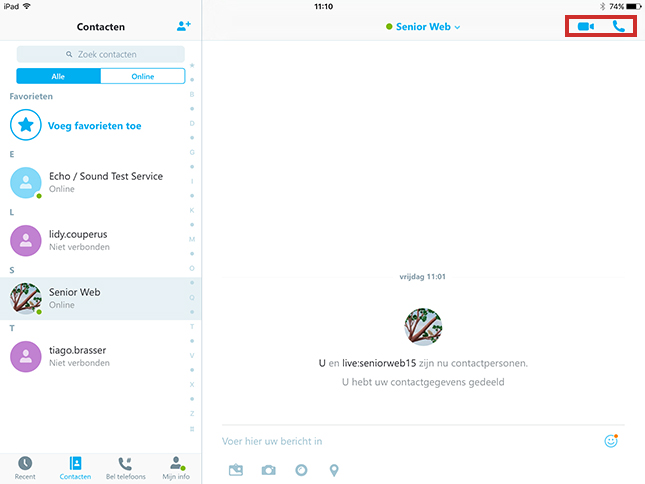
- The other person must now record the conversation. If that person does that, then you have contact.
- At the bottom of the screen you will see four icons during the call.
- On the left you will first see the icon of a microphone. Tap to temporarily mute the microphone, such as when you want to say something private to someone else in the room.
- The second icon is that of a camera. Allows you to turn your camera on or off. It does not matter whether you have started a video call or a call without video.
- With a tap on the phone in red, the third icon, you end the call.
Start a chat in Skype
At the bottom of the window is the option ‘Chats’. New notifications will appear here and you can find chat conversations with others. If you tap a name on the left, the conversation history will appear on the right. You can chat with someone who is online at the same time, but you can also leave a message with someone who is not online for a while.
- If necessary, first tap Contacts.
- Tap the contact you want to chat with.
- At the bottom of the window, tap Type a message.
- A keyboard will appear, now type the message.
- Optionally, add an emoticon (also called a smiley). Tap on the smiling face to do so.
- A window pops up with smileys. Scroll through the pages (swipe right or left) and tap a smiley face.
- The emoticon appears in the text. Tap the blue circle on the right to send the message to the recipient. You will see the message and what time it was delivered.
- Tap at the bottom chats to find conversations.