The Backup and Sync program automatically backs up the images to the computer. This way you can make adjustments afterwards.
Automatically backup photos from computer
Google Photos is Google’s free online photo service. A place to store and edit photos. Images in Photos are accessible from any device. For the tablet and smartphone via the app. There is a website for the computer. And even more convenient: if you install a small program on your computer, you can make a backup of all photos and videos and have them updated automatically. That program is called ‘Backup and Sync’. In this article we will discuss the further options of this program.
Where are my photos and videos now stored?
If you have followed the steps in the software article “Installing Google Backup and Sync”, the photos and videos that are on the computer are backed up. The images have been copied to Google Photos. You can find the copies via photos.google.com or through the Google Photos app.
Remove something from the backup
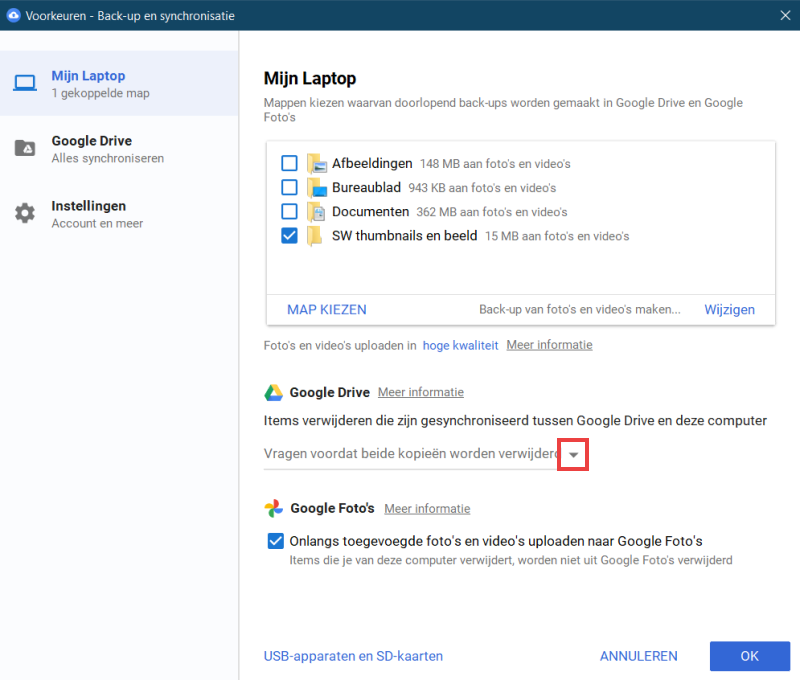
Are you deleting a photo or video from Photos? If syncing with the computer is turned on in Backup & Sync, the same image will be deleted from the computer as well. If you don’t want this, do the following:
- Click on it Starticon and open the program Backup and Sync from Google.
- If necessary, click on the top left My computer or My laptop.
- Under “Google Drive,” click the down arrow.

- click on Never delete both copies.
- click on OK.
Feel free to delete photos and videos from your computer or Photos. The backup copy or the original is preserved.
Backup photos from USB or memory card
Photos on connected devices can be recognized by Backup and Sync immediately. You can also easily back it up.
- Connect a memory card or USB stick to the computer.
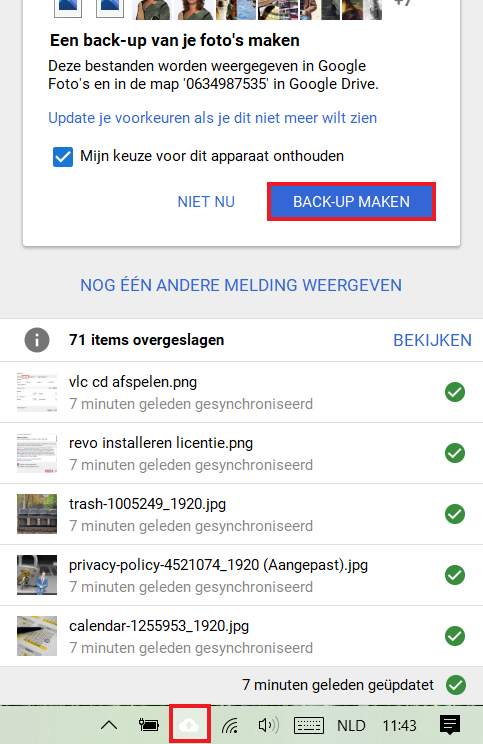
- In the System Tray, click the Backup and Sync icon
 .
. - Backup and synchronization asks what you want to do with the photos present on USB or memory card.

- Click on the blue button Backup to keep a copy of the photos online.
- The program will start transferring the photos and let you know when the memory card or USB stick can be safely removed.
The program remembers the setting for the relevant memory card or USB stick. So the next time they connect to the computer, Backup and Sync automatically starts transferring (new) photos that the program finds.
Change automatic backup preferences
- In the System Tray (on the right side of the Taskbar), you will find the icon for the Backup and Sync program. This is a white cloud with an arrow pointing up
 .
. - If this is not visible, click on the up arrow
 . This makes undisplayed icons visible.
 - Then click on the Backup and Sync icon.
- Click on the three dots.
- click on Preferences.
- In the Preferences window that opens, all important settings of the program can be found.
- Click on the ‘My Computer’ or ‘My Laptop’ tab on the left side of the window.
- Folders can be added here, but also deleted.
- Under ‘Choose folder’, click High Quality or Original quality to change the quality in which images are backed up.
- Click on the left Institutions to turn notifications on or off.
Exit backup and sync
Sometimes you use the computer for a heavy task. If too many programs are running at the same time (in the background), the computer will become slow. Then turn off Backup and Sync.
- In the System Tray, click the Backup and Sync icon
 .
. - Click on the three dots at the top right.
- click on Disable backup and sync.
Backup and Sync will restart automatically after you turn off your computer. Or start the program manually via the Start-knob. Files that have not been backed up in the meantime will still be copied to the online storage space.