In this workshop we explain how you can use Home Assistant and a NodeMCU Amica V2 developer board to manage the CO yourself.2concentration in your home. We use a second one as a water sensor.
Wim Dewijngaert
Home Assistant is a commonly used home automation software package. Many hobbyists use it to centrally control lamps, heating, solar panels or washing machines. In this workshop we explain how you can use a NodeMCU Amica V2 developer board to create the CO2monitor concentration in your home; we use another plate as a water sensor.
|
Amica V2 sign
With a cost of 7 euros each, the Amica plates are ideal for providing the Home Assistant software with various measurement values via WiFi. The working memory (RAM) for your program code is limited to 32 kilobytes, but that is more than enough for most applications. The micro USB connection on the boards not only serves as a power supply, but can also be used to install new firmware flash – which we will do in this workshop.
ESPHome firmware
To begin with, we put the ESPHome firmware on the board. This firmware makes it very easy to realize small projects: it suffices to create a YAML text file containing a number of data about the hardware you have connected and on which ports which value should be read. This file is then compiled into ESPHome firmware, which is then exported to the Amica flashed can become. A child can do the laundry: immediately after connecting, Home Assistant recognizes the sign and the measured values appear.
Python
You can use the ESPHome firmware in several ways flash. In our example we do that with Python. If it is not yet on your computer, a minimal installation is sufficient to get started. Download the installer from https://www.python.org/downloads
On the first screen, choose Customize installation. Select single PIP as an additional module. If custom install location are you using c:Python
After installing, double-click python.exe in the Python directory. A command prompt will now appear. Then tap here:
pip3 install wheelpip3 install esphome
After that, the ESPHomelibrary must be installed. You can check this with the command:
esphome version
The version number of ESPHome will then appear on the screen.
Now connect an Amica to your computer with a USB cable. If all goes well, Windows will recognize the sign automatically. For safety’s sake, it is best to take a look at the DeviceManager. Is there Other Devices an unknown USB2.0 Serial device, you still need to install the correct drivers. To do this, double click on the unknown device, choose in the tab Drivers for Update Driver and then select Search automatically for updated driver software.
To then create and upload the firmware from a YAML file, issue the following instruction to Phython:
esphome run c:python311naamvanhetbestand.yaml
The above mentioned file name replace you CO2 meter or water sensor.
 |
 |
|
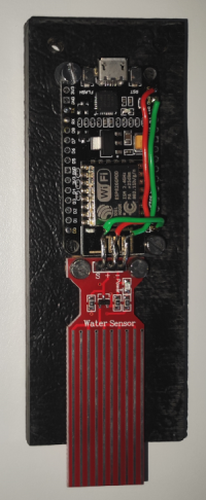
| The finished water detection module |
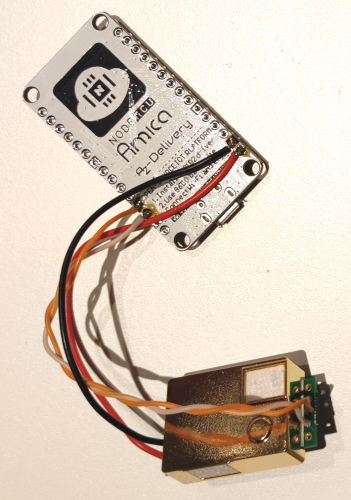
The finished CO2module |
YAML source code
The YAML source code for the CO2/temperature and water detector projects can be found a little later in this article, but also on our website. Search pcactive.nl for CO2 and water sensor. If you type the code, pay attention to the use of spaces – they are important. Don’t forget to adjust the parameters for your home network in the file.
The YAML source code for the co2meter.yaml:
esphome: name: co2meter
esp8266: board: nodemcuv2
# Enable logging logger:
uart: rx_pin: GPIO3 tx_pin: GPIO1 baud_rate: 9600
sensor: - platform: mhz19 co2: name: "MH-Z19 CO2 Value" temperature: name: "MH-Z19 Temperature" update_interval: 60s automatic_baseline_calibration: false # Enable Home Assistant API api: password: ""
ota: password: ""
wifi: ssid: "vul hier je ssid van je wifi netwerk in" password: "vul hier het paswoord van je wifi netwerk in"
# Enable fallback hotspot (captive portal) in case wifi connection fails ap:
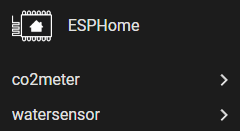 |
| Both sensors to appear automatically in Home Assistant |
ssid: "Co2Meter Fallback Hotspot" password: "YPLFztzCmwqE"
captive_portal:
And here you can find the YAML source code for the watersensor.yaml:
esphome: name: watersensor
esp8266: board: nodemcuv2
# Enable logging logger:
sensor: - platform: adc pin: A0 name: "Water sensor" update_interval: 10s accuracy_decimals: 1 unit_of_measurement: 'V' # Enable Home Assistant API api: password: ""
ota: password: ""
wifi: ssid: "vul hier je ssid van je wifinetwerk in" password: "vul hier het wachtwoord van je wifinetwerk in"
# Enable fallback hotspot (captive portal) in case wifi connection fails ap: ssid: "Watersensor Fallback Hotspot" password: "XMpBwjLF5GBe"
captive_portal:
 |
|
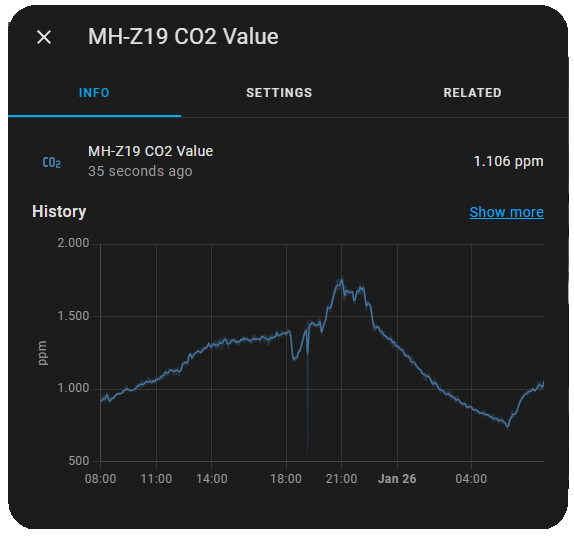
The CO2value can also be displayed |
To connect
After compiling the YAML file, the message appears INFO Successfully compiled program. You will then be asked how the file should be sent to the Amica. Choose here USB to UART Bridge to download the firmware via USB flash. Afterwards, remove the USB cable.
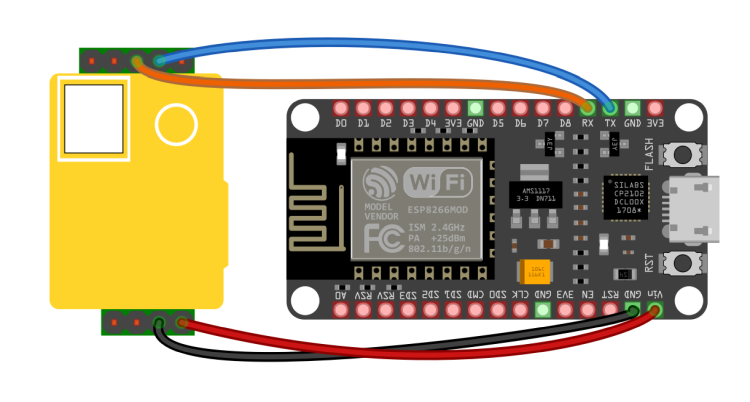
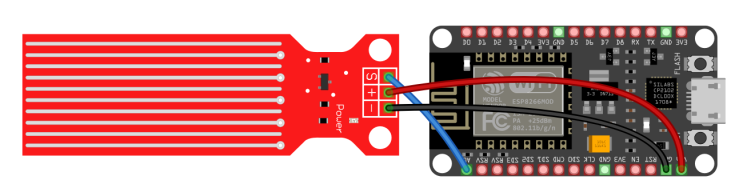
The sensors themselves are easy to attach to the plates with some skill. The pictures accompanying this article show how everything should be soldered. At the water detector, Vin and Gnd go to + and – respectively on the sensor. Port A0 connects you to the S. At the CO2detector, you have to look closely at the schematic, because the connections of the sensor itself are not labeled.
Check and set alarm
To verify whether the plates work, connect them to a USB power supply and then open Home Assistant. If all goes well, it’s there Notifications message in the left column We have discovered new devices on your network. Check it out. If you then Check it out you will be taken to the integration screen. click on Configure and after that Submit to add the sensors to the dashboard.
Finally, you can set an alarm in Home Assistant to warn you if, for example, the CO2concentration becomes too high (ppm > 1000), whether there is water in your basement (V > 0).
|
Wiring diagram of the water detector |
|
Connection diagram of the CO2-detector |