If you are going to take holiday photos this summer, keep these iPhone tips in mind so that you come home with much better results!
iPhone tips for better vacation photos
If you have a recent iPhone, you can take beautiful holiday photos anyway. But it can always be better! If you use these simple iPhone tips, your holiday photos will soon become a lot more beautiful. Take advantage of it!
1. Adjust the exposure
Prevention is better than cure. You can adjust too light and too dark photos afterwards, but you get better results if you optimize the exposure before photographing. That is easier than you might think.
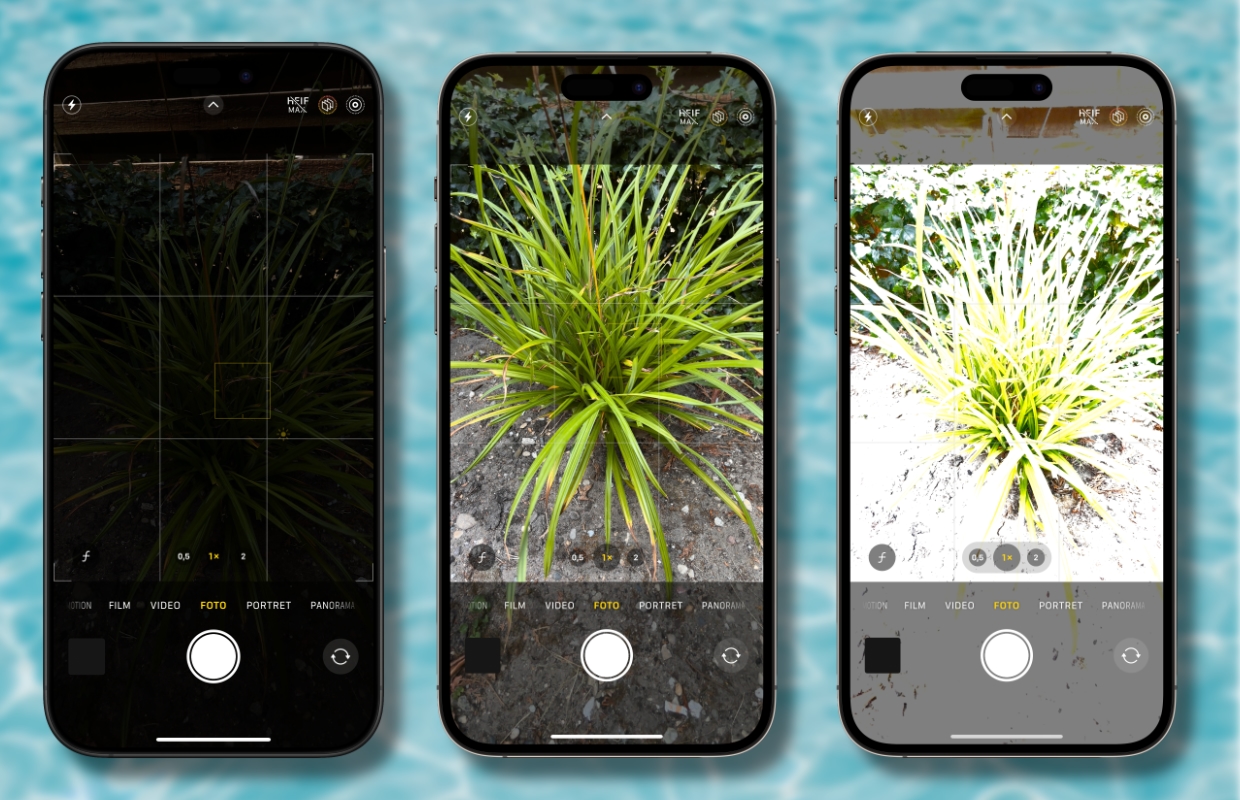
Open the camera and focus on the subject. Tap the subject to focus on that. In addition to the square that indicates the focus area, you now see a vertical line with a charm. You can use it to adjust the exposure by dragging the sun up (lighter) or down (darker). As you can see below, it goes from very dark to very light. This can be very useful in different situations.

2. Use help lines
During your vacation you undoubtedly photograph landscapes and sunsets. Then of course you don’t want the horizon just not straight. Although you can still correct that afterwards, it is always better to photograph right away. Fortunately, with help lines you get that easy for each other.
In addition, a photo works more dynamically when the subject is not perfectly in the middle and you can also use those help lines for that. You will immediately see what the best place in the picture is according to the third -party rule, namely at one of the four intersections of the help lines that divides the image into nine areas. You switch on the help lines as follows:
- Open the app settings;
- Tap ‘camera’;
- Switch on the ‘grid’ and ‘level’ options.

3. Use the portrait mode
With the portrait mode you ensure that the subject is depicted sharply and the background fades. This brings depth in the photo and automatically leads the viewer’s attention to the subject. The portrait mode naturally works well when you make a portrait, but actually also with all conceivable loose objects that you want to get out of the photo extra well.
Just open the camera app and tap down on ‘portrait’. Focus your camera on the subject and tap the subject as soon as you have it in the picture. This ensures that you focus on that. Then you just take a photo. Afterwards you can still adjust the extent to which the background is out of focus, just like the place at which is focused.

4. Use the Burst mode
When a subject moves quickly, it is difficult to take a sharp photo of it. What then helps is Burst mode. In this mode you take many photos very quickly in succession. That way you enormously increase the chance of a sharp photo. And it works easier than you may think:
- Open the camera app;
- Make sure that ‘camera’ is active below;
- Focus the camera on the subject;
- Drag the shutter button to the left and hold it;
- The counter indicates how many photos you have taken;
- Let go of the button when you think you have enough.
You can now choose the best photo from the series at your leisure and remove the rest of the photos.

5. Use the golden hour and the blue hour
The golden hour and the blue hour are the times when the sun provides the most beautiful light. The golden hour is shortly before sunset and shortly after sunrise, the blue hour is just after sunset and just before sunrise. Those are the moments that you take the most beautiful photos.
The golden hour is usually the most popular. About an hour before sunset and shortly after sunrise the sun is low on the horizon, giving the light a warm yellow or orange glow. Despite the name ‘The Golden Hour’, this moment does not last an hour. The closer you are to the equator, the shorter it takes and the farther you are, the longer it takes.

6. Use the environment to get depth in the photo
There are different ways to get depth in photos. You can of course use the portrait mode to depict a part sharply and a part out of focus. That gives an idea of depth.
It also helps to use lines in the environment. Rivers, roads, or walls lead the eye through the photo and thus also give an idea of depth. The same applies to vistas and frameworks. For example, use the frame of a window, or a natural opening in the green.

More iPhone tips?
Did you like these iPhone tips and do you want more? On iPhoned Read useful tips and tricks for your iPhone every week. Check the most recent tips below!
-
Handy iPhone tips that help you take better holiday photos
-
AirPlay warning: Adjust this setting (before it is too late)
-
You can charge AirPods with your iPhone (and that’s how you do it)
-
Have your AirPods fall into the water? You can do this
-
How old is my iPad? This way you find out the fastest!