Version
This item is suitable for Mac computers with OS X 10.11 El Capitan or lower. Do you have a newer version of the driver on the Mac? Then read the article ‘Mail: getting started with emailing (macOS)’.
In preparation
If you want to add an email account from your provider to Mail, it’s good to have the following information ready:
- The email address provided to you by your provider.
- The username provided to you by your provider (sometimes this is your email address, but not always).
- The password that goes with it.
- The address of the server handling the incoming mail.
- The address of the server that handles outgoing mail.
To enter an email address from a free webmail service, such as Gmail or Outlook.com, all you need is your email address and password. However, if you enjoy e-mailing via the web page of a webmail service, we recommend that you continue to use it. The advantage is that wherever there is internet, you have access to the familiar mail environment.
Step 1: Open the Program
You will most likely find Mail in the Dock, at the bottom of the screen. Click on the icon of the program to open it. If the application icon is not on your dock, open the application from the Finder as follows:
- Double-click the Finder icon (bottom left).
- Click on the left Programs.
- Scroll down until you see the Mail program and double click Mail.
Step 2: add email account (1)
When you first open Mail, you’ll be asked what type of email account you want to add.
- Select the desired type. We select ‘Add another Mail account…’. If you add a different type of account, the steps may be different.
- click on Continue.
Step 3: add email account (2)
- In the next window, enter the requested information for your e-mail account. If necessary, click Next in between.
- When asked for your name, you t not fill in your full name after ‘(Full) name’, for example you can also only enter your initials.
- click on Login or create. If Mail can find your account email settings, your email account is now set up. You can then proceed straight to step 8 of this article.
- Can’t find the email settings? On OS X 10.11 El Capitan, you will be directed to a new screen. Here you can select the best POP after ‘Account type’. If your provider also supports IMAP, you can choose IMAP. With IMAP, the e-mails are visible in the program, but in principle the e-mail also remains on the provider’s server. With POP, the mail is removed from the server and is only stored in your Mail program. Then fill in the server incoming and outgoing e-mail. Finally click Login. You can then proceed to step 8 of this article.
On earlier versions of Mac OS X, you’ll see “Account must be configured manually” at the bottom of the window. In that case click on Next one. And continue with step 4.
Step 4: add email account (3)
You now have to enter a few things yourself. For this you need the data that you have looked up in preparation (see first paragraph of this article):
- It is best to select POP behind ‘Account type’. If your provider also supports IMAP, you can choose IMAP. With IMAP, the e-mails are visible in the program, but in principle the e-mail also remains on the provider’s server. With POP, the mail is removed from the server and is only stored in your Mail program.
- After ‘Email server’, type the address of the server that handles incoming mail.
- Check if you have entered your username and password correctly.
- click on Next one.
- A window called ‘Verify Certificate’ may open stating that the identity of the server name you entered cannot be verified. However, if you received the account information directly from your carrier, you can rest assured that the information is secure. In that case click on Connect.
- You may see the message “Additional account information required” at the bottom of the window. In that case, click again Next one. If you do not see this message, you can skip step 5.

Step 5: add email account (4)
- If you have received a port number for incoming e-mail from your provider, you can enter this number behind ‘Port’. If you have not received a port number, leave the field empty.
- click on Next one.

Step 6: add email account (5)
- Enter the server name for outgoing e-mail behind ‘SMTP server’.
- Enter your username again after ‘Username’.
- Enter your password again after ‘Password’.
- click on create. Your email account has now been added to Mail.
- You may see the message “Additional account information required” again at the bottom of the window. In that case click on Next one. If you do not see this message, you can skip step 7.

Step 7: add email account (6)
- If you have received a port number for outgoing e-mail from your provider, you can enter this number behind ‘Port’. If you have not received a port number, leave the field empty.
- click on create.

Step 8: Important Parts
The Mail program opens. The e-mail associated with your e-mail account will be downloaded. We will briefly describe the parts you see.
At the very top, actually separate from the program window, you’ll see the menu associated with Mail. You can click on everything from ‘Mail’ to ‘Help’ to get to the underlying menu items of the program.
At the top of the program window, you will see several icons that allow you to quickly apply frequently used options. In OS X 10.10 Yosemite and 10.11 El Capitan, the buttons are slightly different, but clearly recognizable.
- Of
 retrieves new messages.
 - Of
 create a new message.
 - Of
 delete a selected message.
 - Of
 indicates that a selected message is junk.
 - Of
 compose a reply to the sender of a selected message.
 - Of
 compose a reply to all recipients of a selected message.
 - Of
 forwards a selected message to others.
 - Of
 you can mark a selected message with a colored flag. You can give a meaning to a color for yourself.
 - click on PO Boxes (in OS X 10.9 Mavericks and earlier it says here Show) and below this an overview of your mailboxes and any folders you have created will appear. It is useful to leave this window visible if you have created several folders yourself. You can bring up subfolders by clicking on an arrow
 for a mailbox or folder.
 - click on Incoming and the overview of the incoming messages appears.
- click on Sent and the overview of your sent messages appears.
- click on Marked and the overview of the messages you have marked appears.
- click on Concepts and the list of messages you have not yet sent appears.
Step 9: compose and send an email
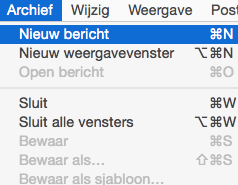
You can create a new e-mail message in two ways:
- Click on the menu at the top of the screen Archive > New message.

- Click on the ‘Create a new message’ button
 .
.
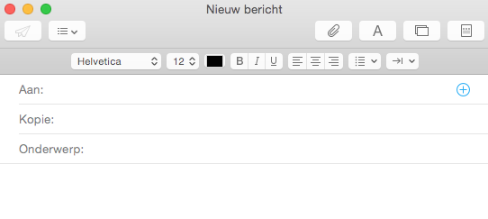
The window appears in which you can compose a new e-mail message.
- Enter the recipient’s email address behind ‘To’. If you want to send the e-mail to multiple recipients, put a comma between the e-mail addresses.
- If someone else needs to be aware of the content of the e-mail, you can enter an additional e-mail address behind ‘Copy’.
- If you also want to be able to send a blind copy, click on the ‘Select visible header fields’ button on the left
 and click on it Blind copy address field.
 - Enter the subject of the email behind ‘Subject’.
- Type your message in the large box below.
- Click the ‘Send message’ button at the top left of the email window
 .
. - The email you just sent is now listed among the sent messages. Is the email not there yet? Then click on the button with the envelope. The folder will then be refreshed.
Tip: Do you use the ‘Contacts’ app? Then you can send an e-mail to a contact person. You do not have to type the e-mail address. To select a contact, click in the field behind ‘To’. A blue circle with a plus sign appears on the right side of the field. A click on this opens your contacts. If you click on the name of a contact person, the saved e-mail addresses of this contact will expand. Click on the desired email address. The e-mail address appears in the field behind ‘To’. You can repeat this step if you want to send the email to multiple contacts. You can do the same in the field behind ‘Copy’.
Step 10: Exit the Program
At the top left of the program you will find three buttons  :
:
- The red button closes the Mail window.
- With the yellow button you can reduce the program size, it will then be placed on the dock.
- With the green button you can enlarge the program, the screen then fills with the program.
You can close Mail in its entirety in two ways:
1. This method is useful when you have minimized the program, for example.
- Right-click the Mail icon on your dock.
- click on Stop.
2. This method is most convenient when you have the program open in front of you.
- Click in the menu on Mail > Stop Mail.